

Introduction: DIY Microphone Amplifier.


Hello all :) I hope everyone is safe and sound. In this instructable I will show you how I made this fun but useful project upon a minimal microphone amplifier which may also be used as a hearing aid as it is capable of driving a pair of earphones easily and operates in the voltage range of 3 to 6 volt DC. It uses very simple and easy to get components.
Let us get building!
Supplies
- Electret microphone
- 3.5mm female audio socket
- BC547 / 2N@2222 or equivalent NPN transistors - 3
- BC557 / 2N2907 or equivalent PNP transistor - 1
- 0.1uF ceramic capacitor - 1
- 2.2uF polar capacitor - 2
- 1K . 25 W resistors - 2
- 100K .25 W resistors - 2
- 4.7K .25 W resistor - 1
- 100 Ohm resistor - 1
- 1K variable resistor(preset) - 1
- Power supply (3-6V), you can also use a CR2302 button cell or a 3.7V lithium-ion cell
- Soldering kit
- A small piece of veroboard or perfboard
Step 1: Gathering All the Components


All the components used in this project are very easy to get and the cost of them is also very minimal. You can even get most of these components from old electronics. Just make sure you have tested the transistors if you are salvaging it from old electronics.
I've also cut a piece of perfboard to size to solder all the components in place.
Step 2: The Microphone Input Section


Since we are using an electret microphone, the additional components we need in order to detect sound signals is a pull up resistor(for the internal MOSFET of the microphone) and a decoupling capacitor to get rid of any DC components of the signal.
For my application, I have used a 4.7K pull up resistor and a 0.1uF ceramic capacitor as decoupling capacitor.
Step 3: The Amplification Stage

The small signal generated by the microphone needs to be amplified so that the output signals have enough magnitude to be usable. For this i have used a 2 stage transistor amplification mode where the first stage directly gets the signals from the mic and amplifies it for the next stage which is again decoupled using a 2.2uF capacitor. The signal to the second amplifier stage is controlled by a potentiometer his any one can change the amplification (or output volume).
Step 4: The Driver Stage


After necessary amplification,we add the driver stage which is capable of driving a pair of earphones and thus provide good audio reception to the user. The driver stage consists of a totem pole made of a NPN and PNP transistor pair.
Step 5: Schematic of the Project

This is the entire circuit diagram of the project. The project works on a voltage range not exceeding 6 volts. You can replace or modify any components as per your requirement.
Step 6: Testing on Breadboard


Make sure you test your circuit on breadboard before you begin the soldering process. It is essential to make sure that our circuit works as expected and do the necessary modification if needed.
Step 7: Arranging the Components in Place


Before starting the soldering process, I have arranged the components in such a way that connections can be made using solder joints only and the use of any jumper or wires is avoided, it makes for a neat and compact circuit and also ensures proper connections. You can experiment with component layout.
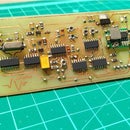
Step 8: Soldering Process Completed


This is how the module looks after all the discrete components have been soldered. Only solder traces ave been used to make this circuit. The only additional components to be soldered is the microphone, the audio socket and the wires for power supply.
Step 9: Finishing Up..


This is the complete module after soldering. I have attached the output to this oscilloscope to check the output waveform and magnitude.
I hope this project was helpful. feel free to drop any suggestions or feedback in the comments below. Do check out the video in the next step to have a look at how this module performs and while you are there consider subscribing if you like my content.
Until next time :)


