

Introduction: DIY Pen Holders for the Silhouette Cutting Machine


I was researching my latest obsession- the Silhouette cutting machine- when I saw that they made pens for it. I looked at the blade holder and realized that it was a basic clamp capable of holding virtually any round object of the right size. I decided I could figure out how to use pens I already had. I dug through the desk drawers and found all the supplies necessary to make a simple pen holder for the Silhouette machine.
Step 1: Using Sharpies in the Silhouette


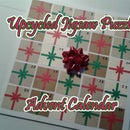
After trying different things from my desk I discovered that a Sharpie cap was almost the right size. I trimmed it so that the tip of the pen stuck out past the edge of the cap. I cut the clip off of the pen cap. Cutting the tip off of the cap removed the inner ring that holds it firmly on the pen, so the pen had to be taped to the cap to stay in place. I also wrapped the cap with enough tape to make it fit snugly into the blade holder.
I loaded a piece of paper onto the cutting mat and did a test to adjust the pen height. This was pretty easy. The proper adjustment clears the paper on the top setting and gently touches the paper in the down position. After the pen height was adjusted it was time to try an image. I used the three headed dog based on my friend Monkey the Science Dog. Since this image wasn't going to be cut out it didn't require any pre-processing. I just imported the JPEG and traced it in the Silhouette Studio software. I did the first 'print' at a pretty slow speed, but later versions came out fine at full speed.
Step 2: Using an Ink Pen in the Silhouette


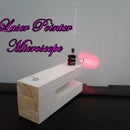
After the success of the Sharpie test, I made an ink pen holder from a dried out Sharpie. I tried several pens, but the Pilot Precise Grip Extra Fine fit the cap the best. I removed the body from the pen so the holder just has the ink cartridge and point. This worked very well, but it was a bit harder to adjust the proper height. Once it was adjusted it made sharp, thin lines with plenty of detail. This image was just a tracing of a JPEG, but I'm sure images designed in vector based editors like Inkscape or Illustrator would yield even more 'drawing like' effects and shading.
Since the caps for the pens have the tips cut off and are taped in place I used some empty tubes as new caps. These tubes originally had hobby knife blades in them but they fit the Sharpie caps perfectly.
Step 3: Combining Pens With the Cutter


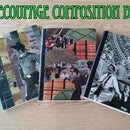
After 'drawing' a few three headed dogs with the Silhouette I got a bright idea- what about combining the pens with the cutter?
I Opened the three headed dog image in my editor, selected an outline and filled the whole thing in black. I selected the black area and stroked it 30 pixels on center. This made the black dog silhouette larger than the illustration. I opened the dog picture in Silhouette Studio and draw it with the ink pen. Next I opened the black over-sized dog outline and traced it in a new image. I swapped the pen for the cutter and sent it to the Silhouette. This cut out the three headed dog image with thin a white border.
This technique had a lot of possibilities. Stop motion animation, business cards, stickers, labels- the sky's the limit! I'd like to try multiple color layers where I switch out the pen colors. I think it would be possible to add a blunt tip for embossing foil, also. This is a great machine. I may be in the market for the larger format version real soon!

Participated in the
Reuse Contest


