

Introduction: 3D Printed Night Vision Scope


Hey everybody!!! Hows it going?!?!?! Ok, so for a long time (~3 yrs.) I have been building these digital night vision cameras, and after over $1,000 and hundreds of hours in R'n'D later, I give you the "Eagle Scope 1.0" (named after the camera inside)!!
It's a pocket-sized, 3d printable night vision monocular that you can build yourself for ~$200!!! Oh, and it is top of the line, sporting a near-eye display (that doesn't burn out your eyeball), a .00001 lux camera with an OSD, a rechargeable 3hr battery, and an (optional) external DVR for recording the footage!!! Best of all, it fits in your pocket!!! Over-enthusiastic!!!!!! But seriously, this thing kicks some major buttocks.
I have built over 7 night vision (NV) cameras including the "OpenScope" made by user MattGyver92. This was the third camera/scope/monocular (I use these terms intermittently) I made and the first truly successful one. This camera was awesome!!! Although there were a few problems with it. First, it had a pretty low resolution. Second, the display burnt out your eyeball (fixable though with a piece of tinted acrylic). Third, the battery was not rechargeable. Lastly, the biggest downside of all, it was freakin HUGE!!! 'little over dramatic... bulky would be a better word. Also kinda hard to wire up. But as I said, it's a great NV camera.
The Eagle Scope can see better than my eye in the dark WITHOUT any passive infrared lighting (IR light) and can see in total darkness WITH some invisible IR lighting. This is really nice if you are playing airsoft and gives you a huge advantage even if you have opponents with digital night vision. This is because having such a low-lux rating makes IR light unnecessary unless it's REALLY dark outside. The camera has a super wide angle lens making it suitable for helmet mounting (which I will be doing shortly). The wide angle lens could be replaced with a "zoomed-in" lens for rifle mounting as well.
Enough blabbing. Let's build it already!!!
Step 1: Tools and Skill Level.


Tools:
- 3D printer (if you don't have one, you can use 3D Hubs, Shapeways, or just wrap everything in electrical tape which is what I used to do before I got a 3d printer)
- Soldering Iron
- Hot Glue Gun
- Wire Strippers (Klein is my favorite) (the 3D printed wire strippers work the best for the thin wires)
- Rotary tool or hacksaw (for acrylic)
- Mini files
- Sandpaper
Skill level:
On a scale of 1 to 10, 10 being the highest skill level, I'd say this is about a 4 or beginner-intermediate. As long as you keep your wires short, It shouldn't be hard to fit everything in. I was actually surprised how easy it is to put together.
Full Disclosure:
Some of these links may be affiliate links -- clicking the links, or even better buying the item, will help support the development of future projects. It costs you nothing though!
Step 2: Parts and Consumables

Parts:
Note: If you watch these products closely, they will go on sale from time to time.
- Camera
The best out there as far as I can tell. .00001 lux is pretty impressive. The camera is an FPV camera made by a well-known company called RunCam.
These things are sooooo hard to find. I had to look, and look, and look, but this thing is perfect.
- Micro DVR (option addition that lets you record what the camera sees)
Sound quality is crappy but the video quality is exceptional.
- Switch
- 400mah Batteries (x3)
3 Batteries have a smaller form factor than buying a single big battery.
Works great. Doesn't have a battery protection circuit so use the batteries I have linked above. (they have the protection in them)
- Acrylic Sheet
Protects the camera.
- 8-32 Machine Screws
- Infrared Flashlight (optional but recommended)
Cheap and works very nicely.
Consumables:
- Solid core wire
Fits the circuit boards nicely.
- Filler/Primer
Smooths the 3d printed surface.
- Black paint (could use other colors if desired)
- Hot Glue
- PLA filament or ABS filament (for 3D printer)
- Heat Shrink Tubing
- Rosin Core Solder
Full Disclosure:
Some of these links may be affiliate links -- clicking the links, or even better buying the item, will help support the development of future projects. It costs you nothing though!
Step 3: 3D Modeling and Printing


3D Modeling:
This will be unnecessary for you (unless you want to redesign it) 'cause I uploaded the design files here on Thingiverse. I used Fusion 360 and a little tinkerkad.
3D Printing:
If you print this yourself, make it as solid as possible. Supports are nice but not required. I used ABS 'cause the primer has acetone in it enabling superior adhesion and even making the surface stronger. Acetone smoothing is also a great (albeit dangerous) option for strengthening the casing.
Step 4: Post Processing and Painting


Super straightforward:
- Remove supports and rafts
- Sand
- Add primer 2-5 thin coats
- After the primer is dry, re-sand
- Add paint in 2-4 small coats
- Let dry for 24 hrs.
Step 5: Wire 'em Up!


The hardest part of the build. Still pretty easy though. Make sure you TAKE YOUR TIME and think things through because having to re-wire the whole thing would not be fun. Make sure to cut your wires short but not too short. Also, watch that you install the viewfinder and the camera in the same orientation lest the image is upside down when you finish it. If you choose to install a DVR there will just be a few extra wires to connect.
1: Glue three 400mah lipo batteries together and wire them in parallel (all the red wires are connected, and all the black wires are connected) to make a 1,200mah battery pack. Cut the wires one at a time so you don't short-circuit the batteries. Go ahead and hot glue the battery into the side of the case. Set aside.
2: Take the viewfinder, cut the chord at 2-3 inches long, strip the ends of the 4 wires inside, and then hot glue it into the other side of the case.
3: Take the camera, cut its wires to ~1 and 1/2 inches and then strip the ends of them. Hot glue it into place.
4: Take the battery charger/5v booster, solder a wire to the 5v+ and 5v-, the EN (enable) Pin and the ground. Hot glue the board to the case.
5: Connect and solder all video wires together, all ground wires together, and all 5v+ wires together. The VBAT+ wire that comes from the camera is connected to the positive 3.7v wire coming off the battery. This enables the camera to monitor the battery voltage. If you are installing a DVR, connect the audio wires together.
6: Take the switch and hot glue it to the case. Cut off or bend away one of the outer pins on the switch (doesn't matter which one). Take the wires connected to the EN pin and the Ground Pin and solder them to the switch. I had originally soldered them to "external switch" but this will not allow the batteries to charge when the device is turned off. Soldering to the EN pin is the way to do it.
7: Take the OSD extension cable that came with the camera, plug one end into the camera and the other gets glued into the access hole on the case.
8: You did it!!! It's pretty much downhill from here!
Step 6: Make the Lens Cover
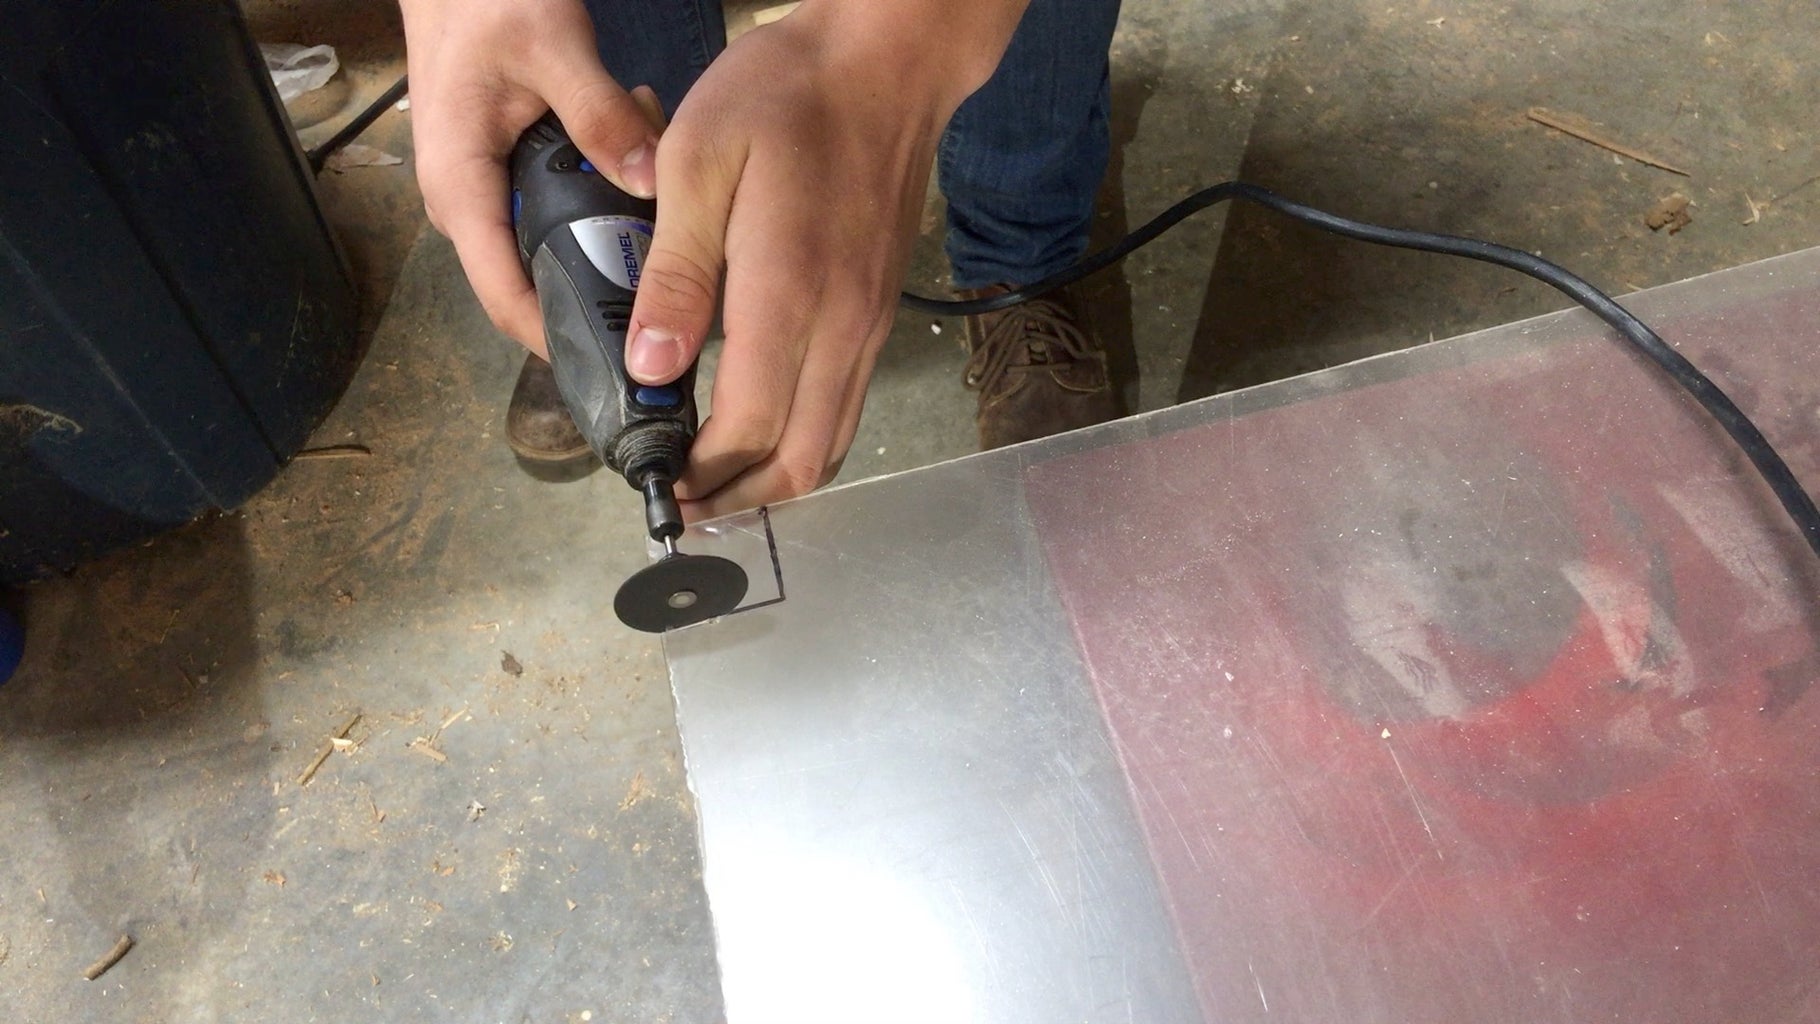

Take your plexiglass or acrylic or whatever and cut it and file to size. There are little notches in the case that should hold it in place.
Step 7: Finish It Up!!!


Widen the holes with a drill bit. Cut some machine screws to size. Screw the case together and you're done!!!
Note: If you are using a DVR you will need to file a small notch into the case to allow the wires for the DVR to exit. The DVR can be zip tied or rubber banded to the outside of the case.
Step 8: Congrats Ya' Finished!!!


Oh man!!! This is soooooo cool! The pictures don't do it justice though. If it looks really grainy, it's because it's one frame from a video taken (I'll be uploading a video shortly). In the some of the pictures above you can see that there is a brighter, clearer spot. This is the infrared flashlight's beam which is invisible to the human eye (and most animals). It provides extra light to the camera if there isn't enough ambient light for the camera to see. If you turn the IR light off, and it's REALLY dark outside, the picture gets grainy but you still may be able to see outlines of things.
I will be releasing a video on my YouTube channel in the next 2 weeks (I hope) so stay tuned... and... maybe... SUBSCRIBE!?!?!?!?
Anyway, I wish you well with your night vision building endeavors! Thanks and have a GREAT day!!!
P.S. This instructable is entered in the pocket size contest and the microcontroller contest. If you could, please give me a vote! Thanks!
DISCLAIMER:
This instructable is purely for entertainment value, any and all replications of any experiments, projects, and creations or similar are the sole legal responsibility of the person(s) involved in replicating them. I can not be liable for any information or misinformation, wrongful use, damage to personal property, death or any circumstances that result from replication of any projects seen.

Participated in the
Pocket-Sized Contest

Participated in the
Microcontroller Contest


