

Introduction: DIY WiFi Smart Security Light With Shelly 1


This instructable will look at creating a DIY smart security light using the Shelly 1 smart relay from Shelly.
Making a security light smart will allow you to have much more control over when it activates and how long it stays on for. It can be activated by triggers other than the PIR, such as other sensors or a schedule. For example the light at the back of my house comes on when the back door sensor sends an open message and the light on my driveway comes on when my phone registers it has entered the geo zone around my house, indicating I am almost home. You could also set it to send a notification to your phone or smart speaker when it is activated.
The Shelly is based on the ESP8266 chip that is popular with home automation and IoT enthusiasts. The primary advantage of the Shelly 1 over other ESP8266 devices, like the Wemos D1 Mini or Node MCU, is that it can be powered directly by mains electricity without the need for additional power supplies. You also don't need to do any soldering to use it!
However, like other ESP8266 devices you easily flash the device with custom firmware. The standard firmware provided by Shelly includes an easy to use web terminal and allows easy integration into many Home Automation systems, via MQTT, or Shelly's own app. I've used the included firmware in my project but other have successfully used ESP Home or Tasmota with the device.
Warning: Electricity is dangerous! Poorly installed electrical equipment can cause electric shocks, leading to burns, internal injuries and even death, and can start fires. You must not work on live equipment and should consult a qualified electrician if you do not have the skill to complete this work. I have assumed a level of competence in this instructable and haven't necessarily detailed the minutia of every step.I am not a qualified electrician but the information I have included is accurate to the best of my knowledge.
Supplies
Black Wiska 308/5 Combi Junction Box with 3 x GLP20+ IP68 Cable Glands
Wago 221-412 Connectors - 1x 2-Way and 2x 5-Way
PIR Sensor- This is the one I used, it is from eBay so the exact one may not always be available but I imagine any that look similar will work, just ensure that it is suitable for switching mains voltage. There is also a thread on the Shelly forum which lists other PIR sensors which work with Shelly.
At the time of writing all of the above could be purchased for ~£35 in the UK.
You will also need a couple slotted screwdrivers and some wire cutters/ strippers.
Step 1: Prepare Wiska Box


You need to punch out 3 of the threaded openings on the Wiska box. One for the PIR, one for the incoming power cable and one for the power going out to the light. We will use the bottom two for the PIR and incoming power and the lower on the left for the power going to the light.
Once you have opened up the holes you can attach the PIR using the locknut it came with on the iside of the Wiska box, as shown in the picture. You can then add two of the cable glands to the other two openings.
Step 2: Prepare Your Light

The floodlight comes supplied with a short length of 3 core cable. You need to cut this down to about 300mm, then remove about 75mm of the outer insulation and bare the ends of the three conductors.
Cut a 150mm section from the remaining cable and remove the outer. Cut the blue and brown wires in half to give you four 75mm lengths, you can put one of the blue lengths aside; we only need three. You can bare both ends of these three wires.
You may also be able to use the rest of it to connect to the mains.
Step 3: Connect the Wires


Thread the cable from your light through the compression gland and into the Wiska box. Repeat this process for the incoming supply cable, remove 75mm of outer and expose the ends of the conductors.
You should now have 9 wires inside your Wiska box.
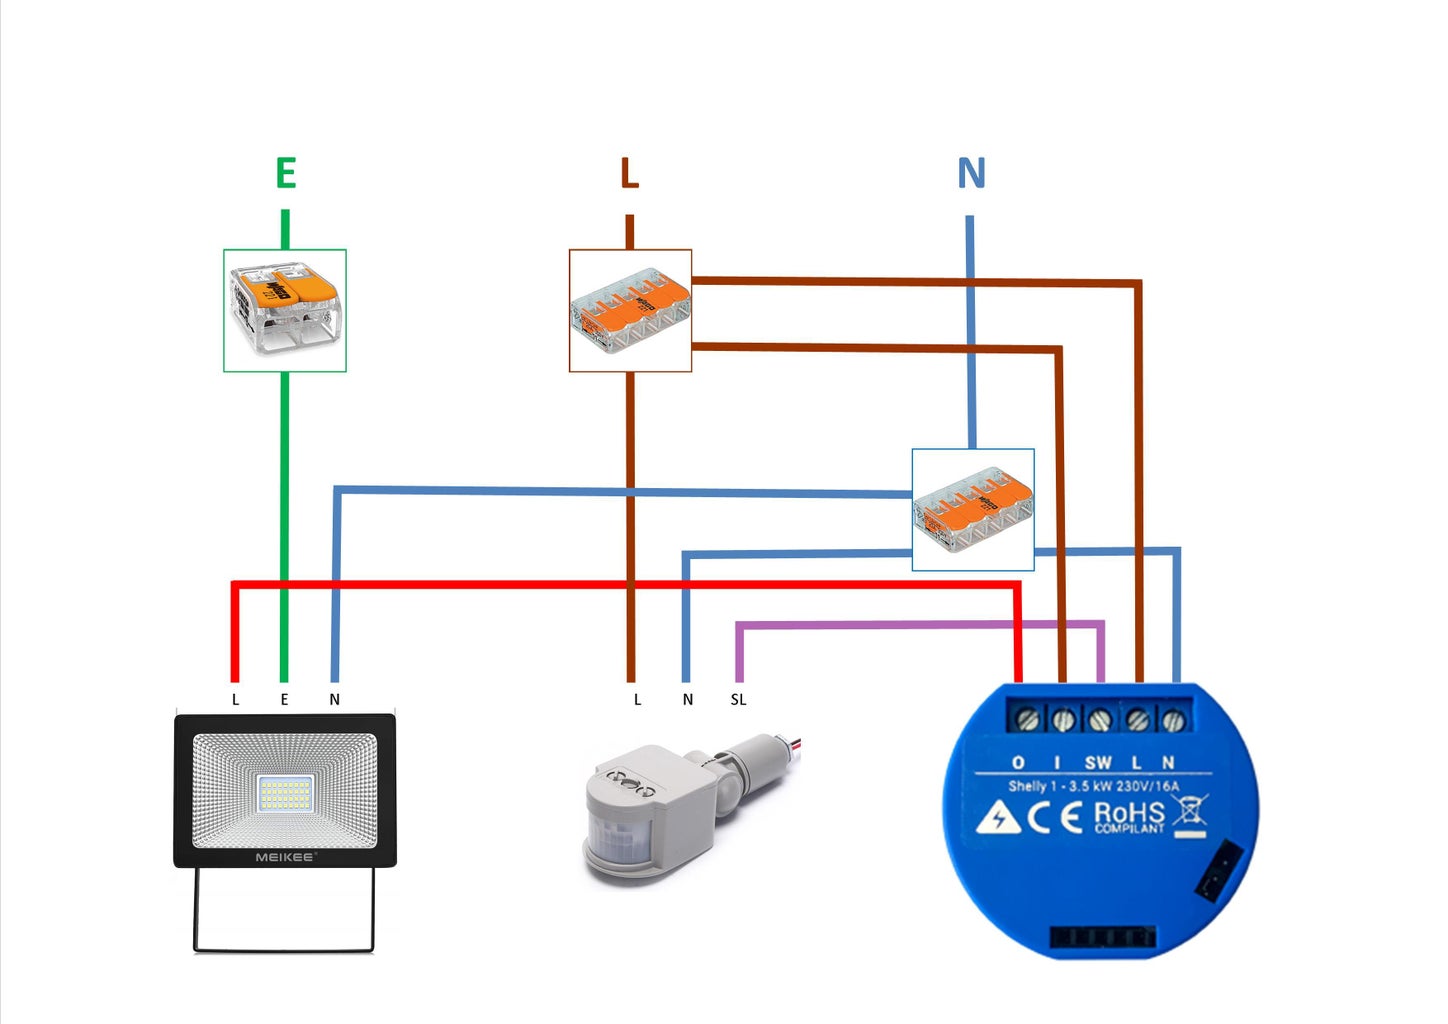
You can now connect the wires following the wiring diagram. Connect the two yellow and green earths together using the 2 way Wago 221.
Connect the blue neutral wires from incoming supply, the light and the PIR sensor along with one of the short blue wires you created in the previous step, this will go to the Shelly 1, using one of the 5 way Wagos. The 5th 'way' in the Wago will be left empty (the don't make a four way version in this style, but it may be useful if you wish to daisy chain in a second light).
Now connect the brown lives wires from the incoming supply and the PIR along with two of the short brown wires you created in the previous step, these will both go to the Shelly 1, using the other 5 way Wago. Again there will be an empty way.
Step 4: Connect the Shelly 1

It is now time to connect the Shelly 1. Connect the wires according to the diagram in the last step they should be:
N- the loose blue neutral wire connected to the neutral Wago
L- one of the loose brown live wires connected to the live Wago, it doesn't matter which
SW- the red switched live wire from the PIR
I- the other brown live from the live Wago
O- the brown live to the security light
You can now close the Wiska box up by placing the lid on and giving the plastic screws in each corner a quarter turn to the locked position. You are now ready to install your light.
Step 5: Install Your New Smart Light


Fix the light and grey Wiska bracket to the wall. you will need to offset the Wiska bracket as far to the right as possible to put the PIR sensor in the middle and give clearance for the cable coming out of the left side of the light.
The Wiska box then just pushes onto the bracket.Don't forget to adjust the PIR settings with the knobs underneath. You can set the detection range, the light level it will trigger at and the time it will stay on for (I set this to the minimum so that I could use automatons to set the length of time the light stays on for).
You can now connect the supply cable to the mains making sure it is safely isolated.
Step 6: Configuration


You can now configure your Shelly 1 device. There are three broad options:
- You can use the Shelly Cloud app to control your device
- You can use the Shelly Embedded Web Server to configure your device to work with your exisiting Smart Home system via MQTT or an integration like Shelly for Hass
- Flash the device with custom firmware like ESPHome or Tasmota (you would need to have done this before installing the Shelly)
Instructions for method one and two are included in the instructions that come with the Shelly 1 and you can find instructions for custom flashing online.
In my set up I used the Embedded Web Server and Shelly for Hass to control my light from Home Assistant.
For more information about the advanced functions of the Shelly 1 and other Shelly devices I recommend The Hook Up and DrZzs YouTube Channels.


