

Introduction: DIY Xbox Controller Receiver for PC


Have you ever wanted to use a Xbox360 Controller on your PC and not have to buy a $15 receiver? Now you can! You can use a old Xbox360 RF Module (ring of light). I had one of these from a old RROD Xbox and decided to tinker with it. This is a very simple process. All you will need to do is some soldering and wiring, cutting and installing and your done.
What you will need:
An Xbox 360 RF Board (I used model Rev H)
A Xbox 360 Controller (synced to the board)
A USB cable with Male end
5 Volt Zener Diode
Soldering Iron
Solder
Dikes
Dremel/Something to cut the case (hole for the wire)
Wire Stripper
Optional:
Project Enclosure (I used this one from Radio Shack and cut it to size)
Small Zip Tie
Lighter
Step 1: Getting Prepared!


To start off, you are going to want to cut the end of your USB cable off, make sure to leave the male end on. Next you are going to be striping the cover of the whole entire cable. I didn't have a wire stripper big enough so I used a exacto knife to cut the outer insulation. Be sure to leave enough room so you can strip the smaller wires inside your cable. I took off maybe an inch. Now, you are going to be striping the small wires inside your USB cable. If you do not have a wire stripper small enough for the wires you can use a lighter and burn the ends off the small wires. Twist the end of each wire to ready them for soldering. You are now ready to start soldering.
Step 2: Soldering to Your RF Board.

Soldering to your board isn't too hard. If you look at the images, there is a small diagram to show you where the wires will end up being soldered in. Just follow the diagram and you will be set.
- Cut your 5 Volt Diode to length and solder it onto the board. The solder point that you should be soldering to is the one on the far left out of the four solder points that are in a line. Next you should solder the red wire to your diode. Make sure you have a good solder joint.
- Solder in your white wire to the solder point on the board. The solder point you should be soldering to is the one next to where the diode is soldered in, the 2nd one.
- The next wire that should be soldered is the green wire. The solder point you soldering to is the one next to where you soldered in the white wire, the 3rd one.
- The last wire you should solder in is the ground (black wire). The solder point you should be soldering ti is the one next to where you soldered in the green wire, the 4th one.
All of your soldering is done. Double check and make sure your solder joints are good and will not come off after some use. Another thing that I did was put a Zip Tie around the wire and hole in PCB to keep the wire from moving around too much, this should help keep your wire in place and hopefully cause less damage if it gets moved around some.
Step 3: Cutting Your Enclosure.


I had a little trouble here, lets hope you don't. I am not the great cutting smaller objects with a table saw. I was able to do it but it came off the saw funny and it cut into the but a little. It looks just fine though. Lets get on to the cuts you should make.
- Take your box and from the bottom mark a line at 1 and 3/16 in. The is the line you should cut on if you decide to make your box smaller.
- You will now need your dremel or something similar. If you have noticed, your lid to the enclosure will no longer go on. This is because of the lid screw on holes and also the ridges on the side of the enclosure to mount PCBS. Take a sander or cutter and sand or cut the ridges and screw holes out. Your lid should now go on.
- The last of the cutting is rather easy you will need to make a rectangle cut on the side of your box to be able to route out the cable. You may choose the size and location of this cut.
Step 4: Finishing Your Receiver

You may now put your board into your project enclosure. I suggest you screw one of the corners of the board into the standoffs inside the case. This will help it stay in place and not move around while inside the enclosure. Now go ahead and screw on your top. It can be hard the first time but after the first time its easy to pull on and off.
Step 5: Installing Your PC Driver


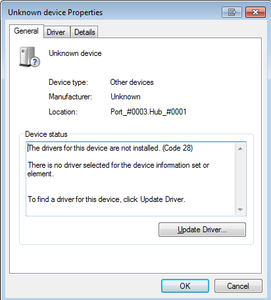


You are going to want to install your driver to your PC to insure it works. Your device will show up in your PC with no driver and you will need to install a driver for it. You can download the driver here. See images for help, if you need more help ask in the comments. You will need to go to: Control Panel, Hardware and Sound: Devices and Printers: Unknown Device. The images should help from then on. After you have installed the driver you are set.
Some more info:
If you install some other programs you can use the Xbox controller as a mouse which can be handy. I mainly built this for playing games on PC, mostly racing games because it is hard with Keyboard and Mouse.
All Done!
Thank you for reading my instructable and I wish you luck if you do decide to make it. If you need any help please ask down below and I will be happy to help you within my abilities. Thanks, Carter.

Participated in the
Gadget Hacking and Accessories Contest

Participated in the
Green Electronics Challenge


