

Introduction: DIY Taser in Flashlight


I built this taser for my diy video podcast. (check out my shirt!) I thought I would make an instructable to enter in the flashlight contest. The design I used gives a jolt of 1200 volts which I promise you can really feel! In the video we have an exclusive interview with Geoff Desmoulin from Spike TV's show "Deadliest Warrior" where he talks about the science and effects of tasing people.
Please check out my other instructables
Step 1: Materials
The shopping list is on the downloadable pdf. The only things not included there are: 9v battery, 9v batt connector, housing (mine was a flashlight) copper circuit board, a small amount of wire and a switch.
Total cost in parts should be around $30
Tools required are:
drill
1/32" , 3/64" drill bits ( I also used a larger bit for mounting the switch but the size will depend on your switch)
soldering iron and solder
wire strippers and snips
copper etching kit
Some tape
a clothes iron
I used an angle grinder with a zip disk to cut the circuit board
If you don't know how to solder, check out this guide:
https://www.instructables.com/id/Soldering/
If you don't know how to etch copper, here are a few good instructables, I used the methods described in the last one.
https://www.instructables.com/id/Sponge-Ferric-Chloride-Method-Etch-Circuit-Bo/
https://www.instructables.com/id/The-Saltwater-etch-process/
https://www.instructables.com/id/Etching-a-circuit-with-toilet-bowl-cleaner/
https://www.instructables.com/id/Stop-using-Ferric-Chloride-etchant!--A-better-etc/
Step 2: Making the Board


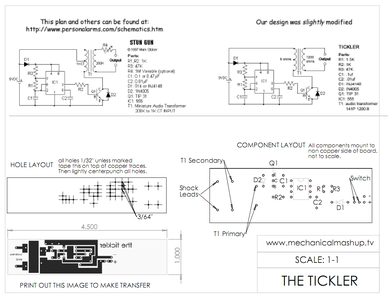
The downloadable pdf file has a transfer image in the bottom left corner. You need this printed in toner on acetate (ie: a laser printer or a photocopier onto a transparency). ink jet printers will not work! Do the printing on maximum darkness to get as much toner on as possible.
You will notice that the word is printed backwards. This is to help you, when you transfer the image with an iron you will be able to read the word. Heat an iron between full and 3/4 full and while you are waiting for it to heat up, clean your copper circuit board with steel wool. try not to get any fingerprints on the copper as the oils will interfere. Tape the transfer to the board on one side only. this will allow you to peel it off when you think you are done and place it back exactly where it was if you are wrong. Place a piece of regular paper on top of the acetate to keep it from melting and press the iron evenly down. If you press too hard the toner can squish and bleed. When you are done you may still need to touch up the transfer with a magic marker or a bit of paint.
Again, there are tons of great instructables on etching so I will not try to compete. check one of the links in the intro if you need to know how to do it.
On our handy dandy pdf there is a hole template. tape this on top of the copper side of the board. Use a small punch or even a finishing nail to gently center punch the holes. Grab a drill and carefully drill your holes. If you are having trouble finding the tiny bits, check out the dremel section of your local hardware store. The larger holes are for the transistor. Check to see if the transformer fits properly, I left a lot of copper in that area in case the leads on your transformer did not match mine. Drill accordingly.
Populate the circuit board with the components. Again, that great pdf file shows where everything goes. Then solder it all together. The guide linked in the intro will help you if you need it.
Step 3: Housing
I chose to use a flashlight as my enclosure for a few reasons:
It conceals the devices true nature (a bit)
It was sitting around the house
It was cheap (I think I paid about $4)
You can probably find a better or smaller enclosure if you look hard enough.
All I really had to do was pull out the batteries, existing bulb and reflector, Drill a hole for the switch, drill 2 holes for the wires to come through the lens and assemble.
I chose to add my own switch because it was a momentary on switch. If I had used the flashlight's switch, accidentally bumping the switch on could drain the battery or worse it could unintentionally shock you.
Step 4: Testing

If you want to see me get electrocuted, you are going to have to watch the video. Just know that I am not acting at all and it really made me jump and yell like that. My buddy Ben Eadie gets shocked as well by Geoff Desmoulin and some of you may note that he does not jump as much as me. I would like to chalk that up to Ben having been hit by lightning twice and having a tolerance to it. Not that I am just a baby.
Geoff talks about the science and effects of tasers he studied on his show "Deadliest Warrior" Thanks!
If you made it this far, you might be interested in our facebook page
Participated in the
Flashlight Contest


