

Introduction: Deconstructing a Pair of Jeans With the Least Amount of Waste


I recently found instructions on how to create a rag rug. Of course, I want to try to make one with denim. And not new denim, but the soft, broken-in denim, like your favorite pair of jeans. And the best place to find that is, in fact, an old pair of jeans. Or rather, in a lot of old jeans.
Then it was time to take apart the jeans. I searched the internet for instructions, but I either found ways to do it that were inefficient (taking the seams apart with a seam ripper – yeah, right) to those that wasted too much fabric. I had instructions for using other portions of the jeans, like the waistband and outside seams, so I didn’t want to waste anything.
I originally posted these instructions on my creative blog (and if you should be interested), go check me out at OnMyCreativeSide.wordpress.com.
So, I decided to write my own instructions as I took apart the pants. There are a couple of terms that I will use that might not be obvious to all readers:
a. I will refer to the thread as gold, although it may be a different color.
b. If you’re not comfortable handling a single edge razor, a seam ripper could be used, but it will dull very quickly. In fact, the razor blades that I use are really only stay sharp through two to three pairs of jeans. Once I find some resistance in pulling the razor blade, I switch for a new one.
c. I will refer to seams as “inner seam” and “outer seams”. Inner seams are folded in and have no outside stitching, while an outer seam has the bulk on the outside and will have decorative gold stitching:
Step 1: Basic Information

So, I decided to write my own instructions as I took apart the pants.
There are a couple of terms that I will use that might not be obvious to all readers:
a. I will refer to the thread as gold, although it may be a different color.
b. If you’re not comfortable handling a single edge razor, a seam ripper could be used, but it will dull very quickly. In fact, the razor blades that I use are really only stay sharp through two to three pairs of jeans. Once I find some resistance in pulling the razor blade, I switch for a new one.
c. I will refer to seams as “inner seam” and “outer seams”. Inner seams are folded in and have no outside stitching, while an outer seam has the bulk on the outside and will have decorative gold stitching:
Step 2: Removing the Label


Okay, let’s take apart some jeans!
First up is removing the brand label. Not all jeans have these, although I have found that most do. I found a cute use for them, by re-attaching them all to a denim pillow. May or may not do this, I guess when I’m done with the rug, I’ll see if I have enough.
I have found this is the fastest way to take apart almost everything related to the jeans. Slide the razor blade at a corner and carefully pull towards you. Continue all the way around.
Step 3: Belt Loops


Jeans are tough. And one of the things that make jeans so long lasting is the reinforcement at stress points. Like the back pockets and belt loops and bottom of the zipper. The key to making it easier to deconstruct a pair of jeans is in tackling these reinforcements. Cutting through the reinforced seam is the most straightforward and easiest way to loosen the remainder of the seam.
I start by cutting through all of the belt loop reinforcements – just the bottom of the belt loops, where it actually connects below the waist band. Then, one by one, pull the belt loop away from you and using the blade, cut just the gold threads.
Step 4: Waist Band


Next, we’re going to remove the waist band. I actually have a project that will use the waistbands and the belt loops attached (at the top), so it is important for me to cleanly cut the seams.
I find a spot where the seam isn’t reinforced or that it has more than one row of stitches. And then it is just a matter of cutting all those seams. I find this to go pretty quickly, the two areas you will find that need more attention is at the the ends – where the button hole and button come together. Just keep pulling back on the seam to reveal the stitches.
Step 5: Removing the Zipper and Separating the Legs


Next we’re going to remove the zipper and all of its components. I know some would like to keep the zippers, but in my case, I know that I would never reuse them. I rarely use zippers, but when I have, they have been much longer than the ones that come from these jeans. This is the first waste product.
Using sharp scissors, cut as close as you can to the outer seam. Then repeat on the other side of the zipper.
Now continue cutting to the side of the ‘out’ seam. This will continue around to the waist in back (between the pockets).
Step 6: Cutting the Outer Seam


Now you have essentially two separate legs. Now you want to split the seams to capture as much of the fabric as possible. Start by cutting along the outer seam all the way to the bottom hem. Cut through the bottom hem.
Now turn and cut up the other side of the outer seam. Set the seam aside.
Step 7: Split the Legs, Remove the Bottom Hem


Now cut off the hem and set it aside. I actually have used all of my hems in a very special project. It is SO cool! Just because I keep and use something, doesn’t necessarily mean you will, so keep only what you want and can use.
Step 8: Removing the Inner Seam


Now, lay the pant leg out. Then fold it in half, right sides together based on the inner seam. Now, cut off the inner seam, keeping as close as you can to the seam.
Step 9: Continue Cutting the Top of the Inner Seam


As you cut the inner seam, you will fun into the pocket as it is incorporated into the seam. Translation? Many layers of fabric! So once you have reached this point, open the fabric and cut with as few layers as possible. You also may have to contend with rivets at the pocket site. These can be heck on scissors, so be careful!
Step 10: Removing the Front Pocket


On the front (with the pocket) cut the outer seam to remove the pocket. I have a project in mind for the mini-pocket (or change pocket) so, I cut away most of the pocket construction and the white portion. I try to leave some fabric around the smaller pocket, so I can accomplish this other project.
Now time to remove the back pockets. You could actually do this at any point in the project, but I like to have everything already done and then sit down on the couch with my box of razor blades and remove the pockets while I watch television.
Step 11: Removing the Back Pocket


Again, pull the sharp edge of the razor blade across the reinforcement at the both corners, once or twice. Once you’ve gotten past the reinforcement seam, the remainder of the pocket is pretty easy.
I’ll share with you my little secret. Some of this fabric is going to be used to upholster a wing back chair. And removing the pocket reveals a darker fabric underneath and adds more visual interest. Even if you are cutting the fabric for use in a quilt or some other project, the difference between the faded and not-so-faded fabric is wonderful.
Step 12: You're Done! This Is the Total Waste

Repeat steps 6 through 10 as necessary to complete the deconstruction. When you’re done, this should be the total pieces from a single pair of jeans to be discarded. I save the outside seams but the not the inside seams.
Step 13: Your Reward!

And here is my bounty. This pile represents about 15 pairs of jeans, ranging from size 30 all the way up through 54″!
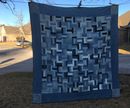
The fabric, shown in the photo, is to be cut into strips and then braided into a denim rag rug. But you can use it in so many ways. I have also created denim quilts of all sizes and styles as well as rugs. There are many ideas out there. And nothing is more comfortable than a your favorite pair of blue jeans.


