

Introduction: Decorative Tooled Leather Maul Handle Wrap


Why have a plain maul or mallet when you can make yours awesome? Mine was screaming for a makeover, so, here goes!
Step 1: Tools and Materials


Materials used:
Paper for pattern
Tracing paper
Plastic kitchen wrap
3/4 ounce veg tan leather
Tandy Super Sheen
Tandy Eco-Flo Hi-Lite Stain, Briar Brown
Fiebing's Black dye
Neatsfoot Oil
1mm nylon thread
Tools Used:
Craftool Poly Maul
Box cutter
Scissors
Swivel knife
Craftool stamps
Edge Slicker
Paint brushes and sponge applicator
Stitching chisel
Straight and curved needles
Step 2: Pattern


First, I made a pattern from plain paper to fit one half of the handle. When I had the pattern close, I folded it in quarters in order to make sure it was symmetrical. This might take a couple of tries to get it right. The pattern was placed on some 3/4 ounce veg tan leather and two pieces were cut out. It might look good with heavier leather, but my hands aren't large, so I kept it thin. (It would be a good idea to check the fit of your leather once it is cut out, while moistened, and before tooling).
Then I modified a pattern from Tandy's Lucky Eight Belt Book to fit the inside dimensions of my pattern on some tracing paper.
Step 3: Tooling and Dyeing


With the leather dampened, I placed plastic wrap, then the tracing pattern over my leather. I traced it out with a stylus, but a ball point pen works OK as well. The leather was cut with a swivel knife along the pattern lines. Then I stamped it with Craftools to bevel, background and give it some texture.
I painted the flower with Eco-Flo Super Sheen as a dye resist, and painted the background with black dye. I let that dry for a little while. Next I painted the pieces with Eco-Flo Hi Lite Briar Brown with a sponge applicator. This was immediately wiped off with a slightly damp paper towel. This makes a nice three color combination. While the leather was still a bit moist, I rubbed the edges with an edge slicker to make them smooth. Also, some Neatsfoot oil was rubbed into the back. (I used a couple of photos with a separate piece of leather after the project was completed for demonstration purposes).
Step 4: Sewing It Up


A stitching chisel was used to stamp out the sewing holes. I used two straight needles to sew up the top and bottom, and the first side. In order to sew the second side, two curved needles were used. A really easy book to demonstrate this is The Art of Hand Sewing Leather by Al Stohlman.
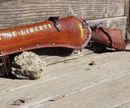
Step 5: Finished


The end product has a nice feel and should provide a very secure grip. Not to mention it will make my work bench look really terrific!
If you liked this, please look at my other leather Instructables, like my Winchester 73 Leather Rifle Scabbard and Buttstock Cover

Participated in the
Tandy Leather Contest 2016


