

Introduction: Dia De Muertos Nightlight


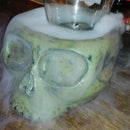
A while ago, I made a skull with no purpose, just to try out a glazing technique called 'Raku Baking'.
Normally, it should have a copper colour with black cracks in it, but it became something entirely different.
The skull came out black with a bit of copper shining trough and mostly with a silver shine, but without the cracks.
Apparently the results of the look of the glaze depends on what type of oven used. So make sure you run a test before making a good piece.
Sure that was a failure for that technique, but it came out nice for this project.
Black and gold fit perfectly together.
Let's spend a long time making this thing!
Step 1: Supplies for the Mold for the Skull
First thing to do is making the mold for the skull.
The required materials:
- Chavant clay
- Vaseline spray
- Pensel
- Sculpting materials
- Duplo blocks
- Painting tape
- Regular clay (without chamotte)
- Molda 3 Bis (Gyproc casting plaster)
- Plastic skull you can buy in the shop around the time of Halloween
- Lighter fuel for a Zippo
- Square piece of glass (40x40cm)
Step 2: Preparing the Skull


If you look at the skull, there'll always be moulding lines from the template made by the factory.
You take a marker and mark all of the lines you see. These will be the lines you need to use to make the mold work. If they can get it out at the factory, so will you.
Now you inspect your skull and look for any shapes that will make it hard to get your skull out. Look at the first picture: the red part goes inwards so you have to fill this space up with chavant clay to make sure your skull comes out nice and evenly. Think about in which direction you will take your mould apart. For example, the front you will pull towards you. So if you see any inward shapes that will block this movement, fill them up!
As you can see on the next pictures, every hole in the skull needs to be filled up and smoothened with the lighter fuel and a brush. The fuel dissolves the clay a little bit which makes it easier to smooth out any excess material.
Make sure you take your time, because the better this job is done, the less work you will have afterwards to clean up the skull.
It's also better to smoothen sharp edges and small gaps like the teeth. This will also help to get your skull out of the mold. Probably you will have to adjust the mold to get certain parts loose.
Step 3: Making the Mould


- Step 1: (picture 1, 2 and 3)
Take the glass plate and build a duplo block wall on top of it around the skull. The height depends on the size of the skull (your wall needs to be at least 3cm higher than the skull). Put painting tape all around the wall because later on the plaster could be running through the cracks.
Put your skull upside down inside the duplo blocks.
Take the regular clay and put it around the skull, follow the markerlines you drew before. (see picture 3) This means that if the lines are curved, the clay is curved too till the sides of the wall. Try to make the surface as smooth as possible.
Remember, the front of the skull has to be able to be pulled forwards, so the bottom of the skull needs to be leveled.
On the sides of the temporal, sphenoid and zygomatic, go inwards, which means that the sides of the mould can not be pulled straight to the side, but need to go slightly backwards (see picture 1)
The zygomatic is a hole in the skull. ( the red circle on picture 1) To make sure you'll be able to get the skull out you'll need to fill this space with regular clay. Later on you can saw this piece back out. If you skip this step, your skull will die!
Spray the complete mould with vaseline-spray to get the mould loose easier later-on.
Mix the plaster. It must be runny! Pour it gently onto the clay. Make sure all the holes are filled and there aren't any airbubbles. Leave to dry.
Remove the wall and the clay.
The result must be looking like picture 3.
- Step 2: (picture 4, 5 and 6)
Turn the bottom around so your skull stands straight. Here the duplo blocks come in very handy, you can rebuild the same wall as before. Make sure it's at least 3cm higher than the skull and don't forget the painting tape!
Again, take the clay and build another wall on the marked lines on the front side from the skull (picture 4)
Make it at least 2 cm thick, otherways the wall will break because of the pressure of the plaster. This is a very messy business you don't want to get involved in!
Again you spray the mould with vaseline-spray and pour in the plaster. (picture 5)
If the plaster is dry, remove the wall and the clay. It must look like picture 6.
- Step 3: (picture 7, 8 and 9)
The back piece is split in the middle. So make a wall of clay for one side first and put a square cone on the top of the skull to make a pouring hole for the porcelain clay. (see picture 7)
Spray with vaseline-spray again and pour in the plaster. (see picture 8)
Remove the clay walls, but leave the square cone for the pouring hole.
Again spray with vaseline-spray and pour in the plaster to make the other side. (see picture 9)
- Step 4: (picture 10 and 11)
Build a circle wall around the pouring hole with clay. Spray with vaseline and pour in the plaster (picture 10 and 11)
- Step 5: (picture 12 and 13)
Break down the duplo walls and open up the mould. Now you'll know if you have sprayed enough vaseline :-)
Normally it will be a little tense to get loose, so you need to use some force on it. Only if you see no other way you can use some tools like a screwdriver, but be carefull! (see picture 12)
Rinse of the excess clay with water and a brush. (see picture 13)
You can let everything dry naturally or put them in your oven at 100°C for 10 hours.
Step 4: Supplies for Making the Skull
Time to test your mould!
Required materials:
- Cordless drill
- Mixer
- Wooden stick
- Porcelain clay (I used Witgert G52)
- Clay thinner (Witgert Liqui-Fix)
- Strong needle
- Pouring cup
- Painting tape
- Painter brush
- Small coping saw (only the blade, it must cut in all directions)
- Steel wool
- Scouring pad
Step 5: Pouring the Porcelain Clay Into the Mould


- Step 1: (picture 1)
Tape the pieces of your mould together. Make sure to press the parts well together, so the porcelain can not run trough the edges.
- Step 2: (picture 2)
Mix the clay. If it is not runny enough, you add some of the thinner until it has reached the right consistency. Pour the porcelain clay in the mould until the brim and into the pouring cup (so you can use it to refill later on).
Now you'll see as the mould picks up the water of the clay, the sides will dry up and the level of the clay will go down. If this happens, fill back up with the pouring cup. You will need to do this several times. The more time passes, the thicker the wall of your skull will be.
To check the thickness of the wall, you can look in the pouring hole. It will always be thinner than the walls itself. Depending on weather conditions and the dryness of your mould it could take a different time to receive the wall thickness you like. My experience was 20 minutes.
- Step 3: (picture 3 and 4)
If you're happy with the thickness of your skull, pour out the clay in a bucket. Do this very gently because if you flip it to fast you'll create a vacuum with the result your inner surface will collapse.
Let it drip out for 10 minutes and turn it back around.
- Step 4 (picture 5 and 6)
Clean the pouring hole of the mould with the needle. Make sure nothing remains! (picture 5)
Pour back in some of the clay, stay away of the sides of the pouring hole. Put the lid on and turn around the mould slowly so the porcelain clay spreads evenly on the inside. (see picture 6)
Let the mould rest for about 1.5-2 hours. Again, this depends on weather conditions and the wetness of your mould.
Your skull needs to be leatherhard (This is a therm used to describe the state of the clay) It is hard, but not dry yet.
You can not let the clay in the mould for too long, because it will shrink at least 10 percent. Because of the complexity of the mould, a little bit of shrinking is good to get the skull out, but if it goes too far, the clay will start to burst.
- Step 5: (picture 7, 8, 9 and 10)
If you think the skull has shrinked enough, begin with the front piece. Pull it towards you with a wobbly movement. (see picture 7)
Then take the sides, pull them slightly backwards with the same wobbly movement. (see picture 8 and 9)
At last, pull the skull up again with the wobbly movement. (see picture 10)
The first attempt may fail, but don't give up and try again! It took me 5 pours to get a skull without cracks and to adjust my mould to get the skull out more easily (like removing sharp edges). The more you use the mould, the easier it will get to get the skull out.
- Step 6:
Let the skull dry a few days.
Time to clean up the skull.
Begin with a modeling tool and scrape off the biggest surplus material. Take a green scouring pad and grind off the seems (where the parts of the moulds came together) and other shapes that aren't right. Now use some steel wool to smoothen the surface of the skull. (see picture 11 and 12)
Take the modeling tool and refine the small details like the cracks in the skull, the nose and teeth,... (see picture 16)
Take the little sawblade (see picture 13) and cut out the holes for the eyes and the sphenoids (see pictures 14 and 15)
Now take a brush and wipe it over the surface of the skull to polish the details. If you want you can polish it some more by rubbing all over with your bare hands.
For the finished skull, see picture 17.
- Step 7:
Biscuit-bake it from 0°C till 400°C in 6 hours. Then heat the oven to 900°C, keep it for 15 minutes at that temperature and turn it off. (but leave the skull in there)
- Step 8:
Because I made the skull a while ago, I don't have any pictures of the following proces, but if you search the internet for 'Raku baking' you'll find plenty of tutorials.
The glaze I used was something store-bought, you can choose whatever glaze you want to match your own taste.
Step 6: Preparing the Cloche
Required materials:
- Glass cloche with a diameter of 23cm and a height of 34cm (store-bought)
- Piece of wood (30x30x4cm). I used oak, but beech would be better because it's more dense.
- Piece of wood (15x15x4cm)
- Wood chisel
- Lathe
- Band-saw
- Calliper
- Long nut (5 cm)
- Bolt (M16x80)
- Sanding paper (100, 220, 360)
- Drill (diameter 16)
- Vise
- Clock drill (diameter 105mm)
- Piece of OSB (300x300x18mm)
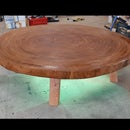
Step 7: Making the Cloche


- Step 1: (picture 1, 2, 3 and 4)
Take the piece of wood (30x30x4) and the calliper. Measure the diameter of your glass cloche, add 5 cm and draw a circle on the wood with the calliper. (see picture 1, 2 and 3)
Cut out the circle with the band-saw (see picture 4)
- Step 2: (picture 5, 6, 7 and 10)
Drill a hole (diameter 16) in the center of the disc (see picture 5). Take the long nut (see picture 10) and put it inside the clamping piece of the lathe (see picture 6). Now take the bolt and put it in the hole of the wood disc and screw it on.
- Step 3: (picture 8 and 9)
Level the bottomside of the piece of wood and the sides with the chisel of the lathe itself at 700rpm. (see picture 8 and 9)
- Step 4: (picture 11, 12 and 13)
Put on a chisel that takes off the sides (see picture 11) and cut off the first incision to make the cloche fit. (see picture 12 and 13)
- Step 5: (picture 14, 15, 16 and 18)
Put a bar on the clamp of the machine and make sure it comes at 0.5 cm of the edge of the wooden disc (see picture 14). This bar is to hold the chisels to cut out the rest of the incisions. I had no real plan how I wanted it to look. I just started cutting out and stopped when I liked it.
The only really important diameter is the first one (to make the cloche fit). The rest can be done as you like. (see picture 16)
Take off the piece and chisel of the remaining layer around the hole in the middle. (see picture 18) This is to make sure that you have a flat surface.
- Step 6: (picture 17)
Sand off the entire piece. Begin with sanding paper 100, then 220 and at last 360 (see picture 17)
- Step 7: (picture 19)
Turn the piece around and flatten the other side. (see picture 19)
- Step 8: (picture 20 and 21)
Chisel of the remaining layer at the middle of this side as well. (see picture 20 and 21)
- Step 9: (picture 22)
Test your glass cloche on the disc and make sure everything fits smoothly. (see picture 22)
- Step 10: (picture 23, 24 and 25)
Take your skull and the smaller piece of wood and draw the outlines of the skull (see picture 23). Then draw a second line at 1.5 cm of the first outlines. (see picture 24) Cut out the piece at the outer line with the band-saw. (see picture 25)
- Step 11: (picture 26 and 27)
Put the piece of wood in the vise and chisel of the sides so you end up with slope sides (see picture 26 and 27)
Sand the piece the same way as you did the disc.
- Step 12: (picture 28 and 29)
Testfit your skull on the small piece of wood. (see picture 28 and 29)
- Step 13: (picture 30, 31 and 32)
Take the piece of OSB and drill a hole with the clock drill right trough. (see picture 30 and 31) Take two clamps and fit the hole in the middle of the bottom of the wooden disc (see picture 32)
- Step 14: (picture 33 and 34)
Now you drill a hole in the bottom of the wooden disc, about 2,5 cm deep. To make sure you don't drill to deep, tape of 2,5cm at your clock drill so you can see how deep you must go. (see picture 33 and 34)
- Step 15: (picture 35 and 36)
Use a chisel to cut out the hole. (see picture 35 and 36)
- Step 16: (picture 37 and 38)
Time to glue the little piece on the disc, I used Polyurethane glue. It foams a little bit, so it fills up the gaps nice and the pieces fit tightly. (see picture 37)
Put another piece of wood on the top and bottom to protect and tighten up the construction with two clamps. (see picture 38)
Keep together like that for at least 4 hours.
- Step 17: (picture 40 and 41)
The colour of the original wood wasn't dark enough, so I used a varnish with a dark oak finish. The more layers, the darker the wood gets (picture 40 and 41). After every layer of varnish, sand off slightly with sanding paper 360.
Step 8: Supplies for Polishing and Buffing

Before we start with the brass flowers. I will first give a little explanation of how to polish the flowers. The technique is the same for all flowers, leaves and ranks. So I do not have to repeat the polish-process every time.
Required materials:
- Polishing machine
- Polishing brush (with hair)
- Polishing brush for dremel (with hair)
- Buffing brush (cotton)
- Buffing brush for dremel (cotton)
- Green polishing wax
- Red polishing wax
- Sanding paper (360)
- Aluminum Oxide Flap Wheel (red)
- Dremel
- Fast drying acrylic clear varnish (aerosol)
- Degreaser (acetone)
- Soft brush
- Water and soap (handsoap will do just fine)
Step 9: Time to Polish
Step 1:
If you look at your flower petals and you see deep dents and scratches form de result of using your pliers, you will have to take these out first with the sanding paper.
Step 2:
Start off polishing your pieces with the flap wheel until you only have the scrachtes left made by the flap wheel. The outside edges you can do with a big one, but you will need a smaller one for the inside.
Step 3:
Mount your polishing wheel and add some of the green polishing wax to the brush. Keep polishing untill you have a nice even satin shine over the whole piece. Again you might need a smaller one for the insides.
Step 4:
Now mount the buffing brush and add some red polishing wax to it. Keep buffing untill the whole piece get an high gloss shine. Be carefull because your piece will get very hot.
Step 5:
Take the pieces and clean off the wax using a soft brush, water and soap. Or if possible use a ultrasonic cleaning device (optional)
Step 6:
Degrease the pieces and varnish them as quickly as possible. If you leave them unprotected for to long, oxidation will occur an you will see a change of color. Let this dry overnight.
Step 7:
You are now done with the polishing process, carefully assemble your pieces with the nuts and bolts. Try to prevent making scratches so handle with care.
Step 10: Making the Brass Rose
Required materials:
-Brass plate (500x400x1mm)
- Round hammer
- Common hammer
- Lead block
- Drill (dia. 3mm)
- Bolt (M3 x 30 mm)
- Nut (M3)
- Cordless drill
- Round nose pliers
- Flat pliers
- Block iron (to form the leafs)
- Blow torch
- Plate scissors (tin snips)
- Pattern rose
- Round pons
- Center punch
- Fine marker

Step 11: Shaping the Roses


Step 1: (picture 1)
Print out the rose templates (rose.pdf) on thick paper and cut them out. Place the template on the brass plate and trace them with a marker.(picture 1)
Step 2: (picture 2 and 3)
Cut out the petals with your platesiccors (picture 2) and use the center punch to mark the center. Heat up the petals with a blow torch untill they start to glow (picture 3). This will soften the brass and will make it more pliable.
Step 3: (picture 4,5 and 6)
Take the iron block and secure it in your vise. Drill a hole (3mm) where you made a mark with the center punch (picture 4). Take the petal and hit it with a round hammer until the brass starts to curve upwards (picture 5). Hit the outsides more so the edges will be thinner.
Step 4: (picture 6,7 and 8)
Heat up the flower again like in step 2 (picture 6 and 7). Take the bolt an nut (M3x30mm) and screw them into the smallest petal. Use the round nose pliers to bend one of the five petals to the middle and make it as small and round as possible. Now take the next petal and bend it round the first one, continu doing the same with petals 3,4 and 5 (picture 8). The underside of the petals should be as round as possible, use a hammer if you must.
Step 5: (picture 9)
Unscrew the nut of the first petal and add the second one. Now srew the nut back on. Take the round nose pliers and bend second set of petals around the first one (picture 9). Do the same for the third and fourth, make sure that the position of the petals vary so that they don't line up.
Step 6: (picture 10)
The fifth set of petals will have to be more curved. Place the petals on the lead block and hit them using the hammer and round punch until the are smooth round shape (picture 10).
Step 7:(picture 11 and 12)
Put the rose together an use your round nose pliers to bend the top edges of the petals slightly outwards (picture 11 and 12).
Step 8:
Now it's time disassemble the rose and polisch the pieces individually(as explained in step "Time to polisch"). After this you reassemble it and the rose is done.
Step 12: Making the Brass Daisy


Required materials:
- Brass plate (500x400x1mm)
- Round hammer
- Common hammer
- Lead block
- Drill (dia. 4mm, 1.5mm and 3mm)
- Bolt (M3 x 10 mm)
- Bolt and nut (M4 x 20mm)
- Wiretap (M3)
- Cordless drill
- Round nose pliers
- Blow torch
- Plate scissors (tin snips)
- Pattern daisy
- Round pons (10mm and 20mm)
- Center punch
- Homemade punches (picture 1,2 and 3)
- Nail polish
- Sodium persulfate (for etching pcb's)
- Silver solder
- Borax (Boric acid)
- Brass tube (4mm)
- Self adhesive paper ( to use in a printer, you could alsow use doublesided tape and regular paper)
- Small coping saw
- Small half round file
- 3w LED
- Small pip bender (picture 4)
Step 13: Shaping the Daisy


Step 1:(picture 1 and 2)
Print out "daisy.pdf" on self adhesive paper (picture 1) and cut it out. Place it on the brass plate (picture 2).
Step 2: (picture 3 and 4)
Saw out the flower shapes with the small coping saw, and mark the center with the centerpunch(picture 3 and 4).
Step 3: (picture 5 and 6)
Place the flower on the lead block and use the homemade punches to curve the leaves (picture 5 and 6). Use the sharper one for de little sets of petals and the bigger one for the big set.
Step 4: (picture 7 and 8)
Use a small half round file to round off the bottom edges on all three pieces (picture 7 and 8).
Step 5: (picture 9 and 10)
Now drill al hole (4mm) into the center of each piece (picture 9). Now take the smalles piece and position your LED in the middle. Trace the positions were you will have to place the bolts to secure the LED and the electrical wires (picture 10). Now drill the holes for the bolts (3mm) and the wires (1,5mm)
Step 6: (picture 11,12 and 13)
Now assemble the whole flower with the centerbolt and place the leaves so that they don't aline. Drill all the holes all the way trough (picture 11) and make sure your LED fits (picture 12 and 13).
Step 7: (picture 14 and 15)
Saw out a circle from the brass plate that is 2 mm wider than the 2 3mm holes (picture 14). Drill a 4mm hole in the center and place it on the bottom side of the flower. Redrill all the holes in the flower, the ones for the bolts must be 2,5mm (picture15).
Step 8: (picture 16 and 17)
Use the wire tap to cut threads into the 2,5 mm holes (picture 16). Now asselmble the flower to see if its fits (picture 17).
Step 9: (picture 18 and 19)
Draw to lines form the wire holes to the center and saw them out about 1 mm thick. This makes room for the cables to pass (picture 18 and 19).
Step 10: (picture 20 and 21)
Cut out and a circle 40mm in diameter and punch a hole in the center(picture 20). Secure your piece in the vise and file little teeth all along the edge(picture 21).
Step 11: (picture 22 and 23)
Put the iron block in the vise and use the sharp edge of a hammer to punchs grooves in the topside of the piece all around (picture 22). Now put the circle on de lead block and shape the part using a 20mm punch and a hammer. Then use the 10 mm punch to make the center piece al little deeper (picture 23). Drill a 4 mm hole in the middle.
Step 12: (picture 24)
Polisch the piece with the flap wheel brush (picture24).
Step 13: (picture 25,26 and 27)
Paint the inside of the part with nail polish (picture 25) and paint fine lines on the topside (picture 26). Now submerge the piece in sodium persulfate for about 30 minutes (picture 27). Afterwards take the piece out of the sodium persulfate and clean with water. Use acetone to dissolve the nail polish. Now you have etched little grooves in the topsides for a fine detail finish.
Step 14: (picture 28)
Cut a piece of 4 mm pipe, depending on the size of your cloche. Bend the pipe using the small pipe bender untill you reach the ideal shape where youre light has to come (picture 28).
Step 15: (picture 29,30,31 and 32)
Put the tube trought the hole you drilled in the top piece untill it sticks out 2mm on the inside (picture29). Mix some borax with water an have a fine brush near. Now heat up the piece using a blowtorch and while it's hot apply some of the borax solution with the brush. This will make the it easier to work with the silver solder. Heat up the piece again, take some solder and dip it in the borax solution. Now while the piece is hot push the solder in place using tweezers. Now warm the two pieces simultaneously to make te solder flow out evenly. If this doesn't work you might have to help it along with a small sharp metal rod (picture 30). Now take the round piece (picture 31) with the treads and solder this to the inside of the top part (picture 32).
Step 16: (picture 33,34 and 35)
Assemble the piece to make shure everyting fits.
Step 17: (picture 36 and 37)
Now disassemble again an polish all the pieces but don't varnish them yet. Then reassemble the flower and bend the pedals down(picture 36). Now disassemble, degrease, varnish and reassemble with electrics (picture 37)
Step 14: Making the Brass Prunus Flowers
Required materials:
- Brass plate (500x400x1mm)
- Round hammer
- Common hammer
- Lead block
- Drill (dia. 4mm)
- Bolt (M4 x 20 mm)
- Nut (M4)
- Cordless drill
- Round nose pliers
- Block iron (to form the leafs)
- Blow torch
- Plate scissors (tin snips)
- Pattern rose
- Round pons
- Center punch
- Fine marker
Step 15: Shaping the Prunus Flower


Step 1: (picture 1)
Take the smallest template of the "rose.pdf" and cut it out three times in the brass plate. Mark the center with the centerpunch and drill out a 4mm hole.
Step 2: (picture 2)
Shape the petals the same way as explained in the step "making the brass rose". But use a round punch hollow out all the petals.
Step 3: (picture 3 and 4)
Screw a couple of nuts on the bolt and clamp it in a visegrip ( picture 3). Use an anglegrinder to round of the edges of the bolthead. Finish with sandingpaper (120). Take your centerpunch and hit small dents into the bolthead (picture 4).
Step 4:
Polish, varnish and assemble.
Step 16: Making the Brass 5 Petal Flowers
Required materials:
- Brass plate (500x400x1mm)
- Common hammer
- Lead block
- Drill (dia. 4mm)
- Bolt and nut (M4 x 20mm)
- Cordless drill
- Round nose pliers
- Pattern 5petal
- Round pons (20mm and 50mm)
- Center punch
- Self adhesive paper ( to use in a printer, you could alsow use doublesided tape and regular paper)
- Small coping saw
- Small half round file
- Visegrip
- Anglegrinder
- Sanding paper (120)
Attachments
Step 17: Shaping the 5 Petal Flower


Step 1: (picture 1,2 and 3)
Print out the "5petal.pdf" on self adhesive paper(picture 1) and saw them out (picture2). Mark the center with the centerpunch and drill a 4mm hole (picture3).
Step 2: (picture 4)
Round of the the bottom edges with a half round file (picture 4)
Step 3: (picture 5 and 6)
Screw a couple of nuts on the bolt and clamp it in a visegrip ( picture 5). Use an anglegrinder to round of the edges of the bolthead (picture 6). Finish with sandingpaper (120).
Step 4: (picture 7 and 8)
Polish with the flap wheel and the green polish wax.
Step 5: (picture 9,10 and 11)
Put the smallest piece on the lead block and use the 20mm punch to round the leaves (picture 9). Do the same with the big piece but use a 50mm punch instead (picture 10). Now take your round nose pliers and bend the point of the leaves backwards (picture 11).
Step 6: (picture 12)
Now polish the pieces with the red polish wax, degrease and varnish. Assemble the flower and you are done (picture 12).
Step 18: Making the Brass Leaves
Required materials:
- Brass plate (500x400x1mm)
- Common hammer
- Lead block
- Round nose pliers
- Flat pliers
- Block iron (to form the leafs)
- Blow torch
- Plate scissors (tin snips)
- Fine marker
- Plastic hammer
- Vise
- Anglegrinder
- file
- round nose pliers
- flat pliers
-tape
Step 19: Shaping the Leaves


Step 1: (picture 1,2,3 and 4)
If you put the flowers on the display, you will see that the nuts are visible. We will cover this with the leaves. So taking this into account, you will have to choose how many leaves you have to make. I made 10 pieces until i was happy with the result.
take a piece of brass plate ( picture1) and mark a line in the middle (picture 2). Put the plate in the vise and hit it with a plastic hammer until it has a 90° corner. Take it out and put it back in to compress the 2 pieces together. Then hit it with a hammer to make sure tht the 2 pieces are completely flat (picture3). Now heat up the piece with the blow torch and let it cool down (picture 4).
Step 2: (picture 5 and 6)
Draw with a fine marker the shape of a leave, the shape and size vary to your own needs (picture 5). Grind out the shape of the leaves with a anglegrinder and clean up the edges with a file (picture6).
Step 3: (picture 7 and 8)
Put the leaves on a iron block and hit the sides with a square hammer. The leaves will fold outwards, but make sure that they don't go to far by hitting the middle (picture 7 and 8). Heat the pieces up with the blow torch and let them cool down.
Step 4: (picture 9,10 and 11)
Take your flat pliers and put some tape on them, so you don't damage the leaves when you open the 2 pieces up (picture 9 and 10). Take a round nose pliers and shape the leaves until you are satisfied (picture 11).
Step 5:
Now polish the leaves as explained in the step "time to polish".
Step 20: Making the Brass Ivy
Required materials:
- Brass rod (1.5-2-2.5-3 mm)
- Sanding paper (120,220 and 360)
- Cordless drill
- Abrasive sponge
Step 21: Shaping the Ivy


step 1: (picture 1 and 2)
Cut a piece of rod (picture1) and put it into the drill. (picture2)
step 2: (picture 3)
Take a piece of sandpaper 120 and hold it between your fingers, put the rod in the middle and turn it round with the drill. press your fingers together and make a forward and backward movement, until your rod reaches a point (picture3). do the same wiht the sanding paper 220 and 360
Step 3: (picture 4 and 5)
now start polishing the rod with a red abrasive sponge (picture 4). now put some green polishing wax on a cloth and make the same movement like before. Do the same with the red polishing wax (picture 5)
Step 4:
i put the skull, flowers and leaves on the display and looked where the ivy would fit best, and made them where I thought it was necessary. In the end i made 5 rods (dia. 1.5-2-2.5-3) and bent around the skull, and 1 round the daisy.
Step 5:
After the rod are bend, polish them again with the red polishing wax and a small polish brush on a dremel. Now degrease and varnish the pieces.
Step 22: Assemble Parts

Required materials:
- Drill (dia. 8mm 100mm long)
-Drill (dia. 2-3-4mm)
- Cordless drill
- Electric cord with a switch
- Power controlled supply (350mA)
Step 23: Put Everything Together


Now we will mount everything on the display, the best is to hold the flower where it must come and then drill the hole
Step 1: (picture 1,2 and 3)
Keep the flowers in place 1 by 1 and drill the holes as you see fit (picture 1 and 2). I did not want them to be symmetrical so i changed the position on the 2 sides a little bit (picture 3).
Step 2: (picture 4 and 5)
Take a long 8mm drill ( picture 4) and drill a hole in the back of the disk into the electrically space in the bottom (picture 5). This will be for the electric cord afterwards.
Step 3: (picture 6 and 7)
Test everything if it fits and take photos so you know where pieces have to come when everything is ready (picture6 and 7).
Step 4: (picture 8,9 and 10)
Mount the power supply in the hole at the bottom and put the electric cord through the hole in the back (picture 8). Connect it to the primary side of the power supply and put on a strap so the cord can't get out (picture 9). Turn the display around and begin to mount the daisy in the right place and put the wires through the hole. Connect the wires to the secondary side of the power supply and turn around again (picture 10) . Test to see if everything works.
Step 5: (picture 11)
Now glue the the flowers on the base followed by the skull. Then put in the evy and make sure that everything is in place. the leaves wil be put on last except the 2 in the front. these come behind the front rose (picture 11)
step 6: (picture 12,13,14,15 and 16)
The assembled piece should look like this (picture 12,13,14,15 and 16). Now put on the cloche and you are done!!! (picture 17)

Participated in the
Lights Contest 2017

Participated in the
Halloween Contest 2017

Participated in the
Power Supply Contest


