

Introduction: Direct to Excel Measurement


Microsoft Excel is a very powerful tool for its analytic and graphics capabilities
so it's interesting to read directly from an instrument into an active sheet and visualize-calculate online data from a process to measure, at least in intervals on the order of a few seconds. There are several solutions currently available, usually based on DLL programs to read a COM port and put the value in the sheet efficiently. Some of these solutions are free, such as PLX-DAQ from Parallax and others cost a few dollars, such as Windmill. There are several excellent Instructables showing how to do that. We propose here to use instead the Excel import query function as web page reader. The web-query operation access information through a TCP/IP connection to the Internet so the sensor must generate a web-server interface with an HTML page that is updated with the variables to be measured. Several measurements can be read but in this example will read only one for simplicity. What makes this very easy today is the existence of wonderful ESP8266 or any other circuit of the series (such as NodeMCU) since it has already solved the problem of TCP/IP stack and can withstand a somewhat modest but effective web server over wifi.
Step 1: Measurement an Excel
In this example we read a temperature sensor LM35 simply by being connected to ADC port in NodeMCU. The bulk of the recording and sequencing logic lies in the Excel' spreadsheet running a fairly simple macro.
This same solution can be done with Arduino or other circuit board but the NodeMCU has the advantage of low-cost and ease of programming, without requiring extra "shields".
I am indebted to several people who have made contributions to various forums, in particular with the solution given by RinusW in github.com/nodemcu/nodemcu-firmware/issues/730 and my son Andres.
There are several excellent Instructables on how to activate a lua interpreter 8266 and connect to a router, so this will not be explained.
Step 2: Gather Supplies.

- The NodeMcu8266 used here. US $
6 EBay or others.
- LM35 temperature sensor. US $ 1.5
- wires
- 5V supply or battery
- PC with Windows and Excel
- Access to a LAN or the Internet, also usually exists.
- IDE "esplorer.jar" on java,free.
- LuaLoader, also free.
Step 3: Install NodeMCU.

The NodeMCU can be programmed using the free IDE
"Esplorer.jar", but for loading management programs and testing them it is more comfortable to use LuaLoader from Peter Jennings. Initially, the NodeMCU board is connected to the PC with a USB cable.
The chip must be configured as wifi client and connected to the wireless router in the normal way, which it is done only once.
When the programs are loaded, the PC can be disconnected and the board can be energized with a 5V power supply from a battery or a cell phone charger. It could be located anywhere in the wifi area.
The programs are the following:
1. Init.lua:
--setup baud rate
uart.setup(0,115200,8,0,1)
--5s delay before start to break if needed
tmr.alarm(0,5000,0,function() dofile("temper.lua") end)
This program will be loaded and run automatically when you reset the chip. The delay is intended to make a "break" if something is wrong, because otherwise you must reload the interpreter in flash, a complex process.
2. Temper.lua:
-- HTTP server lee ADC(0) del ESP8266
--20 junio 2016 jaime aravena
srv = net.createServer(net.TCP,30)
srv:listen(80, function(conn)
conn:on ("receive",
function (conn, payload)
temper = adc.read(0) -- se lee la variable
temper=temper*330./1024. -- Si no es 3.3.volt,calibrar
conn:send('<!DOCTYPE HTML><html>',function(c1)
c1:send('<head><\head>\n<body>',function(c2)
c2:send('Temperatura:'..temper..'',function(c3)
c3:close() end) --close c3
end) --close c2
end) --close c1
end)
end)
The program publishes identification and the read value, which is updated
each time the page is requested by a browser. The strange nesting C1, C2 and C3 is due to a peculiarity of the SDK implementation. This program reads the ADC port and publishes a website at the address wifi for the NodeMCU board. The page is very simple and works with the latest version of firmware.
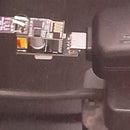
The LM35 sensor is connected to the 3.3 volts of the board and the ADC input.
Step 4: In Excel.
In the Excel's active sheet you can put the cursor at "A1" and the
operation to be performed is "Data -> Import External Data -> New Web Query" so the dialogue starts to indicate the NODEMCU URL to read the html server. If this address for wifi ESPNODE is targeted using a dynamic DNS then can be read from anywhere in the world.
Once the page is obtained, "Import" is pressed and it is defined an area in which text are the result and updates could be seen. In this case, the reserved area is the "A1: C4" range..
Step 5: Formulas.

Then fill the "D1" and "E1" cells with the following formulas are defined:
D1: now()
E1: =VALUE(SUBSTITUTE(MID($A$3;14;16);".";",";1))
The first one gets the date and time of the reading, the second one extracts the read value as String and transforms it into a valid number. These cells are copy-pasted sequentially in the writing range.
Step 6: Macros

The Excel sheet contains two macros: the first one allows you to clean the
writing area to start the process. It invoked by "Control + i" as defined when it is created.
The second macro automatically starts the reading process using a loop. The number of points to read and reading interval specified on the same sheet, in the cells "L1" and "L2". The maximum reading speed is about one sample per second although I do not have conclusive evidence and can be apparently 4 or 5/second, but it depends on the environment.
The maximum number of points to read is limited by the nearly 32,000 pairs that can be graphed but in newer versions of Excel this number could be larger. The chart is useful, being possible to add other meaningful calculations as maximum and minimum and all that is deemed appropriate within the operating speed. A dashboard graph can also be implemented.
Start Macro:
'Keyboard Shortcut: Ctrl + i
Sub start()
ActiveSheet.Range("D4:E32005").ClearContents
End Sub
Reading Macro:
Sub temper()
' Macro recorded 20/06/2016 by c
' read value from web esp8266
' Keyboard Shortcut: Ctrl+t
Row = 4 ' Intial row of read data
Final = ActiveSheet.Range("L2").Value + 3 'Number of values to read
Retardo = ActiveSheet.Range("L1").Value 'approx delay between reads
L: Range("A1").Select 'area holdiing the query
On Error Resume Next
Selection.QueryTable.Refresh BackgroundQuery:=False
ActiveSheet.Range("D" & CStr(Row)).Value = Worksheets(1).Range("D1").Value
ActiveSheet.Range("E" & CStr(Row)).Value = Worksheets(1).Range("E1").Value
newHour = Hour(Now())
newMinute = Minute(Now())
newSecond = Second(Now()) + Retardo
waitTime = TimeSerial(newHour, newMinute, newSecond)
Application.Wait waitTime
Row = Row + 1
If (Row < Final) Then GoTo L:
End Sub
This macro copies the "D1: E1" content to the write area.
The use of outdated structure GOTO is dued to the apparent fact that "while" loops interacts badly with the "query" operation and may cause it to "hang" but I'm not sure. The ON ERROR clause is essential because the connection between computers is not guaranteed. In case of loss of connectivity, the previous value is repeated. Other solutions are possible. In the example, has been defined a Trendline which smoothes 30 readings. Sensor sensitivity here is about 1/3 degree due to the ADC resolution.
Step 7: Conclusions.-

The main merit of this Instructable is its simplicity and economy based on
the wonderful 8266, which can also read I2C and SPIO so that the range of possible sensors is wide. The access via the Internet makes it a solution available anywhere and economical.
It is possible to read several 8266 almost simultaneously, each with multiple sensors. As the sensor can be energized with battery, field measurements are simplified as no wires are deployed. Avoiding Galvanic connection can be a great advantage in some environments.
I will be very grateful for any comments and corrections.
Thanks, good luck and congratulations to the designers of 8266


