

Introduction: Hammock Dog Bed


Here's my instructable on how to make a hammock dog bed...
You can buy these online (but not here in the uk) for about $150
But why buy it, when you can make it!!!
Apolagies about the photos, i had taken some throughout the making process, however i have since lost them.
For this instructable you will need:
- Timber (i have used elm)
- workshop tools; table saw, chop saw, drills etc.
- 4 x eye bolts
- 4 x dome nuts
- 4 x karabinas
- screws
Step 1: Creating Your Base


Figure out how big you want you bed to be, my two dogs are rather small, so it depends on how big your dog is i guess. the length i went for was 760mm.
Now find the centre of one piece and set the other piece to 60* (it should look like the above picture)
Mark around your second piece and head on over to the table saw.
I used my digital angle gauge to set the miter fence to 60* to the blade, and dropped the blade down to just under half the thickness of my workplace (about 9mm)
I then ripped out the section i had marked out to create a recess, so that once the other piece had been done the same, they would marry together and sit flush.
Now glue it up, clamp it, and screw it up!
Step 2: Creating the Up Stands.

Begin by figuring out the height you want you bed to be, again it all depends on how big your dog is, considering I've got a dachshund, it needs to be relatively low, so that his short ass legs can get up there!
I went for around 250mm.
with the four pieces cut down to length, i then grabbed my angle finder, and got to work figuring out the angle i want them to sit at. It worked out at about 107* to the base legs, so i set the angle up on my table saw (as it was the easiest way to do it, and cut a scrap piece to gain my angle.
Using the scrap angle, i then set my chop saw to the desired angle, and cut the four upstage to 107*
Step 3: Mounting the Up Stands


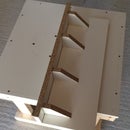
so there was a slight cock up when i mounted my up stands, one that i actually liked so left it in.
When mounting your up stands, leave enough gap at the end, so that if you wish to cut the base to the same angle as the legs you can do so. i didn't do this, so as you can see in the above images, the base runs from 90* through to 107* (easily fixed if you move the up stands further away form the ends)
Using a stepped drill bit, i recessed the holes for my screws, pre drilled, glued and drilled the up stands into place! nice and easy!!
Step 4: Drilling the Holes for the Eye Bolts.

as i wanted the eye bolts to sit at 90*
so using a flat speed bit, i raised my drill up on a scrap of wood, marked the centres of the up stands, and drilled them free hand. If you're not bothered by this, you could have drilled the holes before hand in the pillar drill.
next, mount the eye bolts onto the up stands, ensuring the sit at 180*
Step 5: Cutting Your Hammock Fabric.


Step 6: Mount Your Hammock.


Mount your hammock and you're done!!
If you want to finish your wood with any varnishes etc. its up to you, I've left mine natural at the moment, mainly as the wood has been sat in my garage for a few months, and i wanted to let the moisture leave the wood before i coated it with anything.
Feel free to comment below! or if you've made one too let us know!!!
Apologies for the lack of images, I lost a lot of the photos I had taken during the process. Once I've made another one, I'll update the instructable


