

Introduction: Dog Stairs for Bed, Take 2 (successful)


My elderly dog is having problems with her hips and knees. She hurt herself trying to jump into bed with me a few months ago. After that she didn't even try to jump up for about a month and a half, but now she's trying again--and she can't make it, and I'm concerned she's going to hurt herself again.
My bedroom is small, I have back issues, and I'm not willing to buy pre-made steps at the prices I can find. So I made a set of steps that is lightweight, takes up as little space as possible, and is fairly inexpensive. Bonus: it was quite easy and perhaps it will help someone else with a not-so-mobile--
In Take 1 (https://www.instructables.com/id/Dog-stairs-for-bed-take-1), I made something very pretty but that my dog ultimately could not use.
In Take 2, we'll see something that she finds much more usable, if requiring slightly more in the way of expenditure and hardware.
Step 1: Disassembling the First Attempt: a Crash Course in De-upholstering


So, I had a rather pretty set of steps that couldn't be used. My stingy nature wouldn't let me just toss it and buy all new parts, so I took it apart.
I used a LOT of staples. Boy. Okay, taking apart an upholstered piece of furniture involves a number of tools. These are my favorites:
* really sturdy awl
* wire cutters
* hammer
You find the staple, and stick the awl tip under it to pry it up. You may need to use the hammer to get the awl under the staple.
Once the staple is loosened, you can pull it off by hand, or you may need to use the wire cutters to slide under and grab it.
If the staple breaks, the wire cutters come in really handy for pulling the pieces out.
I removed, and removed, and removed staples. This involves not just repetitive motion that's rather hard on your wrists, but also hunching over to get at just the right spot; very bad body biomechanics. If you're trying to take something upholstered apart without destroying the underlying frame (and particularly without destroying the cloth, or in this case carpet), it takes a LOT of work.
(I really, really should have used a minimum of staples until was sure the project would work out. Ah, well, hindsight.)
Once the carpet was finally fully removed, it was simplicity itself to just remove the screws that secured the steps.
I left the bracing board on the back; I'll mention in in construction, though.
And now, ready to move into construction of the alternate version.
Step 2: Tools and Supplies
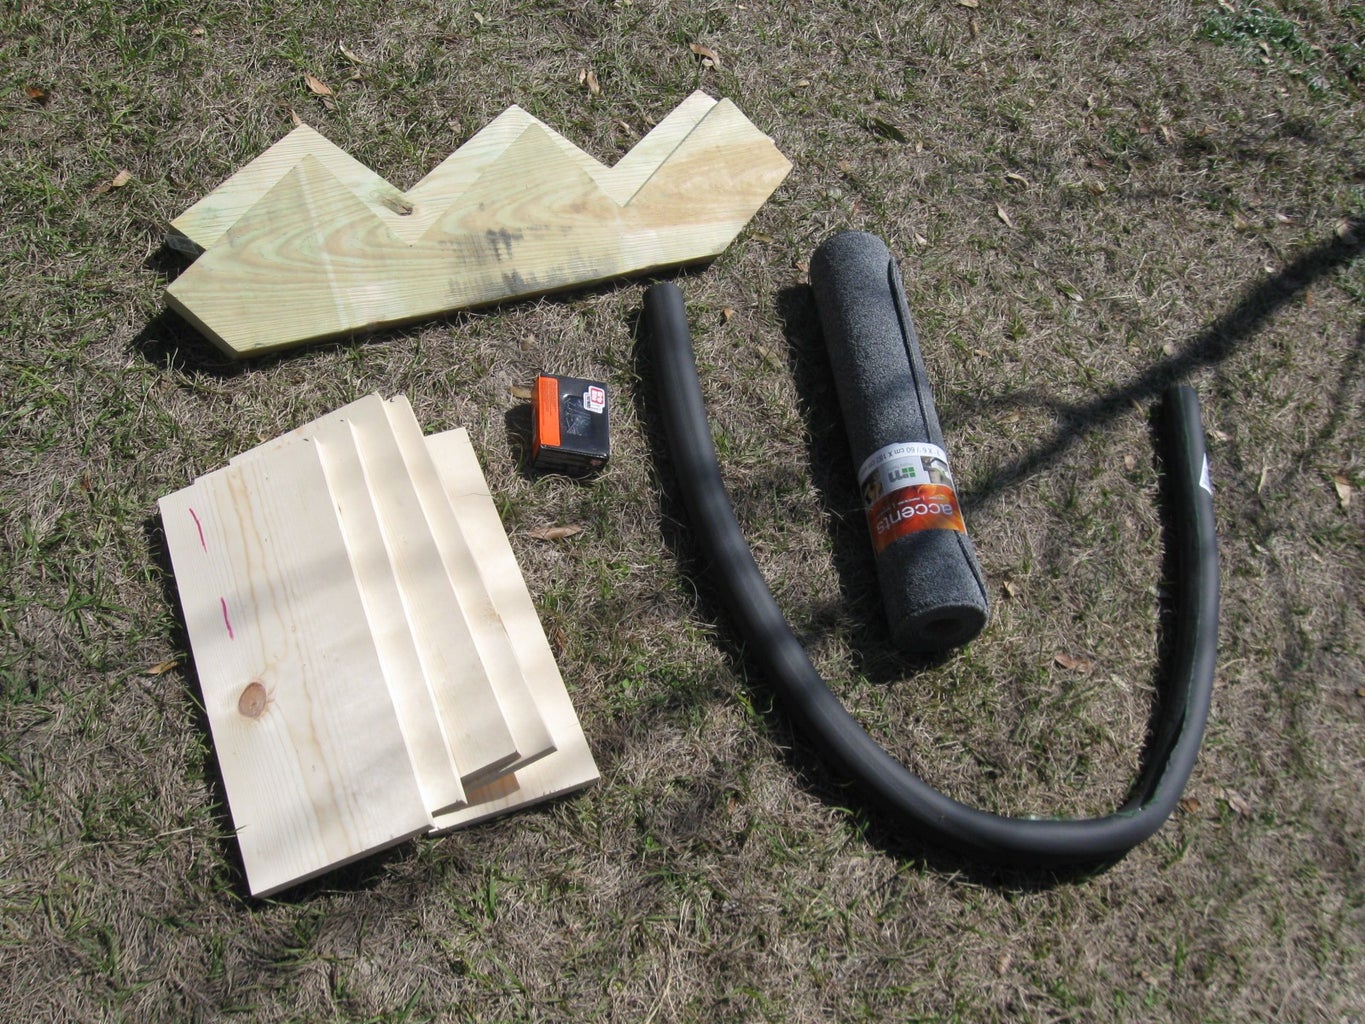


Supplies:
* (2) stair stringers (~$5/each) -- for the side of the stairs
* (1) 1"x10"x10' board, cut into 18" pieces (~$10) -- for steps
* (2) 5" corner braces (~$7) -- for added security
* (2) 7" corner braces *~$12) -- for handing the whole off the frame
* box of 1 1/2" screws (~$5)
* (4) 3" wood screws -- for the corner braces
* (4) 1/4" flat washers --for the screws on the corner braces
Optional supplies:
* a piece of pipe insulation; this piece is 1/2" rubber insulation, but it's expensive (~$6). could possibly use just regular insulation, about 1/4 the cost -- for padding the underside
* piece of runner carpet, 2'x6' (again, I got a somewhat expensive piece at $12, could be much cheaper) -- for traction on the steps
* About 5' of sturdy thread or light string (I used #92 nylon thread)
Tools:
* Drill
* Staplegun
* Scissors
* Measuring tape
* Pencil
* I had them precut my board at the store, but you might need a saw.
* Thick, sturdy needle if you're going to be attaching the carpet to the angle brace hangers.
Step 3: Construction


I had a board already attached across the back for stability (from previous construction). This also braced it so I could go ahead and attach the steps. If you're making from scratch, you'll want to add the bracing board at some point in this step.
I screwed on each of the 3 steps (the 12" long 1"x10" board), this time using the stringers as designed (more sloped, lower down). I used 4 screws (one at each corner) for the bottom and middle steps. I used only 2 screws on the top step, leaving the back side unattached. I'll get to that in a moment.
Then I used 5" corner braces to attach the top step really securely.
Step 4: Making It Hang Off the Bed Frame


Okay, here's where I needed to experiment to make sure it would fit well. I attached corner braces where the 3rd and 4th screws would have gone on the steps, with a gap to provide a hanger. These will hang off the bed from the corner braces. The padding will go under them to protect the wood of the frame.
First I used 5" corner braces. I attached the braces off the edge of the top step, sticking out and over. On each side (left and right), I wrapped them and the back of the stair stringer with a single piece of the pipe insulation. Since it's designed to go around pipe, it clings in place without needing extra attachment.
But to have room to go over our bed frame and have sufficient padding, the 5" corner brace only had room for one screwhole on the step. That's not enough. I considered using 4 corner braces, but it would still be more likely to crack the board than anything else.
So I got 2 8" corner braces, which allowed me to use 2 screwholes to hold it on. I also used 3" screws with washers (not the 1 1/2" screws I'd used for the construction) for added security.
After multiple checks of placement with padding to make sure it was fitting correctly, where I wanted to hang it, the overall construction was complete.
At this point, the project could be done (once tested to make sure it works for the dog). The finishing touch involves tacking on carpet for added traction, which my elderly dog does need.
Step 5: Carpeting


Again, I needed the carpet securely attached before I had the dog try it. This time, however, I only used enough staples to secure it in place before testing.
I laid the carpet across it and determined that I had enough to fold it across the bottom, cover each stair, and have a little over at the top.
I tacked it on with the staplegun, starting at the bottom and putting about 3 staples into each step.
Then I tested it, putting it in place and inviting the dog to climb it. And, fantastic, she found it easy and can climb right up into bed on it. Delightful.
So I finished tacking down the carpet, folding or cutting where necessary.
At the top, I cut next to the angle braces, leaving about 3" to the sides of the angle braces. I wrapped the middle part around to the underside of the top step, and stapled it down.
Step 6: Covering the Angle Braces


Here's a step that's solely for cosmetic purposes. It took all of five minutes, but you could just cut those pieces of carpet off instead.
I had a little wiggle room after I put in the larger angle braces, so I decided to wrap the carpet around them for a touch more padding and to make it slightly more visually appealing.
I took a long piece of thick thread and a heavy-duty needle. I pierced the carpet about 3/4" from the edge to keep it from tearing out. I left the original piece hanging loose (did not try to tie a knot and secure it, that wouldn't have worked).
I made a criss-cross stitch securing the carpet around the angle brace, first stitching up then stitching back.
Then I pulled the thread tight, and tied the loose ends together.
The angle braces hanging over the bed frame are now covered in carpet and look a little more finished, at least from above.
Step 7: Complete!


Again, for a finishing touch. I could have gotten slightly wider carpet (and wrapped around to the bottom) or spray-painted the stringers a color that matched the carpet. Or I could even have stained them a color that matches my bedroom furniture, I suppose.
I'm quite satisfied with it, however. It does exactly what I intended, and hopefully my senile old girl can be convinced to use it instead of hurting herself. The non-senile, not-quite-as-im


