

Introduction: Doggie Door Saver


If you've got a new car and a furry friend that rides shotgun this is for you.
I didn't have any luck finding a door protector online that I liked. Seemed like all of them involved sticking hook and loop to your door, was ugly, and did not tuck away easily. I wanted something that I could quickly hook in the gap between the door panel and window seal, store easily, and look good. So I decided to make my own.
Step 1: Planning Stages


The design I came up with was to drape 3 sections of material from 2 slices of aluminum sheet metal with the ends bent to make the hook. Reason I used the aluminum was because I had the pieces left over from a previous project. I annealed the aluminum with a torch to make it easy to make the bends as well as shaping the length of the aluminum to the door panel later.
Step 2: Measurements

To start I measured down from the window to armrest on both sides of door and connected the dots to get the angles, same thing with armrest depth. I applied those measurements to tracing paper and draped it on the door to make sure everything lined up.
Step 3: CAD and Cut


I've never sewn before so I chose to use my laser cutter to do the hard work for me. I threw my measurements in CAD making sure to add the extra material for joining the panels. Don't make the mistake I did and forget to mirror the back pieces if you want the smooth side out on the back. I then went array crazy with 1/16" holes for the stitching.
Step 4: Stitch Stich Stich


Since I had no experience with this part I watched a couple short how to videos. Luckily I premade the holes so it was pretty easy to get into the rhythm, I still ended up going back and redoing some of the starting areas though. There was a lot to do, so I used Star Trek Next Gen to keep me sane, I highly recommend it.
For the armrest part, I sandwiched in a few layers of 1mm EVA foam to give it some more protection.
Step 5: Adding the Hangers and Test.


This was the trickiest part. I slid the aluminum hooks into their pockets and hung it on the door to mark where I'll want the fabric to begin on them. Then marked the aluminum where the stitching holes rest and drilled out every one of them. I made sure to clean up all the edges and make it was smooth as possible so later I do not slice the thread. I sadly did not get a picture of the finished hangers before going into cover.
After the hangers were all stitched in I did some testing before finishing it off. It went smoothly, even seemed to give her better traction around corners.
Step 6: Finishing Up


During testing I noticed the corners curled up, so I slipped in some clothes hanger wire on the ends to keep them rigid.
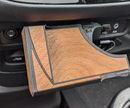
I finished it off with a strap and a random fastener I had laying around to keep it neat when not in use.
Now I have a cover to protect my door, look good, only takes a second to install, stores easily and allows me to use the window.
Thanks and enjoy.

Participated in the
Leather Challenge


