

Introduction: BigDog Murphybed and Fold-Up-Kennel


Update- Its been several days since I completely finished this project and am happy to say that Elwood loves his new bed. He loves having his very own piece of furniture to lay on.
Step 1: Materials and Tools You Will Need
Ok. As I said, I don't have a shop so don't feel like you will need one to to build this, its fairly simple and only a few power tools are necessary. Mostly what you will need is your creative mind.
- drill, cordless is nice but not necessary
- selection of drill bits for making pilot holes
- phillips head screwdriver
- table saw - if you don't have one a circular saw will work, at the very least a crosscut handsaw and lots of muscle
- a jigsaw
- yard stick and or tape measure
- T-square
- level
- 2 sets of pliers
- dykes (diagonal wire cutters)
- pencil and a sharpie
- compass
- sander and paper, or just paper
Materials needed might be subject to change depending on the size of your dog. Ellwood is about 70lbs, enough said! It should also be said that I used Pine because, besides the fact that its cheap, it blends in with my sisters low cost furniture. If you have hardwood furniture you might want to spring for a better quality of wood, Oak isn't too, too expensive.
- 1"x12"x 4 feet
- 1"x 6"x 18 feet 3- 6 foot boards
- 1"x 2"x 24 feet 3- 8 foot boards
- 1 4x8 sheet of 5mm sub-flooring plywood. You can use thicker wood if you want but you won't need it, and it will only make your finished product really heavy.
- 1 4x8 sheet of remesh. Its a sheet of wire grid used to reinforce poured concrete. We'll use it for the cage. There are many other options for cage material at the hardware store. I liked the 6"x6" grid that this has, and it was only about $8.
- 2 - 1 1/2" lag bolts and nuts
- box of 1 1/2" woodscrews
- box of 3/4" woodscrews
- 8 L-brackets
- box of plastic "cable mount" brackets
- 2 hinges, any style or color
Step 2: The Cage Frame


We'll start with the rear section of this piece, which will house the fold-up cage and support the fold-down bed. Grab one of your 1"x6" boards and cut two 30" pieces. Cut your 1"x12" down to 42". We'll be building the bed and cage 3 feet wide, so measure 3" in from each end of your 1"x12" and mark each. Attach an L-bracket on each mark, and then a 1"x6" to each L-bracket. they should be flush with one side of your 1"x12", and we'll call this the "back side". You should now have two "legs". Measure and cut a 3 foot length of 1"x2", and secure it near the bottom of the legs, flush with the "backside".
Now cut 2 -13" pieces of 1"x6". Attach one to the end of each leg of your frame, on the outside of each leg. They will be perpendicular to each leg, forming "feet" at the bottom. Use your T-square when lining these up, so your frame will stand up nice and straight. Now stand it up and use your level to verify that it stands level, make adjustments as needed.
Step 3: The Bed Frame


Ok, now we will make the bed frame. Cut two 29" lengths of 1"x6" and a 36" length of 1"x6". Use your compas and draw a round end on each 29" board, cut these round ends with your jigsaw. Attach a 29" board at each end of the 36" board using L-brackets.
Step 4: Create a Hinge


Now we will want to join the Bed frame with the Cage frame. Drill a hole through the center of the rounded ends of your Bed frame, large enough to accomodate the lag bolts you have. Measure and drill corresponding holes on the "feet" of the Cage frame. Make sure to measure for a 1/4" gap between the Cage frame legs and the Bed frame legs. Use your 1" hole saw to make countersink holes, so that the lag bolt head will sit flush. Use your lag bolts to join the two frames. Don't over tighten the bolts, we want to allow some movement.
With this, youre basic frame should be complete and fit together nicely.
Step 5: Cut the Back

OK, we'll seal up the back side now. Expose the back side, measure and cut a piece of the 5mm plywood to fit. Attach the plywood.
Step 6: The Bed Support


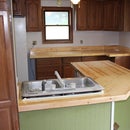
As you've seen from the pictures of my finished product, there is a nice looking wooden grid on the front. As well as looking nice, this grid also supports the bed where your dog will be laying. The design of this support is up to you, make your own unique pattern. What ever you choose to do, make sure it will be appropriately supportive for the size of your dog. The pattern shown is strong enough to hold me at 150lbs, even with the 5mm plywood. I recommend notching your wood at each intersection, as this adds a great deal of strength. This can be done very easily by setting the depth of your tablesaw blade (or circular saw) to half the depth of your wood, and making multiple cuts. You can see the many cuts I made in one of the pictures.
When your supports are cut and fit together, attach the structure to the front of your Bed frame.
Step 7: Cut the Front


When your supports are securely attatched to the Bed frame, measure and cut a piece of plywood to fit the inside of your Bed frame. Secure that to the supports.
At this point, you should have a fold down bed frame ready for a nice plush doggie bed.
Step 8: Fold-up Cage


To attach the fold up cage, we'll use two hinges. they can be any style you wish. Mark a line on the underside of the 1"x12", from leg front to leg front. Attach the hinges, oriented as shown, near each leg. You want the free side of the hinge to swing forward and up. Now measure and cut your last piece of plywood to fit. It should be roughly the same size as the front piece of plywood. Attach this piece of plywood to your hinges. You will want to attach it to the back side of the hinge; in other words, when the board is hung, you should still see the hinges.
Now you're ready to measure and cut the cage material. Whatever you have chosen to use, you will need two side pieces, a front piece, and two doors. Make sure the door opening you cut is large enough for your dog. I used Cable anchors, the little plastic things you secure audio/ video cable to the wall with, as hinges; see pictures.
Because there are so many choises of cage material to use, I have basically just given you some pictures of how mine works and how it's secured to the plywood. Depending on what you use, you may have to be a little creative when putting yours together. You can do it!
Step 9: Catch Release


I came up with a very simple way to secure the cage material to the plywood while its folded up. I used a wooden hook to support the folded up cage, attached to a knob on the other side of the plywood. When you want the cage to open up, simply turn the knob, which turns the hook out of its supportive postion.
Step 10: So, Hopefully I Have Instructed You Well Enough That Yours Works Like This

I have left you with a lot of room for personalization in this instructable, but I think I have layed out how the basic design goes together. With a little tweeking of your own, yours should work like mine does in this short video. I would be very happy to answer any questions you might have, should you choose to construct your own. Good luck and thanks for reading.
Can't seem to figure out how to upload my video, can anyone help?
Step 11: Finish the Wood
Finishing the wood will be a personal preferance. As I said earlier, this project is supposed to help your pets needs blend in with your house. If you have nice hard wood furnishings, a matching stain and polyurethane will look great; painted walls and trim, a painted finish. My sister asked for a solid black finish to match some shelves I made for her some time ago.
Step 12: The Bed


Basically, i made a big pillow case. It will hold any kind of padding, and is easily washable. An unused comforter/ blanket makes great padding and is also easily washable. I used stick-on velcro on the inside of the bunk, and its matching piece sewed to the pillow case, to keep the bed in when its folded up.

Participated in the
ShopBot Challenge

Participated in the
Furniture Challenge


