

Introduction: Doodle Bot With Design Process


Hello educators and technology fans. This instructable includes instructions on how to build a doodling robot in your classrooms and at home. I used the engineering design process as a way to organize the creativity of the students. There should be a special point made that there is no right or wrong. The purpose is to plan, design, re-plan, redesign, build, fail, rebuild, redesign...... and on and on. The constant improvement and problem solving is the greatest strength of this project. The gears of the design process are meant to show how each step is constantly being used during the project and they all influence each other.
Step 1: Engineering Design Process

The overall goal for this project is to teach the Engineering Design Process. The steps shown may look similar to the scientific method but there are a few upgrades. The scientific method, which is slowly being faded out, is a straight path to the finish line. It is a step by step guide to testing solutions to a problem. The major issue is, there is little room to readjust as you go. The results are my hypothesis is correct or not correct. The Engineering Design Process allows multiple paths to reevaluate and adjust the project. Even if the solution to the problem is a good one, you can go back to the middle of these steps and alter the outcomes. Constant brainstorming and redesigning!!!!
Step 2: State Problem, Specify Requirments, and Some Background

Problem and Goals
There can be more than one problem to solve or goal to achieve in these types of projects. I would take the first day or time slot of class to explain the design process and overview the entire project. Set the tone for the next couple days. This is not meant to be a race or a competition. Failure is encouraged and often the most exciting part. There is no being done, redesign multiple times and keep adding to the robot. Some of the main objectives would be:
1. How can we design a drawing bot with these materials
2. How can we use the Engineering Design Process for this goal
3. How can we work in groups collaboratively to achieve a common goal
Specify Requirements and Background
The background research here is minimal. Your explanation of the project serves as most this information. If you wanted to spend extra time explaining how a battery or a simple circuit works that would be great. It is not needed to build this robot but will give the student a deeper understanding. The most important part is specifying their requirements and limitations. The Parts you will use are what we are looking for here. You will need a battery pack and a DC motor for sure (cheep on amazon). Next you will need cups tape and markers but this is all adjustable. Tell the students how much time they will have also.
Step 3: Brainstorm and Develop a Solution


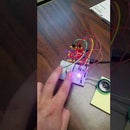
This is where the creativity begins. I think this should be done several ways to keep redefining the ideas each student may have. You could first have them alone with a pen and paper drawing anything that comes to mind. have them put their initial thoughts down and start to imagine what they would like to do. Next i would put them in small groups and have them share their ideas. They should look for comments and suggestions to help improve their idea. Other students may get inspired by something said and come up with a completely new thought. This could turn into a whole class discussion where ideas are flying around. I think small groups work well for this project so students with similar visions may want to work together. Be Flexible!!!! The pictures above show two possible ways to attached the battery pack. First problem and solution they can constantly overcome.
Step 4: Develop Prototype


Now the students can start to build their 1st, 2nd, 3rd attempts at the design. You will run into multiple problems which need to be rethought and redesigned. Making sure the makers are at a good length and the robot is balanced is very helpful. Make sure students are willing to start fresh and remove some tape. The only real requirement is that the black and red wires get attached to the copper tips of the motor as shown. This can be soldered together in a more advanced class with a soldering gun available. I also added an eraser to the spinning part of the motor to make it unbalanced. This causes the shake in the Bot and is actually very similar to how a cell phone vibrates. Experiment with different erasers and other items and shapes. This falls off often and is another problem to solve.
Step 5: Test, Redesign, Retest, Improve.......
Now the students can start testing their design and seeing the strengths and weaknesses. adjustments should be made to make the robot stand and move. Changing the legs slightly may produce a whole different drawing pattern. Add more legs or put the motor in a different position. The possibilities are endless and its encourages to find them all. Send the students back up to the brainstorming stage if they think they are done and have them over complicate their solutions. Hopefully the students take away a lot of excitement and ownership after this project. Please get in touch with any comments or questions

Participated in the
Make It Move Contest 2017

Participated in the
Teachers Contest 2017


