

Introduction: Dragon Hands


My daughter is already planning for Halloween this year and mentioned going as a dragon. As a 3D Printing dad, I couldn't just stand by.
In this instructable I'll show how you can 3D print items integrated with a mesh material (no glue required) allowing you to create all sorts of interesting things that can be integrated as costume (think Halloween or Cos Play)
Credit where credit is due, I did not invent this technique. I'm just using it. The first time I saw this was at MRRF 2018 (Midwest Rep Rap Festival) where it was applied (and possibly invented) by David Shorey at Shorey Designs.
The principal is fairly simple: You print one or 2 layer as usual, you then pause the print, apply some sort of mesh and continue printing. The next layers will bond with the layers below the mesh creating a strong integrated print and fabric "thingy".
For this instructable I use Slic3r for creating the g-code. Programs like Simplify 3D have more sophisticated ways of manipulating g-code but what I show here should apply to any g-code (regardless of slicer).
For this instructable, It is assume that you know how to use slicers and how to 3D print.
Step 1: Items Needed


For the dragon hand, only required a few extra items beyond the usual 3D printing things.
Tulle which is a nice material mess that is very well suited for this process. The mesh allows the top layer of plastic to bond with the layer beneath.
You can find Tulle at your local Walmart or you can buy it here: https://amzn.to/2QiUIiB
Elastic cord for the wrist pieces which can be found at local crafting stores or you can buy it here: https://amzn.to/2Qmxnwh
A design to print. In this instructable I'm using my own custom design which can be found here: https://www.thingiverse.com/thing:3096734
If you want to go with something more generic you can check out this link: https://www.thingiverse.com/thing:2788805
Step 2: Creating the G-code


I personally use Slic3r for my 3D printer slicing needs but this process can be repeated for sliced code from other slicers (like Cura, of S3D).
The Dragon hand is printed as two separate as one part requires the Tulle integrated and the other part does not (the wrist pieces).
The slicing process is normal as any other print but there are a few things to take not off. This hand was designed for my 10 year old daughter. If you want to do this for an adult hand you will have to re-scale. For reference the inner diameters for the fingers are as follows:
- Pinky 15.8mm
- Ring Finger 17.8mm
- Middle Finger 19.8mm
- Index finger 17.8mm
if your index finger measures 21mm then scale this print 21/17.8= 1.18 (in case of Slic3r 118%). I haven't personally scaled this yet so experiment with it.
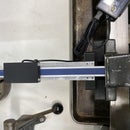
Next you need to take note of a couple of settings in order to find where to insert the "pause" code into the g-code file.
- First Layer height
- subsequent layer heights
- z-offset
In my slic3r the settings are as follows:
- First Layer: 0.3mm
- Subsequent layers: 0.2mm
- z-offset: -0.15mm
Based on this information I know what z-height to look for in the generated g-code file
0.3+0.2+0.2-0.15 = 0.55
In the g-code I need to search for the first reference of :
G1 Z0.550
above that line I insert the following code
;this is where it's supposed to pause

G92 E0
G28 Y0 X0
M300
M25
; wait for resume
G92 E0 will reset the extruder to 0 (most likely already done prior but can't hurt to repeat.
The G28 X0 Y0 will bring the extruder home so I have room to add the Tulle over my print in progress
The M300 will make a loud beep getting my attention
M25 will pause the print and it would resume until I press the Resume Print on my display.
Step 3: Printing the Dragon Hand

Don't worry, you only have to stick around for the first two layers. After the Tulle has be put in place you can let it run its course.
Technically when it automatically pauses it will remain in that state for as long as you want it to but letting the extruder sit at full temperature might mess with the filament in the chamber. What I'm trying to say is no need for hurry but don't let it pause for 2 hours.
Before starting the print (or while it is printing the first two layers) cut a piece of Tulle that will span the width of the bed. Have it along with 4 binder clips (blue painters tape might work too).
When the print pauses and the extruder/hot-end has moved out of the way apply the tulle on top of the print and attach it to the bed. Make sure it's not too loose but also not to tight (don't stretch it as it will pull all the pieces together when done.
When the Tulle is in place simple dial to the Resume print on your LCD and let it go. You can keep an eye on the next layer but at this point there is little left to do than let the print finish.
Step 4: Printing Bracelet Pieces


Only one arm segment is attached to the actual hand via Tulle.
The other pieces (3 of them) are connected with elastic cord.
Cut three pieces of cord of sufficient length to weave though the holes of all 4 pieces and put around a arm (of recipient preferably) and tied the elastic cords with some tension to them.
With a little bit of dexterity you can hide the knots underneath the bottom arm piece.
and there you have it. A dragon hand worthy of Comic Con.
If you want to do both hands repeat 2 through this one but before generating the g-code select mirror around X-axis in the slicer.

Participated in the
Halloween Contest 2018


