

Introduction: Drill Press Table / Pillar Drill Guide


00:04 This odd shaped piece of ply was my original attempt to fix the base of the mitre saw. It didn't work particularly well and you can see me taking if off in this video (http://youtu.be/CoFJlf4bxSM) and replacing it. I now have no need for this piece and began this build by cutting and squaring, using the homemade table saw sledge.
00:37 I take another piece of scrap which happens to be a little thicker then the base and square one edge. Placing the smaller piece upon the larger, with the squared surfaces against the sledge fence I mark the length and cut.
00:57 Now I cut this piece square. This will become the back fence to the table.
01:31 I wanted to attach an extraction hose adaptor for those jobs which create a lot of dust. After working out the angle by eye, I set the bed to the desired angle and used a forstner bit to drill the hole out.
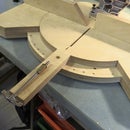
02:21 To expand the working surface I drill a semi circle out, a little larger than the size of the pillar post so the bed can be pushed a little further back on the machine.
02:33 I estimate roughly the travel distance of the fence, marking after I use an engineer's square. I check the measurement afterwards with a tape.
02:52 I routered two grooves on the bed.
03:18 After drilling into the base of the fence I inserted two insert nuts. Passing two threaded knobs in the slots and tightening to the bottom of the fence. Because this is only a hobby pillar drill I am working with quite small scales, I wanted to reduce the depth of the fence allowing for a greater travel.
03:44 Checking it is all square.
04:00 The inner diameter of the opening on the original pillar drill bed is 20mm and just fits this forster bit. I will use this to help me centre the table later.
04:18 Lining up the two holes of the wooden and metal beds, based upon the forstner bit in the drill chuck, I trace underneath where I will fix the two together.
04:24 For drilling while the fence is closer to the centre of the chuck, I decided to cut a semicircle out to fit the chuck head when plunged downwards. I tried to do this by clamping the fence at first but realised I had to use the threaded knobs from underneath gripped more firmly.
04:45 I cut part of the right hand side of the fence to allow the arms of the pillar drill to swing.
05:01 Cutting the threaded knobs using the portabe bandsaw cutoff saw (see video http://youtu.be/aKdkAs482Po).
05:17 Fitting the insert nuts to the underside of the table. I actually cocked this up and had to refill the old and drill new holes when one insert nut broke off.
05:32 Cutting out some blocks to use to set the wooden table against the metal one.
05:47 After setting up the table how I would expect to find it I glued the three blocks around the metal table and clamped them in place. Once dried I drilled this to ensure they don't move.
7:02 I inlaid some 6 inch ruler into the bed. They are like go faster stripes. After routering the groove I used solvent free glue to set them into the table.
09:00 Cut of the excess rulers.
09:18 To give me an option of fence height, I added a couple more insert nuts to the rear side of the fence.
09:50 Testing everything out.
I decided not to add a sacrificial scrap to the table because I imaged I could always use a piece of scrap on the bed. Maybe after a few month when I get an idea of how the table is used, I may add one.


