

Introduction: Duct Tape Dress Form


I sew a lot of clothes for myself and am sick of taking things on and off to see if it fits only to find that it needs more darts under the bust of needs to be taken in 5 inches at the sleeves.
Measurements are essential to sewing clothes, but they don't account for a lot (I always forget about butts when sewing pants).
This gave me the idea to get a dress form, but I'm fairly small and my dimensions weren't exactly on pre existing forms. Now what?
I had seen people make their own duct tape dress form before but there were no directions and only pictures. Well, it turns out it was pretty simple and I'm here to share my dress form adventure with you! I'll be showing you how to make a dress form with your unique measurements that's cheap, easy, and doesn't look too shabby!
Step 1: Materials

This project is super simple and only needs a few things! Here is what you'll need:
- A old t shirt you are okay sacrificing
- A ton of stuffing or newspapers
- Saran wrap (you don't need a ton)
- Duct tape (you do need a ton)
- I used two small rolls of designed tape and part of a normal silver roll
- A good friend. You'll need a friend to help tape you and make sure to choose someone you're close to because they will be touching you a lot. I recruited my college roommate to help.
Step 2: Saran Wrap Yourself


First off, remember that this is going to be your measurements, so don't try to suck in or push out your tummy.
Ladies, if you know you are going to have some extra padding in whatever you are making or are concerned about duct tape flattening out your chest, wear two bras.
Anyway, back to business. Start off by wrapping yourself in saran wrap to where you want the dress form to end. I stopped it right below my butt. I then took extra saran wrap and covered my neck a little more and held that wrap in place with a few small pieces of duct tape as shown above.
Step 3: Start With the X
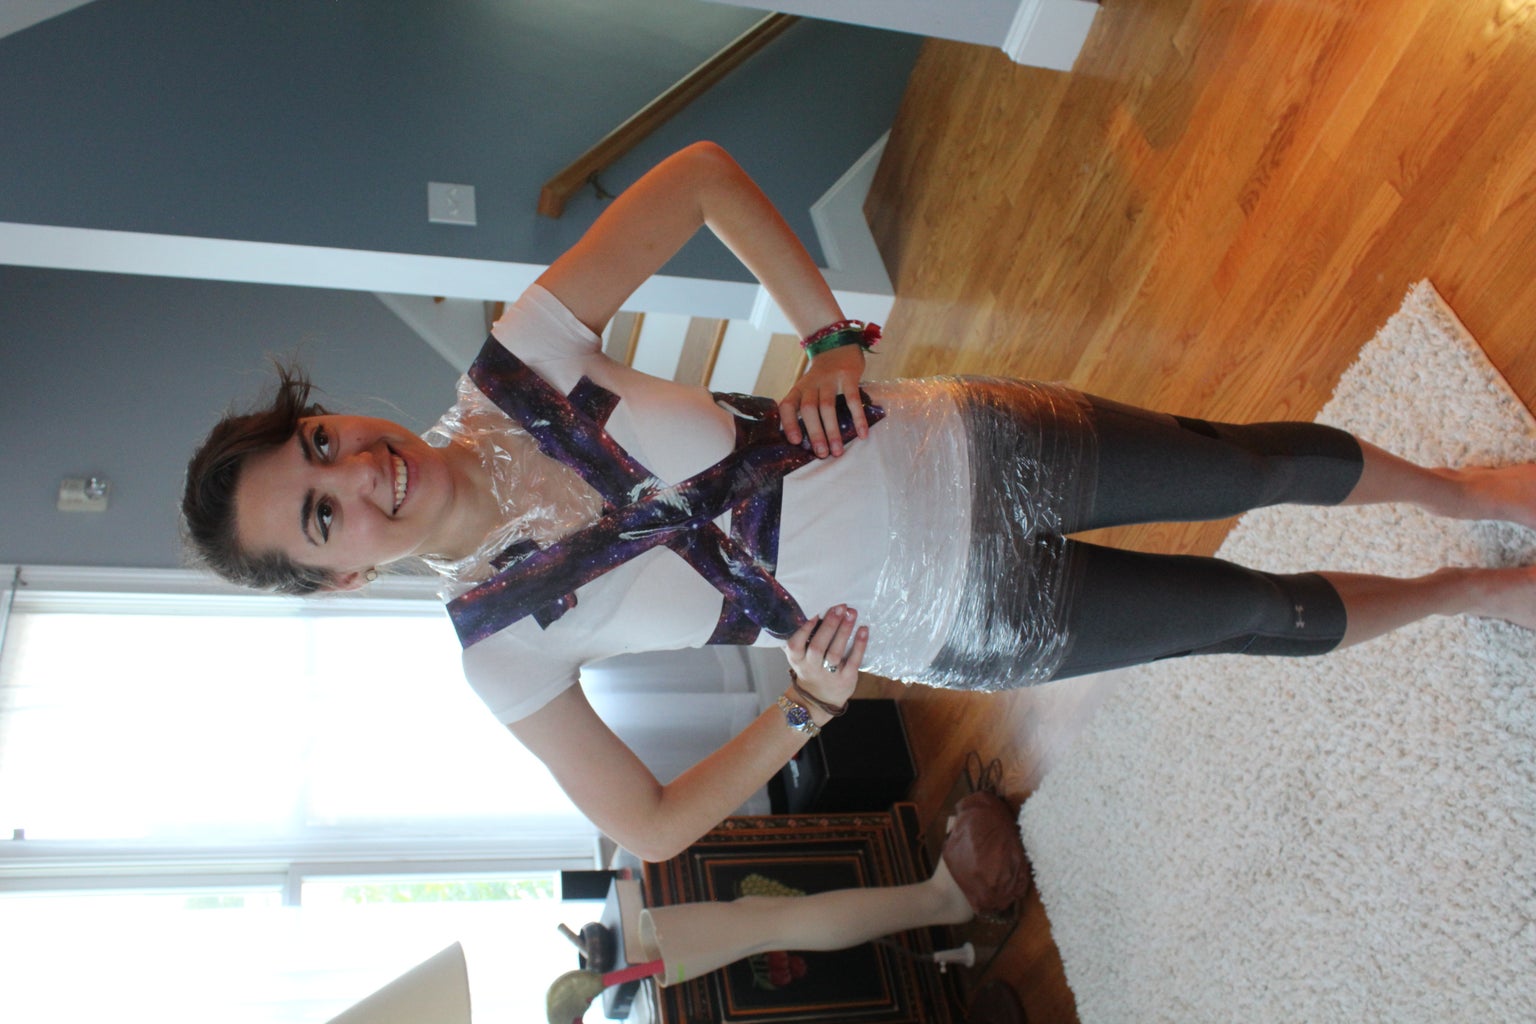

Start off with an easy cross in the front of your chest and begin taping around, making sure to get all the contours.
It doesn't matter if you tape from top to bottom or whatever direction, just cover ever area with tape so it becomes slightly rigid.
Step 4: Progress


At this point we ran out of my cool galaxy tape. Luckily my friend is creative as well and was able to make a space age looking dress looking thing with the silver duct tape we still had.
Now on to the arms and neck!
Step 5: Finished Taping


All areas were taped off!
I left a little cap for the sleeve that lets me know how sleeves will hang off, and I taped a little up the neck for a collared shirt.
Also note the hair: baby hairs like to get caught in duct tape so make sure all your hair is up and out of the way of the tape.
Step 6: Waist Band


Although the dress form is now your measurements, it's not you and it can be hard to find where your hips start.
By bending to the side, I was able to find my hips by the creases in the form (this found the hips as my body moved with the form, not just me pointing to them with my hands). We places a skinny piece of duct tape here to mark this as my hip line.
Step 7: Cut the Back

Using some sharp scissors, have your friend carefully cut the dress form off of you. It might be hard at points as you are cutting through tape an t shirt.
Slip the form off and go change shirts again.
Step 8: Tape Up the Back and Stuff.


I used a strip of plain duct tape down the back to cover where the dress form was cut off of me. I also taped shut the neck and arms so everything but the bottom was closed and covered.
I then filled the form with stuffing until it was fairly sturdy. Too little stuffing might not fill out your form fully and give you incorrect measurements. When your form is stuffed, cut out a cardboard oval and duct tape that to the bottom of the form to fully close the dress form.
Step 9: Done!

Congrats, you now have a dress form that is perfectly your size for so much cheaper than an inaccurate store bought form.
If you want your form to look nicer, consider covering it in fabric or paper mache and painting it!
Enjoy your dress form, thanks for reading, and happy crafting!

Participated in the
Makerspace Contest


