

Introduction: ESP32 LoRa With Arduino IDE: Send and Receive TX RX
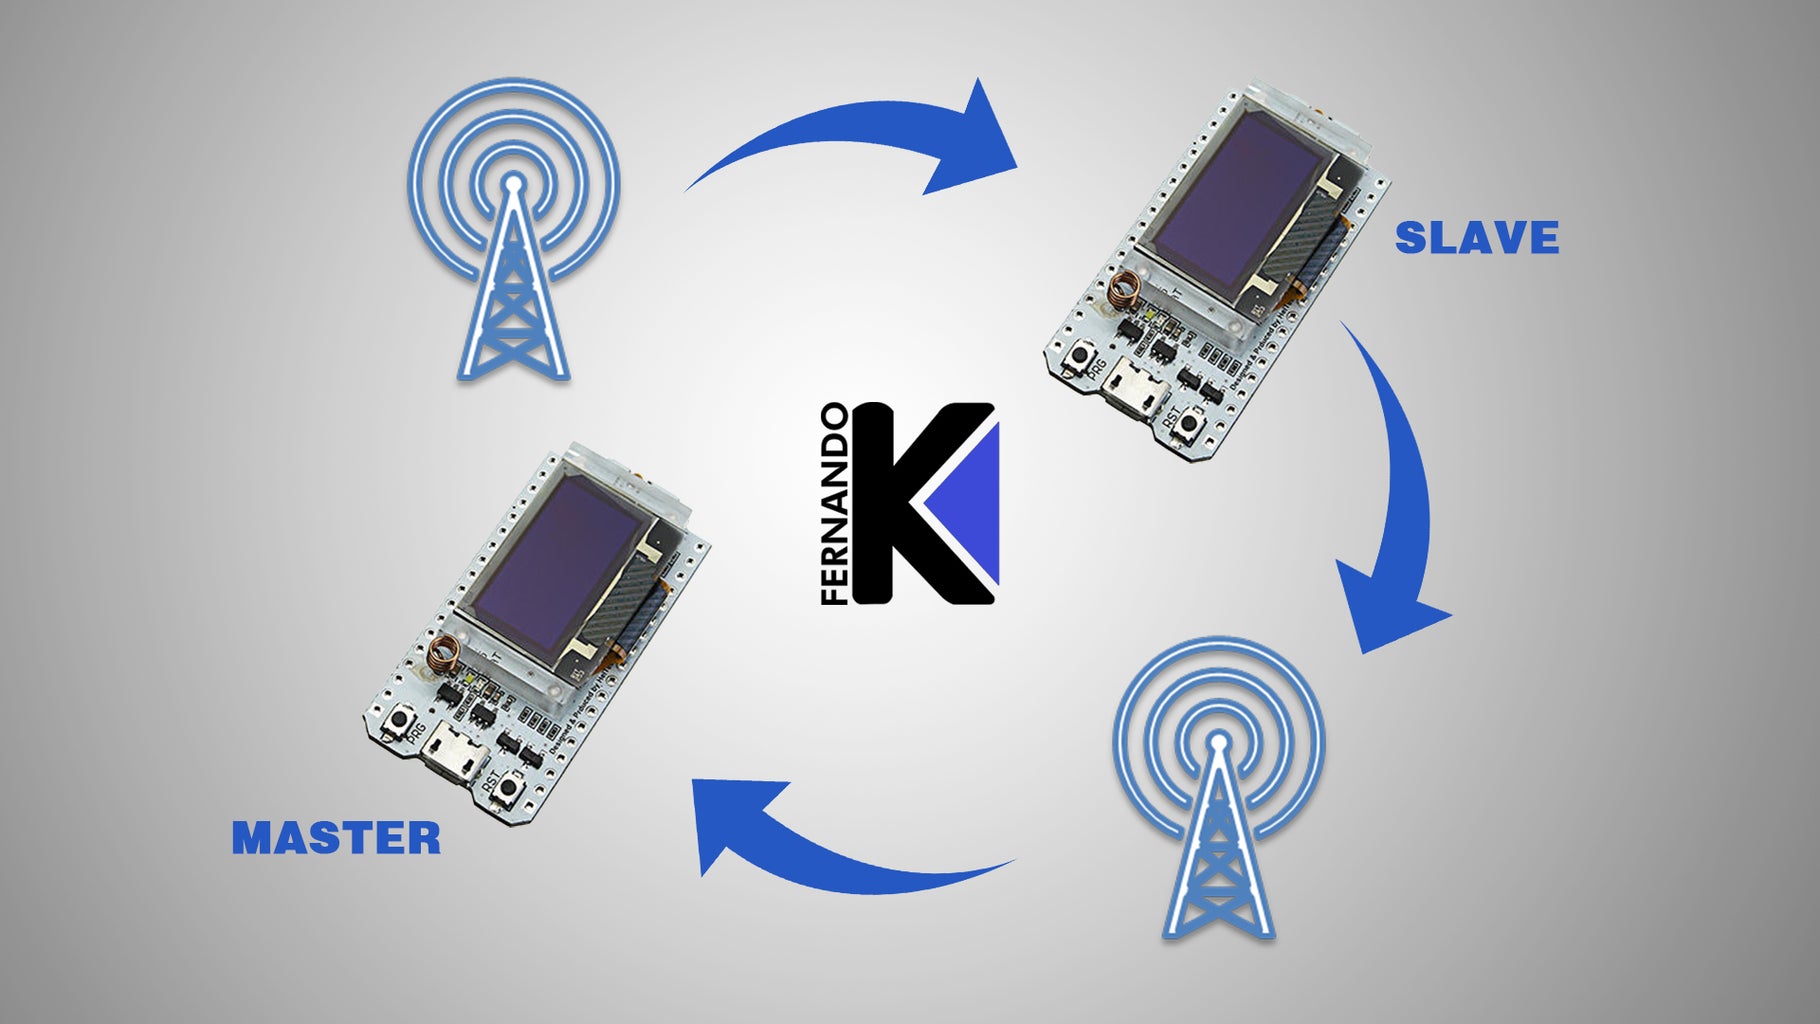


Following suggestions from my YouTube channel’s followers, we will talk about the ESP32 LoRa again today. However, this time we’ll discuss sending and receiving data by the same device. In this situation, an ESP32 LoRa, the Master, will send a packet warning that it wants to receive the data, while another device, the Slave, will wait for the command to send the data back to the Master. This is unlike other videos I've done that featured an ESP32 LoRa as Sender and another as Receiver, as today we will have the same device, the Master, that will send and receive data.
Step 1: LoRa ESP32 Pinout

Here is the PinOut of ESP32 LoRa. It is important to remember that whenever we use this model, it is already using its SPI ports. The pins that are already being used by the LoRa chip are in the image where I put the red arrows, which is below the display.
Step 2: Communication

I show here the working scheme of our project, in which the Master sends a data packet to the Slave, which sends this information back to the Master, a cycle that continues to be repeated in an infinite loop.
Step 3: Demonstration
You can see in the video the two chips exchanging information.
Step 4: Source Code
LoRaSendReceive.ino
At first, we'll include the libraries and set the GPIO destinations, as well as the radio frequency. Also, let's create constants to tell the Slave about the data jobs. In this step, we also have a variable to control the display.
#include <SPI.h>
#include <LoRa.h>
#include <Wire.h>
#include <SSD1306.h>

//Deixe esta linha descomentada para compilar o Master
//Comente ou remova para compilar o Slave
// #define MASTER

#define SCK 5   // GPIO5  SCK
#define MISO 19 // GPIO19 MISO
#define MOSI 27 // GPIO27 MOSI
#define SS 18   // GPIO18 CS
#define RST 14  // GPIO14 RESET
#define DI00 26 // GPIO26 IRQ(Interrupt Request)

#define BAND 433E6 //Frequência do radio - exemplo : 433E6, 868E6, 915E6

//Constante para informar ao Slave que queremos os dados
const String GETDATA = "getdata";
//Constante que o Slave retorna junto com os dados para o Master
const String SETDATA = "setdata=";

//Variável para controlar o display
SSD1306 display(0x3c, 4, 15);
LoRaSendReceive.ino - setupDisplay
In this first setup, we will deal with the configuration of the display.
void setupDisplay(){
  //O estado do GPIO16 é utilizado para controlar o display OLED
  pinMode(16, OUTPUT);
  //Reseta as configurações do display OLED
  digitalWrite(16, LOW);
  //Para o OLED permanecer ligado, o GPIO16 deve permanecer HIGH
  //Deve estar em HIGH antes de chamar o display.init() e fazer as demais configurações,
  //não inverta a ordem
  digitalWrite(16, HIGH);

  //Configurações do display
  display.init();
  display.flipScreenVertically();
  display.setFont(ArialMT_Plain_10);
  display.setTextAlignment(TEXT_ALIGN_LEFT);
}
LoRaSendReceive.ino - setupLoRa
Here, we’ll look at the initial LoRa settings.
//Configurações iniciais do LoRa
void setupLoRa(){
  //Inicializa a comunicação
  SPI.begin(SCK, MISO, MOSI, SS);
  LoRa.setPins(SS, RST, DI00);

  //Inicializa o LoRa
  if (!LoRa.begin(BAND, true)){
    //Se não conseguiu inicializar, mostra uma mensagem no display
    display.clear();
    display.drawString(0, 0, "Erro ao inicializar o LoRa!");
    display.display();
    while (1);
  }

  //Ativa o crc
  LoRa.enableCrc();
  //Ativa o recebimento de pacotes
  LoRa.receive();
}
Step 5: Master.ino
In this part, we work with the configurations that involve the Master, configurations on the compilation, the interval between shipments, and the time of the last shipment.
//Compila apenas se MASTER estiver definido no arquivo principal
#ifdef MASTER

//Intervalo entre os envios
#define INTERVAL 500

//Tempo do último envio
long lastSendTime = 0;
Master.ino - setup
Here, we call up the initial display and LoRa settings.
void setup(){
  Serial.begin(115200);
  //Chama a configuração inicial do display
  setupDisplay();
  //Chama a configuração inicial do LoRa
  setupLoRa();

  display.clear();
  display.drawString(0, 0, "Master");
  display.display();
}
Master.ino - loop
In this Loop, we define the sending of the package to inform the Slave about our preference to receive data, and also check if there are packages to be received.
void loop(){
  //Se passou o tempo definido em INTERVAL desde o último envio
  if (millis() - lastSendTime > INTERVAL){
    //Marcamos o tempo que ocorreu o último envio
    lastSendTime = millis();
    //Envia o pacote para informar ao Slave que queremos receber os dados
    send();
  }

  //Verificamos se há pacotes para recebermos
  receive();
}
Master.ino - receive 1/2
We run an attempt to read the package, check if it has a minimum expected character size, and store the data in a string, which must have what is contained in "SETDATA.”
void receive(){
  //Tentamos ler o pacote
  int packetSize = LoRa.parsePacket();

  //Verificamos se o pacote tem o tamanho mínimo de caracteres que esperamos
  if (packetSize > SETDATA.length()){
    String received = "";
    //Armazena os dados do pacote em uma string
    while(LoRa.available()){
      received += (char) LoRa.read();
    }
    //Verifica se a string possui o que está contido em "SETDATA"
    int index = received.indexOf(SETDATA);
Master.ino - receive 2/2
Now, we retrieve the String that is after the "SETDATA,” which, in this case, is the data we’re interested in. We also analyzed the time it took for the Master to create and send the package, and how long it took for the Slave to receive, read, create a new package, send it, and also for the time it took to be received again by the Master. We then display the data, and the time the operation required.
if(index >= 0){
      //Recuperamos a string que está após o "SETDATA",
      //que no caso serão os dados de nosso interesse
      String data = received.substring(SETDATA.length());
      //Tempo que demorou para o Master criar o pacote, enviar o pacote,
      //o Slave receber, fazer a leitura, criar um novo pacote, enviá-lo
      //e o Master receber e ler
      String waiting = String(millis() - lastSendTime);
      //Mostra no display os dados e o tempo que a operação demorou
      display.clear();
      display.drawString(0, 0, "Recebeu: " + data);
      display.drawString(0, 10, "Tempo: " + waiting + "ms");
      display.display();
    }
  }
}

#endif
Step 6: Slave.ino
Starting the Slave code, we compile only if the Master is not defined in the main file. Here, we have the Counter that will act as the data that the Slave will send.
//Compila apenas se MASTER não estiver definido no arquivo principal
#ifndef MASTER

//Contador que irá servir como o dados que o Slave irá enviar
int count = 0;
Slave.ino - Setup
In Slave Setup, we call up the initial display and LoRa settings.
void setup(){
    Serial.begin(115200);
    //Chama a configuração inicial do display
    setupDisplay();
    //Chama a configuração inicial do LoRa
    setupLoRa();
    display.clear();
    display.drawString(0, 0, "Slave esperando...");
    display.display();
}
Slave.ino - Loop 1/2
Just like in the Master, in this part of the Slave Loop, we execute an attempt to read the package, check if it has the expected number of characters, and store the data in a String.
void loop(){
  //Tenta ler o pacote
  int packetSize = LoRa.parsePacket();

  //Verifica se o pacote possui a quantidade de caracteres que esperamos
  if (packetSize == GETDATA.length()){
    String received = "";

    //Armazena os dados do pacote em uma string
    while(LoRa.available()){
      received += (char) LoRa.read();
    }
Slave.ino - Loop 2/2
Now, we simulate the reading of the data. We create the package, finalize it, and send it. Finally, we display the information on the display.
if(received.equals(GETDATA)){
      //Simula a leitura dos dados
      String data = readData();
      Serial.println("Criando pacote para envio");
      //Cria o pacote para envio
      LoRa.beginPacket();
      LoRa.print(SETDATA + data);
      //Finaliza e envia o pacote
      LoRa.endPacket();
      //Mostra no display
      display.clear();
      display.drawString(0, 0, "Enviou: " + String(data));
      display.display();
    }
  }
}
Lastly, here is a function to read the data you want to send. It could be the value read by some sensor, for example. Here, in our project, we will send only one counter for tests, but you can change the function to read the data of your preference.
//Função onde se faz a leitura dos dados que queira enviar
//Poderia ser o valor lido por algum sensor por exemplo
//Aqui vamos enviar apenas um contador para testes
//mas você pode alterar a função para fazer a leitura de algum sensor
String readData(){
  return String(count++);
}

#endif


