

Introduction: Easy Cold-Brewed Coffee


If you haven't heard of cold-brewed coffee, it is exactly what it sounds like...coffee that you brew using cold water instead of hot. Why, you may well ask, would anyone want to do that? You can Google it and find out far more than I could tell you about it. For me it was because I needed to reduce the acid content of my coffee (I love my coffee but do not like the heartburn afterward), and this seemed to be a means to that end. Less acid, and a great tasting cup of coffee!
I did a lot of research as to how to do that. Of course there are things you can buy to facilitate doing this, and I have tried a couple of them. They work great, but like anything else over time they need maintenance. I got to the point where I needed to buy replacement parts for one of my units, and I decided there had to be an easy way to do this using stuff I basically already had around the house or could easily get locally...after all you are just soaking coffee in water, right?
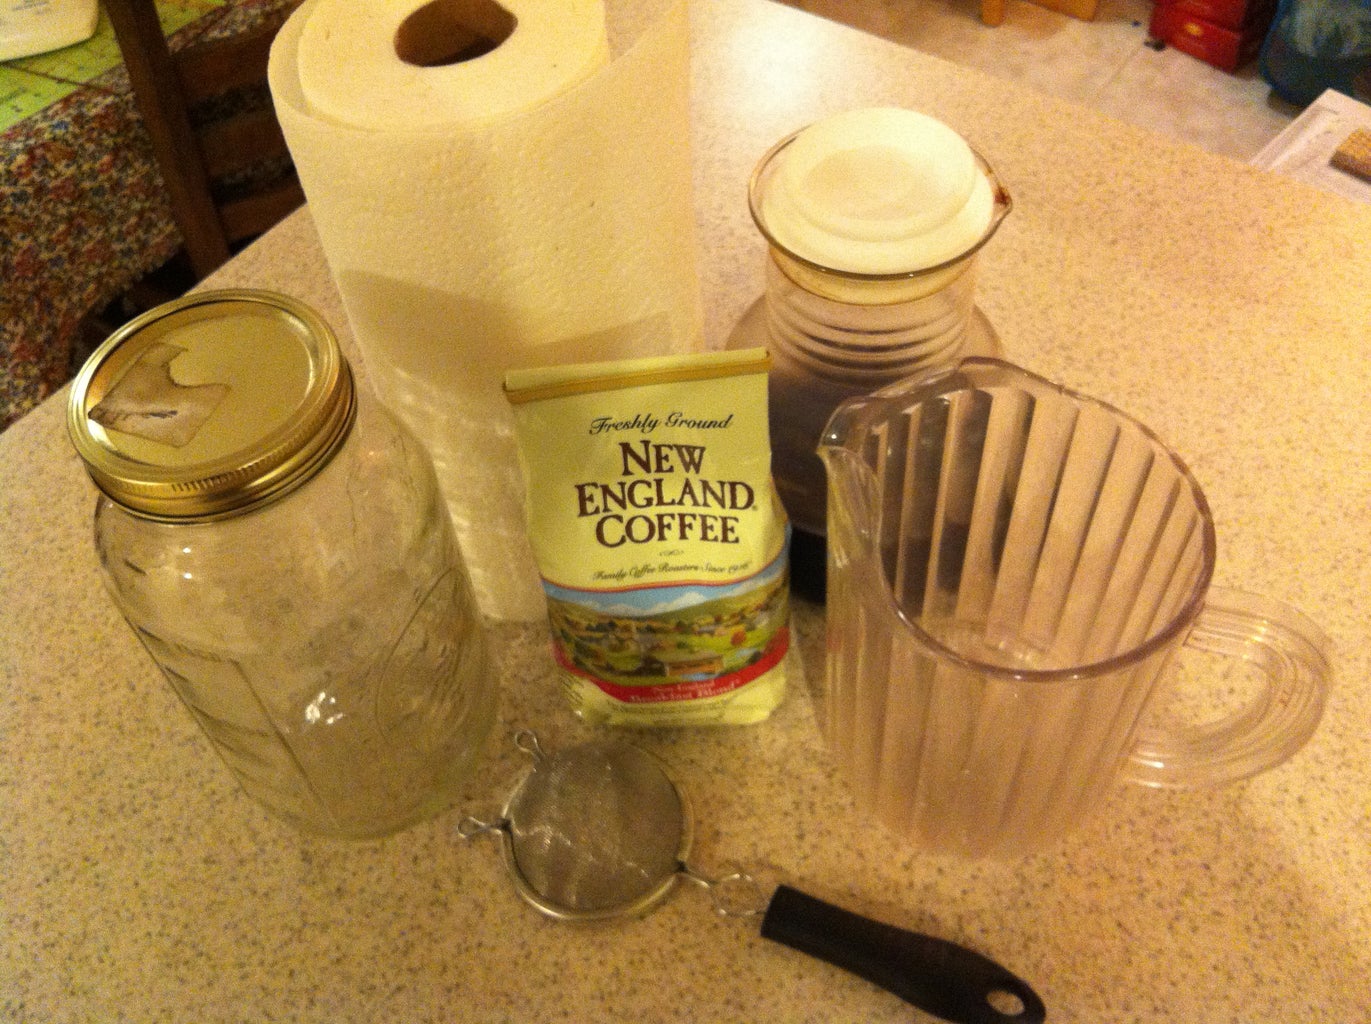
The main thing is I wanted it to be easy, fast, and be able to do large batches since my wife and I drink plenty of coffee. Also, since cold brewing is a little less efficient, you can make it more cost effective by brewing the same grounds twice (the first batch gives you an espresso strength syrup, and the second batch is regular strength coffee), so I wanted to be able to do that as well. To follow my process you will need:
A 2-quart Mason jar
A small strainer
A restaurant style pitcher...needs to have a lip around the pour spout
Something to put the final product in...I use a juice carafe
Paper towels
Scissors
And of course coffee!
A note about coffee choice...we have found that the end product is so much smoother and more delicious that we can buy a less expensive coffee and get the same results as when we were brewing premium coffee the traditional way. Another thing to consider to help keep your cold-brewing costs down.
Step 1: Modify Your Strainer
First step is to prepare your strainer. What you want is something that you can put on the jar to filter your coffee. You can cut the metal strainer with any pair of scissors. Just stab in and cut around the top of the strainer. You will end up with a piece of metal screen that you can flatten out and work with.
You can then use the insert from the lid of the jar as a template and cut the screen to the same size. You will be using the screen as a replacement insert to pour out your coffee. After you cut it out, make sure it fits on top of the jar and that you can screw the ring on over it.
Step 2: Mix
I buy the typical 11-12 oz bag of coffee which is the perfect amount for one batch, so if you buy larger containers of coffee you will need to measure the correct amount and just dump it in to the jar. Add water on top of the coffee to bring the jar to about 3/4 full...I use the sink sprayer becasue it helps mix things up a little better, then put the lid on and give it a shake to blend it really well. Basically you want to make sure you soak the grounds really well. The grounds will float to the top, so when you take the lid back off, scrape it across the top of the jar to keep the coffee where you want it...in the jar. Break up the grounds and stir them in with a spoon. As you stir you will produce a foam on the top as all the air bubbles rise to the top...you can skim off that foam and toss it as it will just take up space. Then you can top the jar off with water...fill it all the way up and put the lid back on, give it a good shake, and set it aside to brew.
At this point it is a waiting game...I brew mine for about 24 hours for the first batch (48 for the second), shaking as often as I think to do so just to keep it all blended.
Step 3: Drain
Now you take the top off, scraping it across the mouth of the jar as you did before. Replace the lid with the screen that you made in the first step, and tighten down the ring good and tight. Get your pitcher ready, and gently start to pour the brew from the jar in to the pitcher. I specified restaurant style pitcher because they have the lip around the pour spout...that allows you to put the lid of the jar under the lip and it will stay upright so you can walk away and let it drain. It will take 20 minutes or so to drain fully.
At this point you can take the jar full of wet grounds and jump back a step and refill the jar. This time it won't foam up as much so you won't really need to do as much stirring and skimming...just fill it up and put the lid on and shake it a few times. This time let it sit for about 48 hrs to get a batch of regular strength coffee.
Step 4: Filter
Now you need to filter out all the fine stuff that the screen let through. I use a paper towel mainly because it is fast, and it gives me a product I am happy with. If you like your coffee a little more clear and less "robust", then you can use regular coffee filters, it will just take a lot longer and you will need to let it sit a while between fill-ups to allow it to drain through the filter. I just shove a paper towel in to the neck of my juice carafe, hold it around the edge, and pour the brew from the pitcher to the carafe. Refrigerate the brew and it will last for a good while. Remember that the first batch is a espresso strength coffee extract, so you will want to dilute it with water or milk to get a "normal" cup of coffee. We mix ours with 4 oz extract to make a strong 8 oz cup...our friends like theirs a little weaker so we give them about 3 oz per 8 oz cup. Also remember that the second batch, even though it takes twice as long to brew, will be half the strength. You will want a second carafe to store it seperately so you don't mix the two up...you will either be surprised by a very strong or very weak cup of coffee if you do!

Participated in the
Coffee Challenge


