

Introduction: Ember Remote Control


The buttons on Ember's front panel leave a lot to be desired like clicky-ness, colors, optional light-upgrade, not having resin on them, etc. Don't worry you don't have to feel unfulfilled any longer! If you follow this Instructable you can pick whichever buttons tickle your fancy. And you'll have the added benefit of being able to cancel anyone's print anywhere from the local network that Ember is on. Neat!
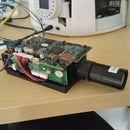
Step 1: The Things That I Used!

I got some buttons, I picked really large arcade buttons because I feel strongly about my button experience and, as they say about any good SPST switch, it don't mean a thing if it ain't got that swing. You'll want some kind of microcontroller/advanced circuit device. I used the Beaglebone Black because that's what Ember already uses so I could just load the Ember dev image from https://github.com/spark3dp/ember-firmware but you could use an RPi or some sweet Arduino with a wifi shield. Speaking of wifi you'll want a dongle, maybe also two, or three who knows!? It's a linux machine and you're trying to add wireless to it, be like a gentoo user and build your own fun! As a display to communicate the inner thoughts of my Beaglebone I grabbed one of Adafruits RGB LCDs https://www.adafruit.com/product/398 it has some sweet features, but mostly I'm just using it as a display so you could get one without any of those features the 16 characters long is nice though because it'll hold entire IP addresses. I also used oodles of wire and ribbon cable and zip ties and jumpers as is the nature of electronics. I laser cut a box to hold my creation, but you can just use a cardboard box if you want! That's what I would have done, but my peers would have judged me and my feelings are just so fragile.
Step 2: Learn How to Connect Your Device to an LCD Display


Because I was using an Adafruit device they had a lovely tutorial and even a library so all I had to do was plagiarize without remorse thanks Lady Ada! https://learn.adafruit.com/character-lcd-with-raspberry-pi-or-beaglebone-black/overview
(some of you might recognize the name zartan in the picture from this Instructable shout out to our true fans!)
Step 3: Button Up!


So it turns out that processors are actually kind of easy to kill. The first time I connected my buttons I was rather lackadaisical about it and before you could say nice butt...ons my Beaglebone only had one light on and wouldn't wake from its slumber. (Some nice person on an internet forum informed me that the Beaglebone is just a $50 computer so it's not a problem because that's really cheap for a computer and you can just get another one. Thanks internet person I totally feel better about my dead $50...) Anyway I wasn't going to let another die in my arms or in my lasercut box or just sitting on my desk next to my laptop or... Anywhere! I put 1k current limiting resistors on the IO pins I was using, and a capacitor from the signal to ground to create a low pass filter. (Also make sure you use VDD3V3 for the buttons and only available GPIOs on the Beaglebone!)
Step 4: Make Wireless Work

I used the same wifi dongle that Ember uses because I have a lot of them they are the DWA-171 from dlink http://www.dlink.com/uk/en/home-solutions/connect... I only started having luck with this applying these patches http://www.dlink.com/uk/en/home-solutions/connect... it has a nice readme just follow it an you'll be set. Make sure you have a kernel that's greater than 4.0 (you can run uname -r from your Beaglebone prompt to know what your kernel number is). If you're using the Ember dev image than you just need to create the wpa-roam.conf at the bottom if not you'll have to add the following lines to the file /etc/network/interfaces
allow-hotplug wlan0
iface wlan0 inet manual
    wpa-driver wext
    wpa-roam /var/local/wpa-roam.conf
You'll have to create the file /var/local/wpa-roam.conf it should contain something along these lines
network={
    ssid="ESSID"
    scan_ssid=1
    key_mgmt=WPA-PSK
    identity="USERNAME"
    password="PASSWORD"
}
Step 5: PRRGRRMMMING

Here's a nice tutorial on buttons from Adafruit https://learn.adafruit.com/connecting-a-push-button-to-beaglebone-black/overview using this tutorial and the LCD you should be able to get most the peripheral stuff however you would like it. I attached the file that I made. Every morning it should update the list of printers and make sure that they are at the same address as before. If you don't want this feature you can just comment out the section of code using the timer and the function findEmbers(). I used the Ember Local Network API to get the printer information you can read more about it here https://github.com/spark3dp/ember-firmware/tree/master/docs Armed with all of this knowledge I made two of the buttons select which printer it's talking to and display it on the LCD. The other two send fake button presses to Ember over an ssh tunnel (note this isn't through the Local Network API).
Attachments

Step 6: Make the BeagleBone Run Your Script on Startup!
So I just followed this tutorial http://mybeagleboneblackfindings.blogspot.com/201... but it has some errors in Step 3. and Step 5. you should actually use the location /lib/systemd/system/ and in Step 5. you should add the -s option to ln ala
ln -s /lib/systemd/system/<scriptname>.service
If you use my script verbatim it'll take a long time to boot because of the for loop polling all possible IP addresses in the 10.140.68 range (up to 255 seconds before you can press a button).
Step 7: Cancel Your Enemies' Prints at Will!

Now you have supreme power over all Embers on your local network. You could even modify the script to find more! Maybe someone out there has their Ember running on a DynDNS or some strange port forwarding on their router and all you have to do is find it and its two buttons will forever become yours, you additive manufacturing deviant you.


