

Introduction: Experimenting With Casting Techniques - Concrete Side Table


Objects cast from concrete generally take a quite simple/geometric/symmetrical form. This is largely due to the fact that you need to first make a mold to pour that concrete into, and in order to do that you'll want a shape that allows the mold to be split easy to remove it..
I've seen some interesting techniques where people have cast concrete into fabric to get more organic forms but I wanted more control over the final shape than this gives.
The aim of this project was to experiment with mold making techniques to come up with a process that would allow concrete to be cast into sculptural/organic forms but also have defined lines/edges if required... This is what I ended up with....
Materials:
- Air drying modelling clay
- Polyurethane liquid casting rubber (Firm)
- Thickener additive to make the rubber brushable
- Plaster bandages
- Concrete (or alternative casting material)
- Superplasticizer concrete additive
Tools:
- Sculpting tools
- Mixing bucket/stick
- General workshop tools - knifes etc
Step 1: The Form


The first step is to create the object you want to be able to cast in concrete (or whatever casting material you choose.) This is done in air drying modelling clay and you can use sculpting tools or your hands to get the desired form. Unlike other mold making techniques, you don't really need to worry about undercuts/overhangs or where the mold will need to split in order to remove this form... You will need to consider what material you're going to cast it in and make the feature sizes large enough to allow it to flow/fill the mold.
Step 2: Mold Making


Once you're happy with the form its time to use this to create the mold for your cast.
First the clay form was covered in a polyurethane rubber. I thickened the resin with an additive to make it easier to brush on. You will want the rubber to be fairly firm and be thick enough to allow it to self support itself without the clay.
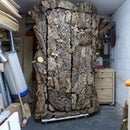
Once that has set, you need to remove the clay. Any clay near the openings can just be pulled out but for the rest you will need to use water. Air drying clay is kind-of water soluble, so you can use a bucket or hose to flush water down into the mold to break up the clay and as the mold is just rubber at this stage, you can squeeze the clay out. Even with a fairly complex form, I was able to completely remove all of the clay.
Hopefully now you've got a rubber, hollow version of your form. Obviously the rubber isn't strong enough to cast concrete into by itself, so the final stage is to wrap the rubber in plaster bandages.
Step 3: Casting


Now you have the mold you're ready to cast. One thing to look out for, is areas where air could get trapped whilst you're pouring. You will want to drill some small release holes in these areas.
I got some ready-mixed concrete from the local DIY store so just needed to add water. I did also add a superplasticizer additive - This allows you to make a 'runnier' mix without having to add too much water, which would compromise the strength of the concrete.
I got a fairly successful cast, with the majority of the mold filling. There were a couple of areas that didn't fill, probably due to air pockets and the concrete having quite large aggregate in it. To fill these voids, I drilled some holes into the mold and injected some plastic casting resin in. To finish it off, I poured some more of the plastic resin to create a smooth top.
You can now break out the finished object. The plaster bandages can be weakened with water and broken apart. The rubber can then cut away to reveal the finished piece.
Overall, I'm pretty happy with the final outcome and think this technique could be used to cast some interesting pieces... If you're got any suggestions for improvements or alternative uses, share away. Enjoy!!


