

Introduction: External VGA / GPU for Laptops Using EXP GDC Beast

Hi Guys.. This is my first tutorial on instructables. English is not my first language so please forgive my grammatical errors. I made this based on my experience in upgrading my laptop. And I will not bore you with long introduction since i know none of you will be interested anyway and get straight to the point
This tutorial will be consist of 3 sections. you can refer your problems to each sections
- hardware installation.
- software configuration
- other things you may need to know
DISCLAIMER: I MADE THIS TUTORIAL BASED ON MY OWN EXPERIENCE. HOWEVER, I DO NOT GUARANTEE IT WILL WORK ON YOUR LAPTOP. IF YOU WANT TO FOLLOW MY TUTORIAL, YOU MUST AGREE THAT I CANNOT BE HELD RESPONSIBLE FOR ANY DAMAGE CAUSED. DO WITH YOUR OWN RISK.
ALL PICTURES SHOWN IN THIS INSTRUCTABLE ARE MY OWN. I AM ALSO NOT RELATED TO ANY SELLER OF THE PARTS LISTED IN THIS INSTRUCTION.
You're free to share this tutorial on your website, or anywhere else as long as you still give credit to me and put a link to this site.
Step 1: Check Whether Your Laptop Is Compatible With This Upgrade
there are two things to check before you start buying the upgrade material
1. check your laptop's WLAN slot interface type.. there are 2 kind of interface that could be used as external GPU. the Mini PCIE and the NGFF and expresscard.. the fastest way is to open your laptop, and see the type. or if your laptop has an express card then you don't need to open the laptop. for those who don't know which part is the wlan card, try google "wlan card" and you will see its shape.. usually there are small cables attached to the wlan card.
2. check your laptop BIOS. many laptops (usually thinkpads) has their BIOS Locked for authorized hardware by their manufacturer. my lenovo e145 (and other thinkpads) won't boot if i change the included mini pcie wlan card to 'unauthorized' other wlan card. and sadly the GDC is not an authorized / whitelisted card.
if your laptop is BIOS-Locked, then you need to unlock or whitelist it first. this will require a modding of BIOS and that is beyond my knowledge so i deem it's not worth the risk.
if your laptop has meet the above requirement, you can start gathering the upgrade material
if not, then you can stop here. because this tutorial won't work.
Step 2: Tools and Ingredients
- The Laptop. I used an Asus N43SL-VX264D
- EXP GDC V8 BEAST. (i'll call this with only "beast" from now on) when you're buying this, choose the one with the same interface as your wlan card. my laptop is using the mini pci-e version.
- An External Monitor, keyboard, and mouse.
- Desktop GPU of your choice. i use a Zotac GTX 950
- a compatible desktop PSU for your GPU. just make sure this PSU has enough 6-pin connector if the GPU require it. my gtx950 need 1 while my sister's r9 270x needs 2 6-pin connector.
- usb wifi adapter or lan cable. this uprade will sacrifice your laptop's internal wifi adapter so you will need other method to connect to internet. i myself personally prefer the latter. most laptop has limited number of usb ports so i don't want to waste the usb port for internet if i could help it. and the laptop is basically a desktop now.
- a screwdriver
- cutting tool. a rotary tools with cutting disk will be just fine.
Step 3: Locate Your WLAN CARD, and Replace It With the Beast Interface Cable
the beast comes with 2 cables. the power cable (8pin to 20 pin and 4pin) and the interface cable (that weird mini pcie/ngff/expresscard to HDMI cable)
Open your laptop using screwdriver, locate the WLAN card and replace it with the beast interface cable.
you might want to search in youtube, on how to disassemble your laptop.. but your goal is to take out the wlan card, and plug the beast interface cable. usually, wlan card is a module with 2 cables attached. don't forget to remove the cables first.
after you replace it, you will have to think about the cable layout configuration. make sure it doesn't mess with the fans, and the cable HDMI end can go outside the laptop. this is where your cutting tools come to play. you may need to cut a hole in your laptop bottom to let the cable trough. some laptop owners are lucky since the location of the WLAN card is easy to reach while some others don't.
as for my asus, i need to disassemble the laptop first. but i was lucky the wlan card is located near a hole in my laptop bottom near the RAM compartment so i don't need to cut open a new hole.
i deliberately not posting a picture of this step because different laptop means different layout. and you might want to arrange the layout as you wish.
Step 4: Outer Cable Configuration

This is where that cable you got when you buy the dock goes.
Connect the HDMI End of the beast connector only to the BEAST!
DO NOT ATTEMPT TO PLUG IT TO SOMEWHERE ELSE OTHER THAN THE EXP GDC BEAST
Step 5: Plug the Power Cable to the Beast.


- plug the 8 pin to the beast
- attach the 20 pin to the 20 pin connector of the PSU
- attach the 4 pin to the 4 pin connector of the psu.
some PSU comes with a 20+4 pin.. and another 4pin connector.. in this case you need to separate the 20pin from the 4 pin before connecting it, if you're using old psu which only have 24 pin, it is still compatible but you might need to cut the hook so the 20 pin connector could fit.
please note that we don't use the 4pin that comes with the 20+4 pin but the other 4pin connector. usually with cable colored 2 blacks and 2 yellow.
Step 6: Insert Your GPU
Put your GPU to the pcie x16 of the beast
if your GPU needs a 6pin power, plug it directly from the psu.
Step 7: Finalizing Hardware Configuration
- connect the external VGA (which you attach on the beast) to the monitor using HDMI or your chosen interface
- plug your networking (wifi dongle or lan cable) to your laptop
- attach all power plug to the power outlet of your home
- the PSU
- the laptop
- the monitor
This is where you might want to consider the layout of your cables if you want it to look neat. detach, wrap, arrange the cables layouts, and reattach..
Step 8: Turn on Your Laptop
you might see the beast LED turn on, and the GPU Fan start spinning.
if your laptop bios is locked, it won't boot.
if the external monitor is blank, it's okay.. as long as you can boot to windows using your laptop internal monitor.
after you get into windows, you might see a notification that says windows is downloading driver for new hardware (the graphic adapter) if you see this, then it is best if you wait until windows done installing the new driver. but you still need to install the GPU driver tough
Step 9: Install the GPU Driver
download and install the gpu driver. you can get it from their main website
For Geforce Graphic card: http://www.geforce.com/drivers
for Radeon Graphic cards: http://support.amd.com/en-us/download
Step 10: Restart Your Laptop and Set It to External Monitor

Restart your laptop.
after you boot to windows again, if your external monitor is still blank, you can go to desktop, right click, and choose screen resolution. and set it to show only on your external monitor.
you can still let the internal monitor on for secondary screen, but for games only use the external one.
Step 11: Optional: Disable Your Old Internal GPU

open device manager.
in windows 8.1 press start and type device manager, locate the display adapter, and disable your old gpu
Step 12: CONGRATULATIONS YOU NOW HAVE EGPU

Steps are done.. install any program or games you want
Step 13: Other Things to Consider
- the mini pcie bandwidth is not as high as the pcie x16 therefore, if you choose a high end graphic card, it won't be able to give you it's maximum performance. so i suggest you use a mid end graphic card that don't use much bandwidth you can find more recommendations of graphic card if you search the forums.
- Take care of the external GPU. since the external GPU is most likely to be placed on the table,
- it will be vulnerable to environment. it will catch dust easily, you should clean the gpu fans more often.
- it could get knocked down accidentally. so be careful when placing the gpu. and when putting something near the GPU
- be careful of bugs and your pets, and other animals. they could damage your egpu. just imagine a bug flies to the EGPU fans or your cat knocks them off the table.
Step 14: Recommended Graphics Card
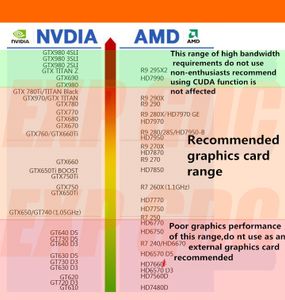
this step is added on 11.11.2018
The exp GDC beast is now a few years old.. the mini pcie slot is way older..
even the new mid end graphics card might require more bandwidth than the pcie slot can deliver...
so if you're using mini pcie, recommend consulting this chart, courtesy to Banggood
edit on 29 july 2020
if you're having a newer generation graphics card, compare it to the ones listed here to figure out how many bandwidth will be used by that card.. basically if the card have performance equal to or higher than GTX 980, don't bother use it.
i can't say the same for NGFF as it's a newer interface.
Step 15: Help Develop This Tutorial
Added on 27 Dec 2021
Hi Guys, i rarely open instructables and now i also don't use the EXP GDC Beast anymore.. but i'm still willing to answer your questions to the best of my abilities.. please send your questions to ultimatebuster@gmail.com
David


