

Introduction: Facebook Security Pro Tips


Hello there, this time I'm gonna share my knowledge about cybersecurity. First of all, I'm a cybersecurity researcher on MainSource 365 Tech (A cybersecurity firm). I'm also programmer and developer, that's why I am comfortable to share some pro tips on how to secure your Facebook from any known hacking methods such as Phishing, Session Hijacking or Cookie Stealing.
This Instructable is focused on making your Facebook account secure and hard to hack. I know some of the users here on Instructables has no Facebook or do not use Facebook at all. Maybe due to privacy concerns or do not know how to use Facebook.
Note: "I am not trying to promote Facebook here, I just wanna give some useful information that possibly helpful to others, since "How to hack Facebook" is very popular to all search engines and help to protect your data from the latest Facebook scandal..."
Background Music (Optional)
I add a background music for all readers of this Instructable, you are free to stop the music if don't want it. Why I choose this music for this kind of Instructable? The title speaks for itself because after you read this instructable your Facebook account's security will be better! If you have a bad experience on your Facebook account's security then this is the time to improve your security... enjoy the music and my simple pro tip about Facebook...
What is Facebook?
I know that everyone knows about Facebook because it is so popular around the world. But it is banned in some countries. So what is Facebook? Here's the simple answer to that question, Facebook is a social networking site that makes it easy for you to connect and share with your family and friends online. Basically, it is a way of connecting people around the world. No need to discuss all things on Facebook. I will assume everyone knows about it.
Recently, I received a news about Facebook that it violates the use of personal data from its users for reason of educational purposes based on the statement by the founder of Facebook. We are not sure that our data is safe with Facebook since we already agree that Facebook will use our data for tracking and personalization purposes. Anyway, in exchange, we use Facebook for free without any cost. Basically, we pay our data usage for social networking and online communication to make our life even easier. For me, as a developer of many popular websites out there mostly e-commerce websites, in my own experience as administrator of a website I can track everything, for example, I can track the browsing habit, the most visited product, the number of likes he/she give, and more. Just imagine you're the central control system of Facebook, you can handle billions of personal data across the world, that's huge! It's all up to you if you want to be tracked by Facebook. For me, it is useful for my everyday life and I agree to track my browsing habit. How about you? Do you agree?
A quick pro tip for you! Do you want to check if you're affected by recent data breach on Facebook?
I don't wanna add this here because it is too much information me to add it here. You can go to this website for more detailed information: How To Check If Cambridge Analytica Could Access Your Facebook Data?
Additional information regarding Facebook–Cambridge Analytica data scandal.
Why do we need to Secure our Facebook Account?
Facebook is now integrating payment options and financial features which is the common target of hackers. If these hackers know that you have plenty of balance on your Facebook account they might be watching you now and planning for an attack. That's why we need to secure our account at all cost. Where to start? Well, I am here to help you on how to protect your Facebook Account from any known cyber attacks. As an additional, it is super hard to recreate again your profile on Facebook if you fill out all the personal information for your personal Facebook account. Tell me am I right? Well, yes! I already experience this since my facebook hacked by someone on the Cyberspace. Wayback 2010 when I created my first Facebook account and I fill out everything on that account every detail of it, after four years it was hacked by someone and deactivate my Facebook and that's horrible to me that's why I start to learn all about computers into hacking until today. On the same year where my Facebook Account has been deactivated by someone, I start to create a new account and I said to myself that this will never happen again to me so I start learning cybersecurity to protect myself from these hackers. Since 2014 my account still alive and I prevent cyber attacks from different hacker group. I monitored my account 24/7 just to make sure any cyber attack will be prevented as early as possible. I have a couple ways how to protect your Facebook from any known attacks.
My point here is that it is hard to recreate an account from nothing, you will be disappointed for that in case you encounter a Facebook hacking. Prevention is better than cure! Continue reading below for more information regarding protecting and securing your account from hackers out there.
What will you learn from this Instructable?
Well, you will learn the basics of cybersecurity awareness, basic methods of securing your Facebook account, advanced methods of securing your Facebook account, Cybersecurity pro tips, and mastering the Facebook Security options also learn how to protect yourself from advertisers. You will learn better by reading this Instructable. As additional, there are some bonus pro tips for using Facebook. So it is better to check them out!
My Facebook account is already protected!
If your Facebook account is already protected (based on your own estimation and your setup) you're not required to do something. If you think you follow all the pro tips shown here, well, you're in a good status no action is required and congratulations because you are cybersecurity aware person. It also means that you are a cybersecurity-focused guy and extremely geek (like me).
"I share a valuable knowledge with Facebook users about how to secure their account from any known cyber attack for free of charge. In exchange, a simple donation or buy me a coffee is much appreciated!"
- W. Gonzaga. 2018
This Instructable should be an entry to Pro Tips contest here in Instructables. I am so disappointed that the contest ends quickly and close without notice to all members of Instructables. This Instructable should be published before the end of April 2018. After my disappointment, I decided to improve more the information here and still want to publish for the Facebook users that need to protect and secure their account. I push this to publish because I want to spread the cyber security awareness to all end users around the world! Still, I want to say thank you to Instructable to have a chance like this to contribute and be their member for years. Still, love you guys on Instructables.
Continue to the next step for more information and pro tips about securing your Facebook account. If you find it useful and helpful please click "Favorite" button above or send your donations so I can continue to share cybersecurity awareness to all for free. It would be nice for me if you donate any amount just to support me in my efforts to share important knowledge about cybersecurity. I spend weeks to write this so I need you to support, share this, and spread the word about this, thanks! If you think my Instructable is lack of information or there's a wrong you can leave a tip or leave a comment below so I can improve it to make this instructable better. Are you ready? (you should be ready to learn some pro tips!).
Step 1: Things You Might Need!?

Here are the things you might need to protect your Facebook account, actually not only your Facebook account it should be all of your accounts. So, go head over below and check out the things you might need.
- LastPass - It is a password manager, it takes care of all your account and I personally recommended their unique service to protect you from hacking and also to help you to keep your account safe. Click here to create your account if you don't have LastPass account.
- Facebook Security Key - It is a specially designed YubiKey, relying on high-security, public-key cryptography to provide strong authentication. Usernames and passwords are no longer enough to protect access to online accounts. It is designed to insert it into any USB port and works with any website that supports the FIDO U2F protocol, including Facebook, Google’s Gmail, Google Cloud and G Suite, GitHub, Dropbox, and Dashlane. And all it takes is a simple touch of a button!
- Password Generator - You might need this online tool for generating strong passwords for your online accounts. If you have LastPass account then you don't need this because LastPass has a feature which you can generate strong passwords.
- Password Checker - You have generated your password, but you don't know how strong it is? Also you don't know if your generated password is crackable by brute-force and dictionary attack. Then you need to use this tool to gather information about your chosen password. Again, If you have LastPass account then you don't need this because LastPass has a feature which you can generate strong passwords.
- Encrypted Flash Drive (Optional) - It is a special flash drive that can protect your sensitive data from data leak or from any known cyber attack. By encrypting your data this means you're protecting yourself from data loss or data theft. This tool is actually used by some federal agencies.
- Encrypted SSD (Optional) - it is a special Solid State Drive to protect your sensitive data from any known cyber attack or possible data loss due to data theft. Your files are encrypted in the hardware so no way to hack your personal data inside the secure SSD. It is PIN protected so you're the one will open and use this military-grade encrypted SSD storage. Check the kit below for more information and specification.
I prepare a special kit for you, I prepare all the things you might need for your cybersecurity protection to protect you from the online world. Click the animated image below!

Cybersecurity Kit by Waren Gonzaga
The things you need to protect yourself from an online world!
Step 2: Basic Facebook Settings to Check

Now we are going to check the basic settings on Facebook before we configure our Security settings. I'll teach you everything about basic settings for your own privacy setup. These settings are the way you want to share your personal information on the internet!
First of all, log in to your Facebook account and go to your settings and click on "Privacy" tab located on the left side of your settings. If you don't know how to get in there well, click this. You can also follow the animated image below for the guide.

Let's review your current settings! I will guide you through this section for the best setup for your privacy while using Facebook. I will explain everything on privacy tab for you to understand how much of your information is exposed on Facebook.
Please look below for the anatomy of the privacy setting. This will be your reference for my explanation of each option on your Facebook privacy tab. I add this so everyone will understand better what I'm talking about.

I need your attention here, make sure we are on the same page, why is it important to check your privacy settings? Well, this is the place where you can control how much information you can share on Facebook. A wrong configuration of your privacy setting would end up in a privacy leak. So just follow what am suggesting to your account. Let's start the discussion.
Your Activity
1. Who can see your future post? - The default option is your friends, you can set it up to "Public" or some other option under it. Why is it important to configure? Well, this is your primary privacy option on your timeline. For example, you make a status on your timeline. Then you set it up to "Public" of course the privacy of your timeline status is automatically set to "Public." What does it mean? Anyone on Facebook can view your status or anyone who visits your timeline can view your public status. For better privacy, set it up to "Friends" only. Otherwise, you can set up a custom privacy for your posts, shared content, and your timeline status. Choose which one should be in "Public" or which one for your "Friends" only.
2. Review all your posts and things you're tagged in - This one is pretty straight, this is the option will redirect you to your activity log. In the activity log, you will see all of your activities on Facebook. For example, the posts you liked, commented, and shared, even the posts you're tagged in.Friend request you've sent and friend requests from someone you received. Everything in the activity log is recorded, you can review all your activities using that tool and limit your personal information exposure.
3. Limit the audience for posts you've shared with friends of friends or Public? - This is the all in one tool for limiting your audience in your past posts. Instead of manual editing of your old posts then try this tool. It will limit all of your posts from being in "Public." Here are a few notes you need to consider.
* If you want to undo this action in the future, you'll need to adjust the audience of each individual post. Limiting the audience of your previous posts cannot be reversed in one click.
* If you have shared a previous post with a Custom audience such as Friends except, Acquaintances or Close Friends, this tool will not change the audience for those past posts.
* If you tagged someone in the post, the audience of the post will still include the person you tagged and people they include in posts they're tagged in.
* This tool only controls the audience for posts you've shared. If you've been tagged in someone else's post, they control the audience for their posts.
Waiting for my best setup? Well, this one will depend on you if you want to limit your old posts.
How People Find and Contact You
4. Who can send you a friend request? - Well, the best option for this is "Friends of Friends." Why? Well, this could be the reason for your privacy leak. Why again? I will share my experience regarding this, let me remind you this is a pro tip. By allowing everyone to you send you a friend request, you are making friends with strangers you don't really know or you're familiar with. Some hackers or stalkers creating fake accounts just to send you a friend request after that they can watch your account and prepare for an attack. For example, some users might start to spy on you and learn how you live and checking if you're online or whatever information they can gather from you since you're allowing these fake accounts to be your friends. The best setup for this accepts only a person which is friends of your friends this is what Facebook called "Mutual Friends."
5. Who can see your friend list? - Don't set it up to "Everyone." Another pro tip for you, set it to "Only Me" Why? Hide your friend list because this can be valuable to your attackers or stalkers. This can be a security and privacy breach of your account since they can see your friend list they can easily add your friends and eventually they become a friend of your friends and they can now add you as a friend if you set up your account to accept a friend request from friends of friends. It is important to properly configure both number 4 and this number.
6. Who can look up using the email address you provide? - My pro tip for this is set it up to "Friends" only. Why again? Well of course if you allow everyone to be able to use your email address to find you on Facebook it could be also your security breach. Some hackers, using email to look for a valid Facebook account using email they got from somewhere. Your email will easily guess by allowing everyone to use your email address to find you on Facebook.
7. Who can look up using the phone number you provide? - This is the same in the number 6, set it up to friends only, so your friends can actually use your number to find you on Facebook, not others. Nothing to discuss here.
8. Do you want search engines outside of Facebook to link to your profile? - I have a pro tip here, Just set it to NO do you understand!? Why? because by setting it up to "YES" you are actually sharing your Facebook ID to the public. Anyone can look up for your Facebook ID which is valuable for hackers. So don't expose yourself to an online world. You're likely placing your keys in the front of your door so anyone can open it.
I provide a quick animated image here to help you with the best setup in your privacy setting. This is my Facebook Privacy Setting. Just follow the animated image below.

Alright! Your Facebook is more secure now, we will not stop there because we are going to configure another tab within your Facebook settings. This is your Timeline and Tagging settings tab. Why is it important? This is an added protection to your Facebook usage. Some of the options there can help you to prevent direct abuse to you on Facebook such as public shaming.
Now let's get started with the second part of this step to check and configure the basic settings on Facebook before anything else. So now, go to your Timeline and Tagging tab. If you don't know how to get in there please click this link. You can also follow the animated image below for you to guide visually.
a
Now, you are on your timeline and tagging settings. Let's see what you have on your Facebook account. Double check your account setting and compare it to my setup. I will explain each option in your timeline and tagging settings. The picture below will help you to understand and visualize what I am explaining. I place numbers and every number will have explanation and description of the functionality of each option under your timeline and tagging settings. So proceed below!
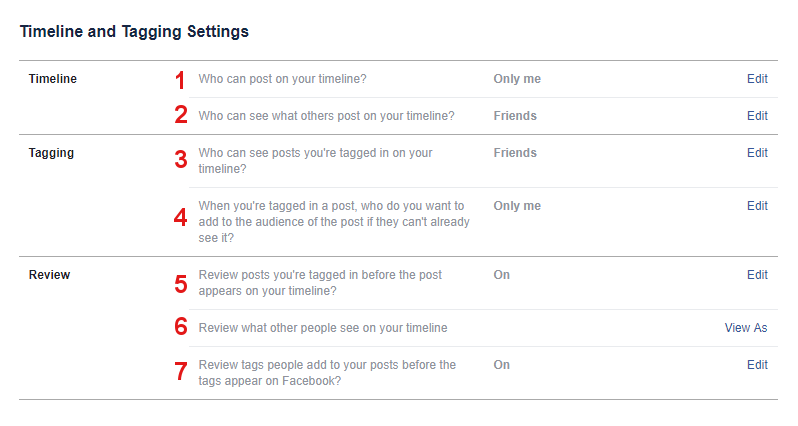
We are in the timeline and tagging settings of your Facebook account, this is important to check this section, properly configured account is the best way to prevent any cyber attack before its too late. Prevention is better than cure is true even in the online world. I'm gonna discuss now my basic setup on my Facebook account. Let's go!
Timeline
1. Who can post in my timeline? - I don't want my friends or friends of my friends to post on my timeline. Why? First of all, it's annoying for me, sometimes my timeline becomes unorganized because of my friends always tagging me for useless posts which is about selling items or whatever networking or scam scheme. That's why my best option for this is "Only Me." As additional, I don't what someone will post on my own timeline just to shame me or to troll me. There are many good things why you should set it to "Only Me." The decision always comes from you. It depends on you what would be the best option based on your Facebook usage.
2. Who can see what others post on your timeline? - I set it to "Friends" just because I want only my friends to see what others post on my timeline. No more explanation for this item. This is effective if you choose a different option from the above item.
Tagging
3. Who can see posts you're tagged in your timeline? - Always set it to "Friends" only, why? because if you set to "Public" it means you are exposing yourself to the public. So if someone tagged you then everyone can see the pictures or posts you're tagged in. If you don't want to set it to friends only then that's okay, your decision will predict how secure your account is. I just sharing what would be the best option for each option. If this item is okay for you then go and proceed.
4. When you're tagged in a post, who do you want to add to the audience of the post if they can't already see it? - For me, I set it up to "Only Me" because I want to keep it to the person who is able to see it not others that can't already see it. I don't want to allow others to see it because of privacy concerns. If you think that this is too much then you can set it to "Friends" and save it.
Review
5. Review posts you're tagged in before the post appears on your timeline? - It should be "ON" just because if someone tagged you in the picture which is awkward for you then your friends and everyone will able to see it. It is embarrassing to appear it eventually without seeing it first. It is kind of filter in your account. If it is enabled then everytime someone tagged you in a post then you can review it in your timeline review.
6. Review what other people see on your timeline - This is one is a very important tool in your Facebook settings. Why? Because this tool lets you see what your profile looks like to the public or a specific friend. Remember, things you hide from your timeline still appear in News Feed, search and other places on Facebook. Wanna try this tool? Well, click the "View As" and check your account for possible information leak in your timelines such as your mobile number or your email is public.
7. Review tags people add to your posts before the tags appear on Facebook? - You should on this one so you can review the tags before they appear on Facebook. So if there's wrong with the tags you can immediately fix it. It is more proper and professional to review any tags before it appears on Facebook. Got my point? If yes then you're good to go!
Alright, since you know all about the options under each section in Timeline and Tagging Settings. I provide a quick animated example of my own setting for my Facebook account. If you want to follow my same setup please do the following option below. Thanks!

Congratulations for having interest in following my own setup to protect your account and make it more private. If you follow my setup your Facebook should be like the image below. It appears to be that no one can add you except your friends of friends. Also, anyone in Facebook can't post to your timeline and another thing they cannot also leave their comments. It shows that only share button is open for strangers on Facebook. Do you like my setup? Wanna see my timeline? Well, go here...

This is the pretty new settings on Facebook. What is it for? Facebook has been using face recognition for the past years to automatically tag you in a photo. Today, Facebook has been released this setting just to ask you if you want to opt out or in for this feature. The benefit of this setting as a promise of Facebook to its user, this setting will help you to combat impersonators. For example, someone uses your picture for their account then will receive a notification that someone is using your personality to run their fake accounts on Facebook. Wanna check your face recognition settings? Go here...

For me, I set it up to yes, Why? This is my personal choice because I want to take down all the fake accounts that use my profile. I hate fake accounts and impersonators. But for me, you should turn it off if you don't want the Facebook to recognize your face. Actually, based on my opinion, this might be a tool of Facebook to help authorities to find criminals and catch them using their face. I'm not really sure about this is only my opinion. So, if you are so aware of your privacy then you should turn it off. If you really concerned about having impersonators then you should turn it on. Nothing to discuss this setting hope you understand this item.
Below the Face Recognition settings, you will see this setting. it is important to properly configure this one. This will save you from anything, but how? Notification is very important to our account because it makes us be aware of what is happening in our account. For example, someone changes our email or password a notification related account will alert us and give us info about that situation and we will have a chance to take an action to resolve unauthorized access to our account. Wanna configure your notification? Well, go here...

Here are my notification settings, all here should be activated and you can customize how much notification you want to receive from Facebook. This part will depend on you, please properly configure this one because it would be your early warning device to detect hackers in your account. This item will work better if you connect your mobile number to your Facebook account. Want to add your number? Please use this link to do that... I don't need to explain the Mobile settings here because I have a dedicated step for it. You can jump to step four of this Instructable if you want to know more about Mobile Settings. For me add your number there so we can protect your account even better and will help it to activate the 2 Factor Authentication in the following step here.
In our basic Facebook account settings, this is one of the important settings to check. By having a good configuration here it will help you to limit how many people will be able to follow you. Also, how would you like to interact with other Facebook users? This part will help you to optimize your account from being publicly available. It will improve your account to be more private and secure. Wanna configure it? Go here...
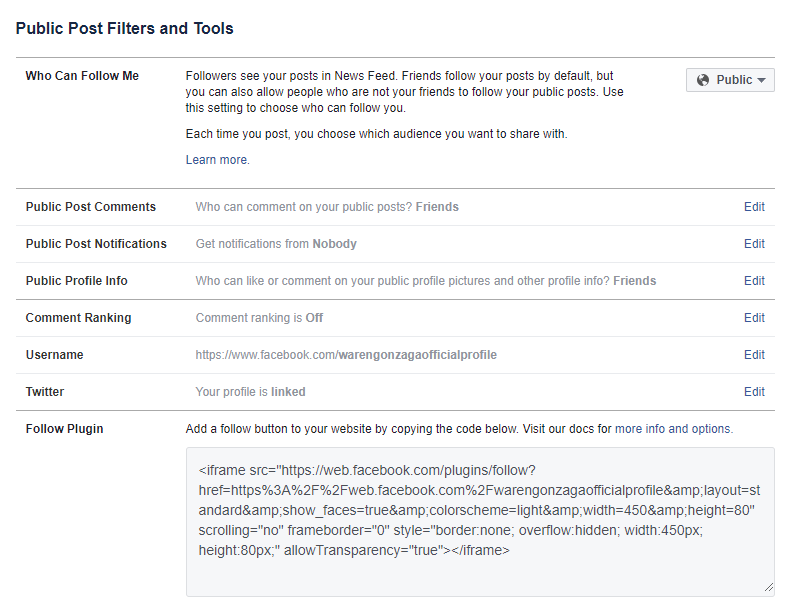
In this part, I'm gonna explain to you these items... it will help your account more private and less interactive if you configure it. Based on my current setup I am accepting followers instead of adding me as a friend. That's better instead of accepting friend requests from strangers that you don't really know. To be honest, I don't accept a friend request from dummy accounts or fake accounts. Another thing, I accept a friend request from the user that is I know personally. So let's begin the discussion...
Who Can Follow Me?
Well, it depends on you, for me I set it up to "Public" why? This is my personal choice because I am allowing people to follow me instead of sending me a friend request. Followers are better than friends because not all on Facebook is you know personally, some of them are your online friends only. So it is better to allow followers to your account. For more, secure and private way you can choose friends only so you have the control who should see your posts in the future. Again, it depends on your situation on what would be your best setup in this item.
Public Post Comments
Did you visit my profile? as you can see there is no way to give a comment to my public posts just because this setting is the reason why it shows only a share button and you are not able to comment. I don't want someone able to give comment to my public post they should be my friend before they are able to comment. It would contribute to your being a private account on Facebook.
Public Post Notifications
The function of this option is to notify you if there is someone following you! If you set it to "Public" of course every time someone follows you then you will receive a notification. If you set it to "Friends of Friends" then you'll be notified if your friends of friends follow you. Like in my setting I set it up to "Nobody" just because I don't care who follow and I don't want too much notification on my Facebook account. I prefer to receive only account related notifications.
Public Profile Info
This one you should set it to "Friends" only because if you only allow friends on this option this means only your friends can only like and comment on your public profile or your public information. So, be careful with this option you should set it to "Friends" only. Alright!
Comment Ranking, Username, and Twitter
No need to do anything here, this will not improve your privacy and your security. So let's move one! Just double check this part and if you want to customize this part then go ahead! Grab it!
Bonus Pro Tip! (Facebook to Twitter & Twitter to Facebook)
Oh, wait! As additional pro tips, if you want to sync your Facebook account's posts and updates to your Twitter account then I'm gonna show you how to do it. Wait a minute, did you understand what I am talking about? Hmm, let me give an example, I posted an update on my Facebook account and the same post automatically posted also on my Twitter account. It looks like my account syncing... it can be done in vice versa, If I tweet on my twitter account it will automatically be posted at the same time on my Facebook account's wall or timeline. Is it cool?

My both account on Facebook and Twitter has the same posts and updates. Originally, I posted on my Facebook account and it will automatically be tweeted to my twitter account. I am more active on Facebook than Twitter. So, now I'm gonna teach you how to do this. First things first, you must know where you're most active on your Facebook or on your Twitter account?
Link Twitter via Facebook - Click this if you want to post or update on your Facebook account and be tweeted automatically your posts and updates on your Twitter account. In short, Facebook to Twitter updates.
Link Facebook via Twitter - Click this if you want to tweet on your Twitter account and be posted automatically your posts and updates on your Facebook account. In short, Twitter to Facebook updates.
If you have questions, on this part then you can leave a comment below! You can go to the last step of this Instructable and look for my contact details. Alright! You may now continue!
This is the last item we are going to discuss and double check in your basic Facebook account setup. So why this item so special and important? Well, this is the item where you share your personal information with third-party apps. For example, you're using your Facebook to log in to Instructables then you will the icon of Instructables on this section. You need to control what application should use your data and information based on the permission you choose to use them. It is better to check out your Apps and Website settings please go here...

If you heard about the data leak on Facebook well this is the settings where the issue began. Based on what I read and know about the Facebook scandal. The Cambridge Analytica use this feature of Facebook to gather and collect information from Facebook users. That's why Facebook facing congress hearing about the privacy policy and data mining. Anyway, I don't want to make it so technical and so far from the topic.

Probably, you receive this kind of message from Facebook right? It means that is the right time to check your apps and websites settings and remove all the inactive apps you are no longer needed or has been expired due to inactivity. Some apps are might still using your data and information to take control of it! To learn more about this go to this article and let me know what you think in the comment below.
Here's we go, just go to your Apps and Websites settings, look for the app that you want to modify how much information you are willing to share. Take note that these apps are your logged in credential to other websites or apps which is you log in using Facebook. So be careful of removing application because you might delete your account from the other third-party apps or websites. No need to discuss this more because all the information is in the settings itself. My only suggestion and pro tips here is that remove unnecessary apps and website that you don't use also include those expired applications. That's how to maintain your account from an unexpected data leak from your account online!
Bonus Pro Tip! (Turn Off Ads and Protect Yourself from Advertisers)
Do you want to limit Facebook how they use your information for ads? You can turn off this ad tracking feature on Facebook. So if you go to the website their ads will not follow you anywhere. This is an added privacy for you! Follow the animated image below to turn off this feature of Facebook. First, go to your ads settings.
Now you have the control of your privacy over advertisers on Facebook. You can also check other options in ads settings. By doing that, have a quick look below on the animated image for the other options that you might need to adjust and control.

As an additional, I will give you some recommendation about protecting yourself from advertisement and keep yourself from tracking your activity online. I would like to recommend to use uBlock Origin as your google chrome extension for blocking ads. Download that and activate it to your browser and thanks to me later. One more thing, for more powerful setup on your ads settings, click this one or click the animated below and follow it!

Before doing this, please make sure that you've turned off your cookies and/or your adblocker. Look for Facebook and tick the checkmark box to its right. You can do this for any other site on the list as well. By checking this, you are preventing these sites from performing "interest-based advertising" based on your browsing habits which are collected by cookies. You're now completely opt out of Facebook!
Congrats! You've learned something today, aside from that there are so many bonus pro tips waiting for you to discover in few next steps! Enjoy, this simple Instructable and let me know what you think about this step by leaving your comment, suggestion or tips below.
Proceed to the next step and I'm gonna share with you some of my techniques and pro tips about your cybersecurity. Go and hit next or continue scrolling! Good luck...
Step 3: Use Multiple and Dedicated Emails

Getting better now? Your account should be better now and you have now the control of your privacy. In this step, I'm gonna share one of my methods on securing my Facebook account. Probably, you are using one email for all of your account rights? Well, that's not a good idea... having one email for all of your accounts online is very dangerous and very bad idea or bad setup. A good article from Joel Lee will explain why we should use separate emails. Proceed below to learn more...
He said...
"If you’re like most people, your email account is probably the centralized hub of your personal activity. All of your Facebook notifications, website registrations, newsletters, messages, etc. get sent to your email box, right? That means you’re putting all of your eggs in one basket – if that basket happens to fall, you’ll lose all your eggs with it. In other words, if you bring all of your activity into a single email account, what happens when someone breaks into it? I’d say it’s plausible that they would gain access to everything else. This is why you should use multiple email accounts. Having separate email accounts will not only help boost your security but also your productivity. Imagine if you could consolidate all of your work emails into a single work account; all of your friends and family communicate with your personal account; you have a recreational account for various websites; and a throwaway account for potential spam links. This way, if someone hacks your work account, all of your personal emails are still safe."
––Joel Lee, from 7 Important Email Security Tips You Should Know About @ MakeUseOf
Joel and I have the same idea of protecting yourself from an online world. In securing yourself from an online world, will start on your email you use. Your email is required for any online registration and account recovery. That's why hackers are most likely to get your email first before anything else. In that way, they can change your account's password and modify any account related things.
For this step, make an email dedicated only to your Facebook. This email could be something like this...
- yourname.facebook@gmail.com (if you're using Gmail)
- yourname_facebook@yahoo.com (if you're using Yahoo)
- yourname.facebook@outlook.com (if you're using Outlook)
- yourname.facebook@website.com (if you're using your own domain)
I assume that's your way of creating a name for your email. You can choose a different name for your email so it is hard to guess by hackers. Don't forget to secure your Facebook email with a strong password later I will help you to choose good and strong passwords for your accounts. One more thing! Your Facebook email should be private, don't tell to anyone your Facebook Email. It is super easy for hackers if they have the Facebook email of the victim.
Note: For custom email at your domain, please make it more personalized, don't use emails like admin@website.com, info@website.com, developer@website.com, support@website.com or webmaster@website.com. If you can't still use your custom email for your domain to make a new Facebook account or replace your old email then leave a comment below or contact me.
The trick is, make a dedicated email for your Facebook. That's it!
Bonus Pro Tips
Keep your Facebook account credentials in one place which is super secured. How and where to keep? Well, that's the time you're required to use a password manager. By using a password manager, you are able to organize all of your account's credentials online and offline. Plus, it is super secured and only the owner can access all the data inside. It is based on my own experience.
I would like to recommend to you my password manager! Use LastPass today to protect your accounts! Sign up to LastPass by clicking all the "LastPass" word in this step and get a FREE month of Premium LastPass!
Want to know more about LastPass? Go here and play the videos in the playlist!
I choose a very simple review about LastPass you can watch it below...
Great review right? Now you know all about my favorite and best password manager, then no need to memorize your passwords for different accounts including your Facebook. Now let's go back to the topic. As I said earlier, make your dedicated Facebook email privately, but how? Well, I'm gonna show you how to do it!
How to make your Facebook Email Private?
Your dedicated Facebook email might be available publicly on your account. It is better to double check your settings. Are you ready to check if you email is private or in public? Well, let's go!
The first thing we are going to do is to go your account's wall and click "About" after that click "Contact and Basic Info" for the better guide look at the picture below.

In the picture above, you will see my 3 different emails on my Facebook account. You can add many emails, more emails more secured. But more emails more annoying for others, for me it is not because one of the emails above is my main email. Then the others are email forwarders only. In future, I will share my method of organizing emails so you're online activity is more safe more than having one centralized email.
On the right side of the picture, you will the red rectangular showing the 3 lock icons. These locks icons are indicating that your emails are private or set it as "Only Me" by Facebook. I'm not sure if this option is a default for new Facebook users. Just double check it and it should be set to "Only Me" or lock icon. After making changes then you should hit the save changes button!
Note: Since you are in your about tab then edit all the necessary information there and you should choose which information should be in Public, Friends, Friends of Friends, or Only Me. Be careful in your profile configuration again as I said a proper configuration and setup on your Facebook will save you a lot from any issue you may encounter in the future!
If this step might not clear to you then leave a comment below. If the information in this step is not enough or has wrong information please let me know as possible and leave it as a Tip or Suggestion. With your help, this simple Instructable would be more informative and helpful to others. I will give credits to all who will submit their suggestions, feedbacks, or their contributions to improving this Instructables plus a premium subscription to Instructables!
Are you done here? Go to the next step!
Step 4: Use Multiple Mobile Numbers

Nowadays, our smartphones are capable of having two SIM cards. So we are able to use a different number at the same time. Some people they are using the SIM1 for mobile data and the SIM2 for SMS or Calls. Actually, that's my own setup. SIM1 for mobile data and SIM2 for SMS/Calls. I don't know if someone out there has the same way of using two SIM cards on their smartphones. Please share yours in the comment below.
In this step, I would recommend having multiple mobile numbers or at least two mobile numbers connected to your account. In this way, if you lost one of your numbers, you will automatically have a backup access to your account. Mobile numbers connected to your account are very important in terms of account recovery. Without mobile number connected to your account, you can't activate the two-factor authentication in your account. Why? Two Factor Authentication may block you forever or you will lose access to your account permanently if you fail to prove that you are the real or owner of the Facebook account. If that happens, that's the time you're going to recover your account using your mobile number!
I'll show you how to add a mobile number to your account! If you have already had two mobile numbers to your account connected or you've already aware of this security methods then you can skip this and you may go to the next step.
For those who have only one mobile number connected to their Facebook account then you should add a more mobile number. This is not required but helpful since your concern is your Facebook security. If you wanna add an additional mobile number to your account then click this to go to your Mobile settings directly or you can click the picture below. It should look like this...
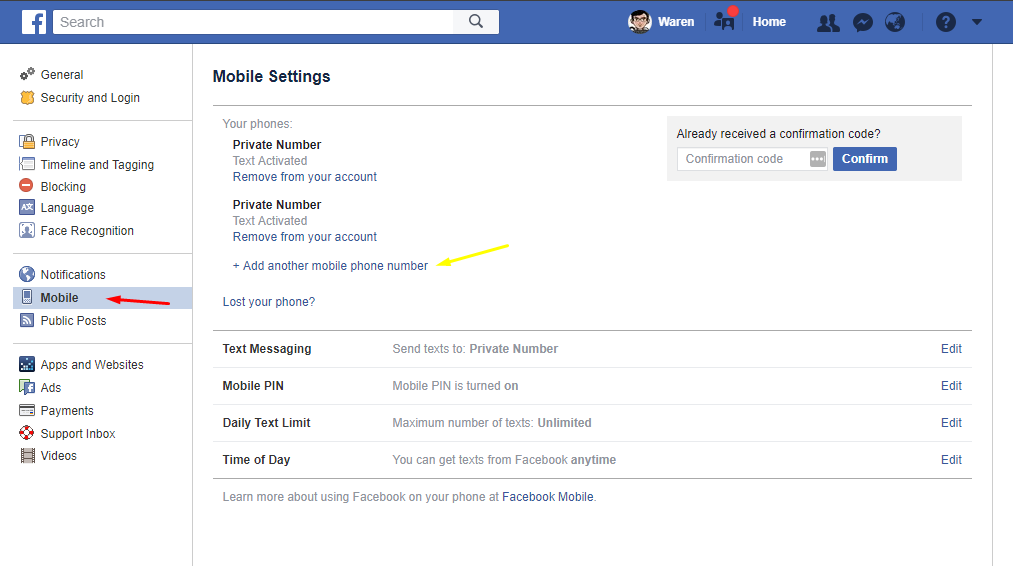
From the General Settings, go and click "Mobile" and you should see this as indicated by the Red Arrow. For my privacy, I hide my personal numbers. If you want to add a mobile number go and click the "+ Add another mobile phone number" as indicated by Yellow Arrow. A new popup window will show on your screen look like the picture below.
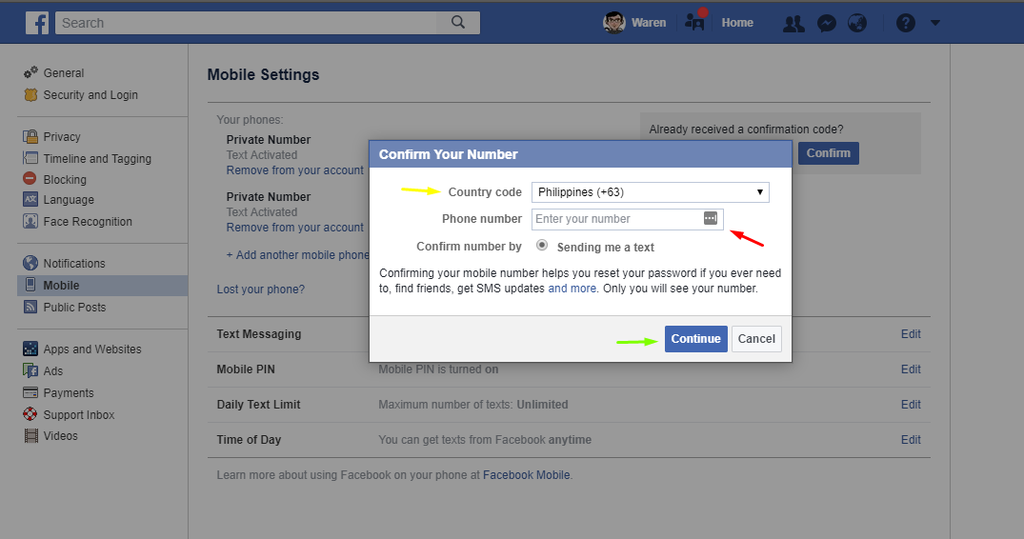
In the new pop up window choose your county code as indicated by Yellow Arrow. My country code is Philippines (+63). You should choose your own country code just to make sure you will receive the code from Facebook. In the Red Arrow, input your mobile phone number then hit "Continue" as indicated by the Green Arrow.
Just wait for the confirmation code to arrive in your inbox for about 5 minutes before to ask another confirmation code to Facebook.
When you receive the code from the Facebook then input it to the picture below.
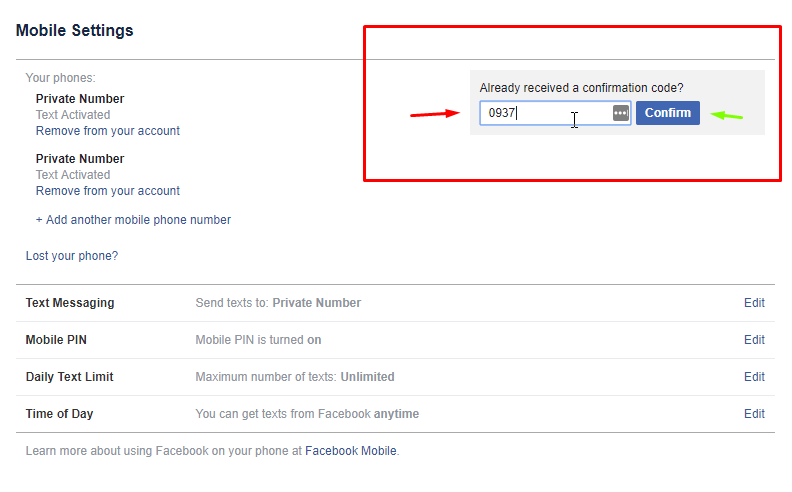
Do you see the Red Rectangle above? This is where you need to input your code from Facebook. The code might have 4 to 6 numbers on it, I'm not sure about that I can't remember. Input your code indicated by the Red Arrow as you see there is a sample code on it. Click the "Confirm" button to confirm and connect your mobile number to your account. It will show up your number in the settings after you confirm it and if it is a valid number. Facebook has an awesome system, you are not able to connect a mobile number already connected to another account. If you do this, the owner of the mobile number will automatically be notified. So, if your number is trying to add someone on their account, you'll be immediately notified. That's Facebook!
Here we go again, I have a quick bonus pro tip for you! But before that read the additional useful information below.
What if I lost my mobile phone?
If in case you lost your mobile phone don't panic! Your account is still safe from hackers out there. It simply Logout out your account that uses your mobile number as your Login credential. How? Well, I will teach you how to do that. Before that, I have a quick bonus pro tip for that!
Bonus Pro Tip! (Remote Logout Method #1)
We can use the "Lost your phone?" as your remote button to log out all of your accounts that use your mobile number as a login credential to your account. I tried this so many times before so it is really working. If you click that one it will not literally remove your number from your account it will just log out your account. Continue reading so you can gather more info about this.
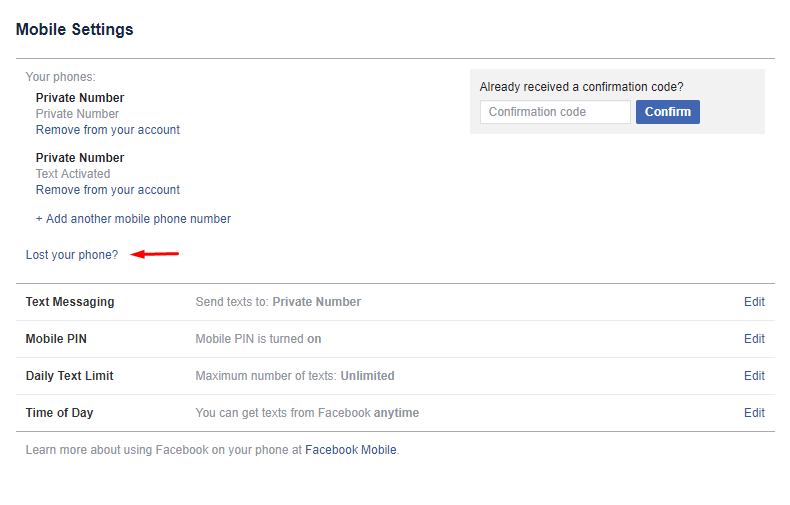
So let's continue... if the event your phone is lost together with your mobile number or SIM card. Then head to your mobile settings which is the topic here. Then click the "Lost your phone?" which is indicated by Red Arrow below.
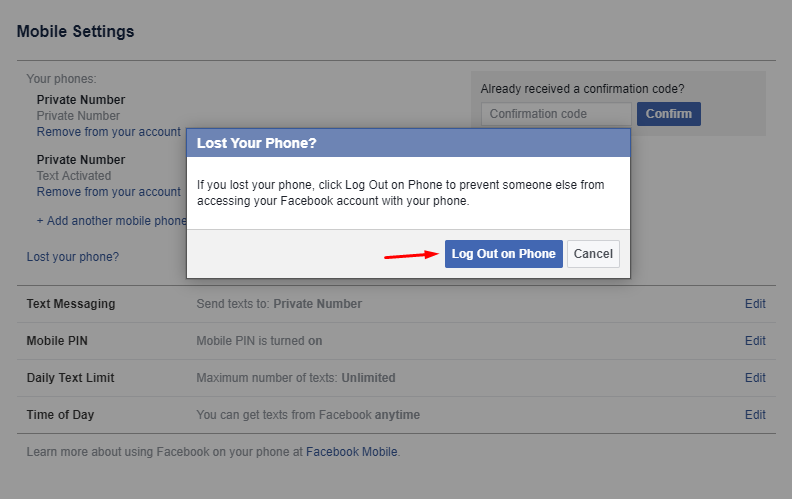
A pop window will appear on your screen, this window is asking you to confirm that you want to log out your account to the phone you lost or all account that uses your mobile number as a Login credential. Click the confirm if you really want to log out!
Now you learn something today about mobile numbers and how they are important in your Facebook account. Please keep in mind that Facebook can see your activity on your mobile phone. When you install the messenger app there is an agreement that asking you to sync or not your Facebook to your phone's contact information. Please be aware of that, for me, I accept it because I want it and I am aware of that. My account is secure and no one will know my activity except Facebook. I trust Facebook for handling my personal data. I believe that someday these days I feed up to Facebook will be useful for my own history. You know what I'm talking about hehe... If you want to know about your Facebook Data then go and click this to learn more...
Now, you have some knowledge about mobile number side of your Facebook, then we are ready to go the next step which is all about passwords. You will learn about making a strong password and how to generate it. Goodluck and see you in the next step!
Step 5: Use Strong Passwords

Passwords are very important in your online account like having an account on Facebook. The password is your first layer of online security, therefore your cybersecurity will depend on how strong your password. Hackers have their own way of how to guess your password so you need a better and secured password. In this step, I'll be guiding you how to pick and choose a good and strong password for your Facebook not only for Facebook but also for your Instructables account. Alright!
Don't use one password for all of your online accounts that are a danger to your online security. It is better to use a different password for different accounts. How to generate a strong password? Well, we will use an online tool for that so every time we sign up to a website we will use that to generate a strong password. These days, some websites offer a password generator upon sign up such as WordPress.com and etc...
To generate a new strong password for your next registration or just want to change your password on your Facebook account you must go to this websiteor click the image below and see it in action.

In the animated image above you see how easy to generate a random strong password. Under the "Your New Password" there is a "Remember your password" right? What is the purpose of it? After you generate a random password simple memorable words will appear below to help you to memorize your new strong password.
Not all can memorize such a complex password in our mind. Even me I hate memorizing passwords. How to solve this issue? We know how to generate random password but we can't memorize it because of its complexity and that's not human-readable not practical at all even if your account is secure with this setup.
The solution to this issue is by using a Password Manager! From the start of this Instructable, I recommended already the LastPass as your password manager. With the help of LastPass, we don't need to memorize all of our passwords for different accounts.
Why are you recommending LastPass?
It is because I am currently a premium user of LastPass and I use LastPass for about 2 years. I trusted them and very thankful for keeping all of my accounts safe in one place. This password manager has a feature of generating a strong password for you. You should try this...
Every time you register or sign up to a website LastPass will choose a strong password for you! Watch the video below for more information and how it works!
Now you know why I recommend this awesome password manager? Alright, if you want to know more about LastPass you can go to this playlist. Want to receive a free premium account on LastPass? Sign Up here and get your Free Premium LastPass for months.
Bonus Pro Tip! (Memorizable Strong Password)
You know what? We can generate strong memorizable passwords not like above. Wanna know how? Well, commonly when we are generating a password we often use birthdays, anniversaries, a name of our favorite anime character, a name of your pets or whatever things that are valuable to you. That method is extremely guessable, hackers are commonly checking all your records from your birthdays to the name of your favorite pet just to guess your password.I will give you some tips on how to generate a memorizable password but avoid to use your password to your online accounts. Again use different strong passwords for different accounts so you need a password manager for that.
To generate a memorizable strong password follow this... think of a thing that is really valuable to you, for example, what really matters to me is writing codes and playing Minecraft. So my password would be...
coding minecraft
That's my initial password, that's not strong because it can guess by hackers quickly using a dictionary attack. So what we need to do is to capitalize the characters and remove the space or add special characters to them. It should like this...
Coding_Minecraft
This one is strong enough, by putting special characters it will become stronger from any dictionary attacks. Another way to improve it, add a special character at the beginning and also at the end of your password.
#Coding_Minecraft!
Now it is stronger! Lastly, put a numerical number in your password, let say my favorite number is three, six, and nine. Then my password should be like this...
#Coding_Minecraft369!
Now we have the strongest password that we can memorize, that's how to make and generate a password without using a tool and at the same time we can memorize it. Let's check how strong this password.
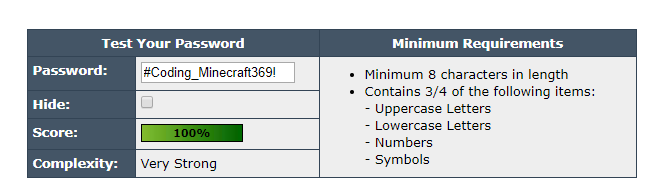
The result is fascinating! We have generated a 100% secured password without using any tool plus we can memorize it. How I test this? Simple, go to this website and input the password we have generated and see the result. On the right side of the picture above is the minimum requirements of the strong password you can follow it to generate more powerful passwords. On this website, it shows that the password is extremely safe from a dictionary attack and brute force attack. Check the image below.

Additional tip and a quick fact!
Did you know that "Tagalog" or "Filipino" words are the most secure and unhackable password? For example, my password is "MalakasNaPassword" in English, it means "StrongPassword" and that's super awesome! If you ask me where I get this fact, well this is based on my research. We all know that the common passwords are English, why not to use another language such as Tagalog/Filipino?
Hackers are always using the same wordlist which is written in the English language. What if your password is written in a different language? What do you think? Hackers might have a longer time to crack and figure out your password by doing that method. This is only based on my research, if someone does a serious research about this then I will appreciate the study, just inform me regarding this matter.
To support my research on this matter, I did a quick test! Please see the results below.

For the password "StrongPassword", it appears to have 74% strength and the evaluation is fairly good. Check the brute-force attack cracking time estimate, you will see the different cracking time estimates. As you can see on the dictionary attack check it is safe, but for me, it is not totally safe because we are still using English based password. Wanna try this? Do you want to generate your own password based on this password checker? Go here and create your password!
For the Tagalog/Filipino password, check out the results below!

Look at the image above! You are looking at the Filipino based password. The result is fascinating, it hits the 97% of the password strength which means it is highly secured and hard to crack. Also look at the brute-force attack cracking time estimate, you're about 573 trillion years to crack the password using a standard computer. If you are interested in my study you can continue the research. For me, using a Filipino based password has a great advantage over dictionary attack that uses English based Wordlist.
Now, you have the knowledge and idea on how to create, choose, and generate your strong password. By having a strong understanding of passwords then it makes you safer while surfing the internet. Keep changing the password every two weeks or every month. That is recommended to change your password frequently. You have the strong password but you're not changing it then you are in danger, don't do that. Keep in your mind to always change your password. Alright! Your cybersecurity is your main concern now.
I am done here. if you have suggestions or want to add useful information regarding this step then please leave a comment below or leave it as a suggestion. If you think that the information here in this step is insufficient then please let me know and if you have other information that should be here then let me know also. I am not perfect and not super expert in the field of cybersecurity. I love feedback from you guys... I need you guys to improve this!
By the way, you may now continue to the next step and let's explore the Facebook security settings! More bonus pro tips are waiting for you to discover!
Step 6: Basic Security Settings

In this step, we will explore the world of Facebook security! I am excited to share with you my knowledge about this important setting on Facebook. I'm gonna show you the proper setting to protect your account from any threat of hackers. Don't be afraid of hackers that they can steal your Facebook account. Facebook is secure enough from these threats. Hackers are actively participating in the bug bounty program by Facebook.
I will ask you... if you have the skill or method to hack Facebook accounts would you report it to Facebook or would you still do the black side of a hacker? For me, I will surrender what I have to the Facebook team and report it. Doing bad things has equivalent consequences and eventually, bad karma will hit you back! Let me know your answer from the comments below I will wait for it!
Anyway, if you find any bug on Facebook you can report it here. You have a chance to receive a reasonable award if your report is valid.
Let's continue the topic! The first thing you need to do is to make sure you are logged in to your Facebook account while you are reading this Instructable. Why? The reason is I have some links here that will redirect you to your Facebook settings.
To go to your Facebook security settings look for "Security and Login" tab on the left side of your general settings. Don't know to go there? Well, click this and you should be redirected to your Facebook security and login settings or click the animated image below and follow it!

In this part, I will help you to configure your Security and Login details. First thing, the information here is based on my own setup and my own method and decision. If you think my options are different from yours then it depends on you if you want to follow me or follow yourself. I am not forcing anyone to follow me and set their account according to my own setup. If you think I am wrong then please let me know immediately in the comments below, I am not perfect guy to teach you about cybersecurity.
Change Password!
Here we go, the first thing you need to configure is your Password! Please change your password into a stronger one. If you haven't change your password for months then this is the right time to change it. Improve your security by having a strong password. To learn more about Password go back to the previous step. Done changing password? You can skip this part...
To change your password you can go hereor click the image below... and you should see this...
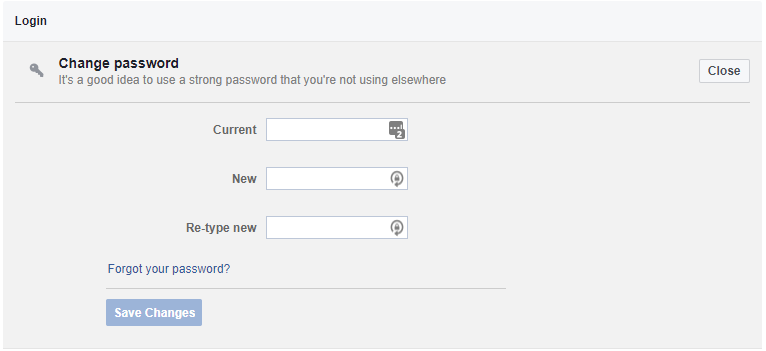
You know what to do if you see this, I will assume that you already know how to change a password on Facebook. So, just change your password and you may now continue to read!
Set Up Trusted Contacts!
The next thing to edit in your Security and Login Settings is your "Choose 3 to 5 friends to contact if you get locked out." This one is very important because it will help you to recover your account in case you lose access or it will prevent someone else to access your account.
Under your "Setting Up Extra Security" on your "Security and Login Settings" click the edit button and start to choose friends you trust. These friends are must be trusted and make sure they are your personal friends. You must have chosen at least 3 of your friends on Facebook and maximum of 5 friends. Click the picture below to set up your extra security by choosing your trusted contacts!
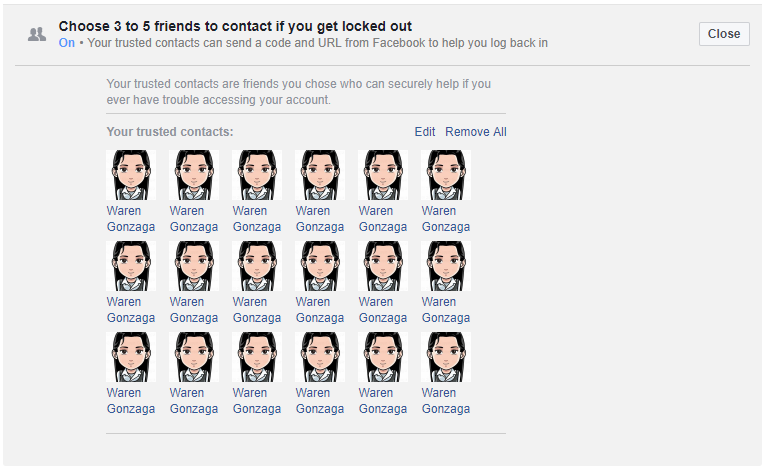
On the picture above is my creative illustration, anyway, it is important to have trusted contacts on your Facebook account. This is an added layer of our security, setup yours today!
So now we have configured our trusted contacts... proceed to the next part!
Turn Off Login with Profile Picture!
I know you will ask why you should turn off this Login feature on Facebook right? This suggestion is for your security purposes. I'm gonna ask you, what if your phone or your computer is borrowed by someone and you forgot that your Facebook account's login is activated to Login with Profile Picture. Then your account is accessible by anyone who borrows your phone or your computer, they simply tap it and they will have access to your account in an instant without any verification. That's horrible! So make sure if you turn this feature on then don't give your phone or your computer to anyone because they might secretly access your account.
To turn off this feature on your account please click this one or click the image below that shows my login settings.
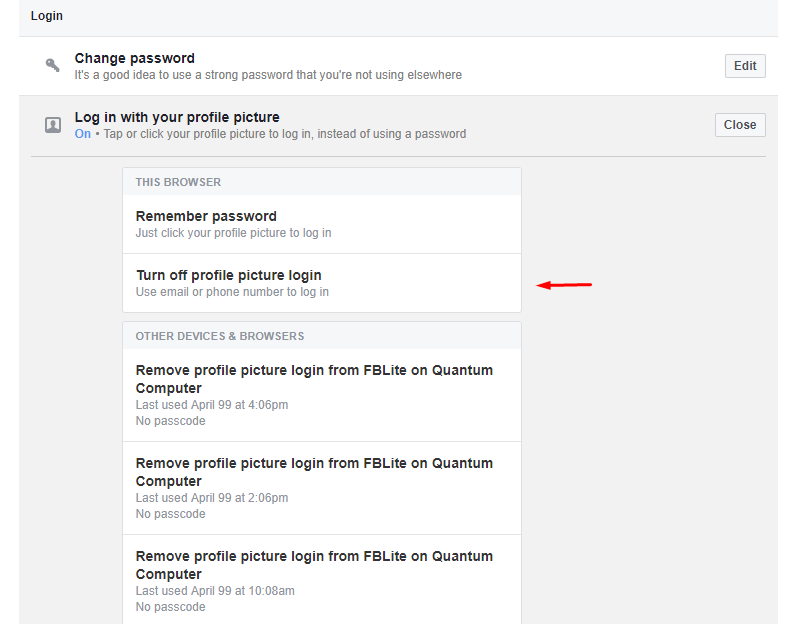
From the image above, just click the "Turn off profile picture login" as indicated by the red arrow. In this way, you are removing the profile picture login mode on your computer browser. So next time you use your Facebook you are required to log in using your email and password. We are not finished yet, if you are a fan of profile picture login then you must follow this, please remove the additional devices that use your profile as your login. To do this, check the image below and click "Remove profile picture login from..." as indicated by red arrow.
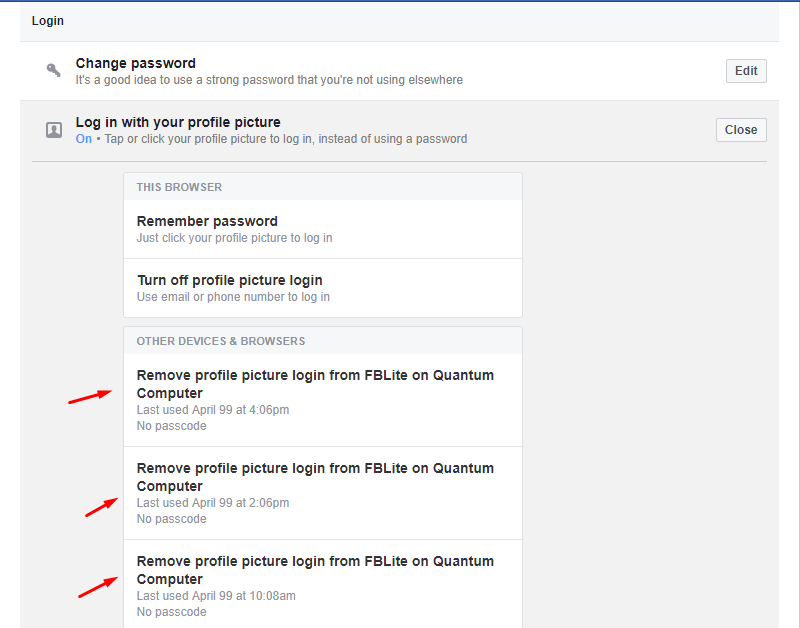
After doing this, you are logging out all of your accounts on all devices you've used before. So, you are safe now from someone else trying to gain access to your Facebook account. I am not forcing anyone to do this method, again this is a safety measure for your account. I don't need to explain more why you need to this. If you know what you are doing then go for it. I am just giving the best set up for your Facebook account.
Now your account has been turned off, you should see this in your security and login settings...
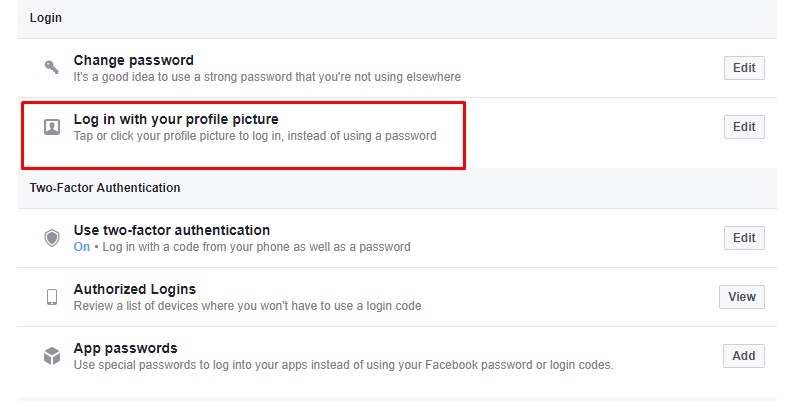
There is no "ON" indicated on your "Log in with your profile picture" which means you have turned off this feature on your Facebook. Congratulations on that! Next time, when you sign in, read carefully the message because this feature might appear and ask if you want to turn on this feature ON or not. We are done here, let's move to the next settings...
Authorized Logins!
We will not touch this one here in this step but I will tackle this on a specific step here in my Instructable. For now, we will skip this but I will give small information about this. This one, the function of this is to review a list of devices where you won't have to use a login code or any two-factor authentication methods to access your account. The listed devices might be your computer, smartphone or tablet you use when you are using your Facebook account. You can check this setting by going here. Proceed to the next settings...
App Passwords!
Even this one we will not configure this, this is because it is optional. If you want to know about this then this one is where you generate one-time passwords you can use to log into your apps without using your real Facebook password. Yeah, I know that is is another layer of security for your account. Again, this is optional for you! When to use this security feature? If you having trouble to log in to apps you use that requires your Facebook account as a login. If you wait too long for your passcode then you need to use this feature. To generate your one-time passwords for your apps then go here otherwise for more information about this security layer then you should visit this and read!
Turn On Alerts About Unrecognized Logins!
This one is a must! We need to know when someone is trying to login to our account or gain access from to our account using another device which does not belong to us or accesses our account from a different place. This is very helpful to monitor our Facebook account from any unrecognized logins. Recently, the Facebook team has been updated this feature and put a messenger on it. So what's new? Therefore you will receive now alerts on your messenger too! Yeah, you read it right! You are now able to receive login alerts right on your messenger!
We commonly receive alerts from our notification and via email but now we are able to receive alerts on our messenger. What are you waiting for? On this feature, so you are always updated on what is happening on your Facebook account. Get rid of unrecognized and unauthorized logins to your account!
To enable this feature then you should follow the image below! You can go here or click the image below to go to your settings.

Now, we have turned on our alerts about unrecognized logins then our Facebook security is getting better. If you already turned this setting on then you are on the right track. After I turned this on I receive instantly an alert in my inbox on messenger. It should be like this if you receive an alert from Facebook unrecognized logins but this time I receive a confirmation message about my action. Check the image below.
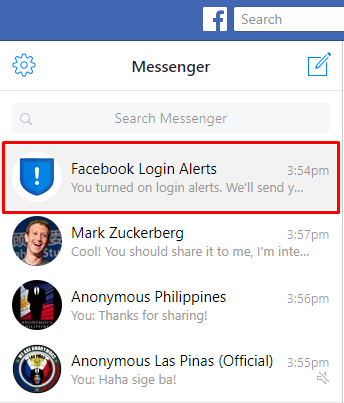
When someone logs in to your account, you'll be alerted to your messenger as you can see above that one in the red rectangle will send you a message about the unrecognized login it includes the date and time, place, and a device used to login to your account. Fell safe? Yeah, that's the power of Facebook security and it is getting better day by day. Thanks to our cybersecurity researcher out there who spend their time to find vulnerabilities on Facebook. You have options in the alert if you want to report it that was not you or you are the one who logs in.
Encrypted Notification Emails
Facebook offers a security feature to encrypt notification emails from Facebook. This is an added security for Facebook users. You should enable this in your account, this feature uses an OpenPGP Public Keys to encrypt your emails. I don't want to talk more about this, I have a good reference for this part so you can learn more about this. You can go here go here for more information about encrypting your notification emails also Facebook enable us to share our Public Keys to our profile so our friends can send us private and encrypted emails or message on Facebook. I don't want to talk about here so let's enable this feature on your Facebook account. It always depends on you if you want to enable this feature. It's up to you!
Anyway, let's do this... to enable this feature go to your "Security and Login" settings and under the "Advanced" section, you will see the "Encrypted Notification Emails." now you should see the same thing below. You can click the image below it will automatically redirect you to your settings.

Now you are in your advanced security settings, we will be able to activate this by downloading Facebook's public key. How? Click "here" as indicated by the red arrow below. After that, open that file in your notepad or notepad++ or any text editor you have in your computer and then select all the text inside and paste it in the field where you are going to input your OpenPGP public key.

I prepare a quick animated image below for you to follow it. If you are not able to follow via words then I will guide you visually so it is a lot easier to enable this feature for your Facebook account. Please check the image below or click it so you can redirect to your security settings.

In the animated image above, I show how to encrypt your notification emails using Facebook's public key. Also, I show how to share and put your public key on your profile. So your friends are able to use this to send you private messages or whatever they want to send to you that is protected and secure. Let me remind you that your public key has 30 days to expire. So you need to update your public key every 30 days to avoid of unauthorized use of your public key. If you have questions about this part then let me know in the comment box below. Let's move to other settings available in my Facebook security and login settings.
Recover External Accounts
We will not configure this one, this one is optional. It is currently available to use for your Github account. If you lost your access to your Github account then you can use your Facebook as a recovery tool to regain access and also in vice-versa manner. I know not all Facebook user is a developer and has Github account so this is limited only to developers like me. If you need more info regarding this part then go here and if you want to configure it then go here. Alright! Now your security is getting better now.
See Recent Emails From Facebook
You don't need to configure this one instead you can use this to check the list of all emails you received from Facebook including account changes, security and much more. In short, this is very useful in an investigation or maintaining your Facebook security. I'll be more detail here in a specific step here on how to maintain your Facebook security. For now, if you need information about this then go here. You will learn more here so just keep reading!
Step 7: Enable Two-Factor Authentication

You must enable your Two-Factor Authentication in your Facebook account for you to protect your important and personal data from hackers or unauthorized access. This will act as your second layer of defense if someone else knows your Facebook account credentials. It is scary if this feature not enabled on your account because it is clear that you are vulnerable to social engineering or phishing attacks. Actually, your account is open to any Facebook hacking methods available today.
How to secure my Facebook account? Well, the Facebook recommends every user to activate and enable their two-factor authentication. This is a must if your concern is your privacy and your security online. By the help of two-factor authentication, it will verify every login if it is really you by sending you a text message or SMS containing security code, might be using your authentication app that is connected to your account or using your security key or your backup codes.
If you haven't configured your two-factor authentication then you should do it now!
Text Message (SMS)
Here we go, the first thing you need to configure and the default two-factor authentication is the "Text Message." If you connect your mobile number to your Facebook account then probably Facebook asked you to enable your two-factor authentication suggesting to verify every login attempts on your account. This is the common two-factor authentication on Facebook and I think this is a safe and easy way to verify your login. There is a downside here, sometimes the security code can receive more than 5 minutes or never arrive in your inbox due to the in-demand way of authentication. Also, this authentication has limits, if you exceed the maximum request for the security code then you will not be able to log in again (SMS Two-Factor Authentication has limits if you exceed it Facebook will not send you, so you will wait 24 hours to be able to receive SMS code to login to your account). We can avoid that, you will know this but in another step just please read everything here in my Instructables all the information here is important.
We will now edit our two-factor authentication, if you already configure this one well you can skip it but all the information here is important. It's all up to you to follow this or not. If your two-factor authentication is deactivated then this is the right time to edit and enable it for your Facebook account's security.
To enable your two-factor authentication on your Facebook account then follow the steps below.
Go to your settings, after that, click on the "Security and Login" tab under "General" settings tab. After that click "Edit" button beside the "Two-Factor Authentication" option. You can click the image below so you can redirect to your Two-Factor Authentication settings directly. Alright

To gets started then click the button that says "Get Started" and a window will appear or popup, this popup will ask you about which security method you want to activate. It should look like this!
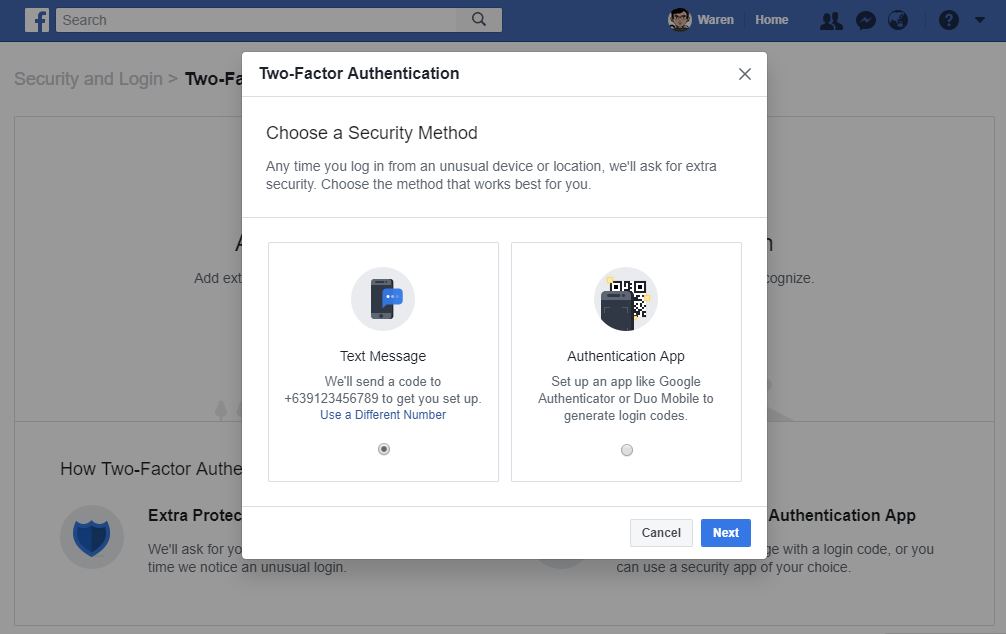
For me, I would choose the basic setting and the default one which is the text message security method. Why don't you choose the Authentication App? Well, because this part focuses on Text Message security option, the next part is about authentication app so please don't be so excited.
Complete the required information to enable this security option, Facebook will send you SMS with a code to activate this. After you activate this please keep in mind that every time you log in to a computer or phone that your Facebook account doesn't recognize then Facebook will send you an SMS with a code to be able to confirm that you are the real owner of the Facebook account. Safe enough? I will show more information about how to log in and log out proper on your Facebook account on another step here in this Instructable. By knowing that, Facebook will not ask you for the SMS with a code if you frequently use the phone or computer to access your account.
This will look like after you enable your Two-Factor Authentication with SMS security method.

Congratulations! You've activated your two-factor authentication on your Facebook account! Your account should be safe from hackers now. The next part will make your account even safer. This part is important to be enabled on your account. This is because it is your backup two-factor authentication security method. We will now use the Authentication app security method to log in. We are not done yet! Check the next part!
Authentication App (Authenticator)
This time we are going to add a new layer to our Facebook account. We will add authentication app security method aside from SMS security method. The SMS security method is our backup two-factor authentication. Why? Sometimes accessing Facebook on different devices, the only way to access it is the SMS method if the device doesn't support the default two-factor authentication method you set or you frequently use to access your account from unrecognize place, browser or device. For example, you are using a security key which is not supported on all devices and browsers. That's why we must activate the SMS security option first. I know not all users have their own USB Security Key to use, that's why I skip it and I make a separate step for it which is the next step. This is a good alternative and added security option to your account since we are in the age of smartphones, so all the users have their own smartphone to use to authenticate their self to access their Facebook account. By enabling this your account will be safer than having one security option.
To enable this security option then you should have a smartphone to use. If you have no smartphone but you have a computer then you can still activate this on your account. How? Then you need to install an android emulator such as BlueStacks or equivalent software then install the application I am recommending. If you still have not a smartphone and computer desktop then you are not able to use this option.
To enable this security method, I would like to recommend to use this application which is the LastPass Authenticator. Since we are using LastPass as our Password Manager then we should be consistent with security service we are using, LastPass has their own authenticator so we can use this actually also on our LastPass account.
Let's get started, first you need to go again on your two-factor authentication settings or you can click the image below so you will be redirected on your two-factor settings directly but before you can access your settings a password is required to be able to access it.
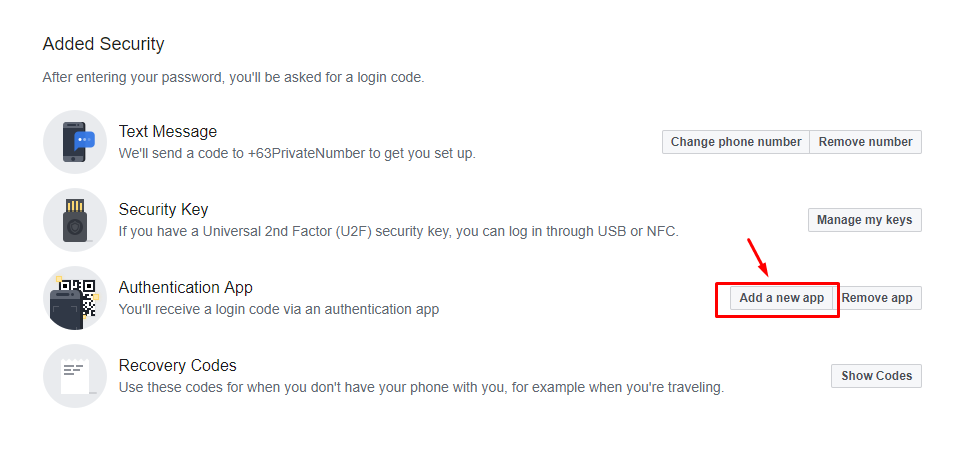
On the picture above, you are going to add a new security method to access your account. To start adding an authentication app to your Facebook account then click the "Add a new app" button as indicated by the red arrow and red rectangle. A new popup window will appear on your screen. By the way, I already added an authentication app to my account that's why the button says "Add a new app" so the image below is the actual look of deactivated security option for authentication app.

As an equivalent, click the "Setup" button, this is for the user who doesn't activate his/her security method for authentication app before. There is no difference in the first image and this one, the only difference is the button only. So yeah click that button and a new popup window will appear and you need to open the application I recommended to use. Before we can use the app we need to download it first to our smartphone. Where? Here's the link where you can download the application. Just click the google play download button below if you're using android right now and click the app store button below if you're an iPhone user. You'll be redirected to the respective download page of the LastPass Authenticator. For more information about LastPass Authenticator then click this to learn more.
Now you've downloaded the application then let's connect it to our Facebook account so next time we will use the generated code from the app to access our Facebook account aside from SMS security option.
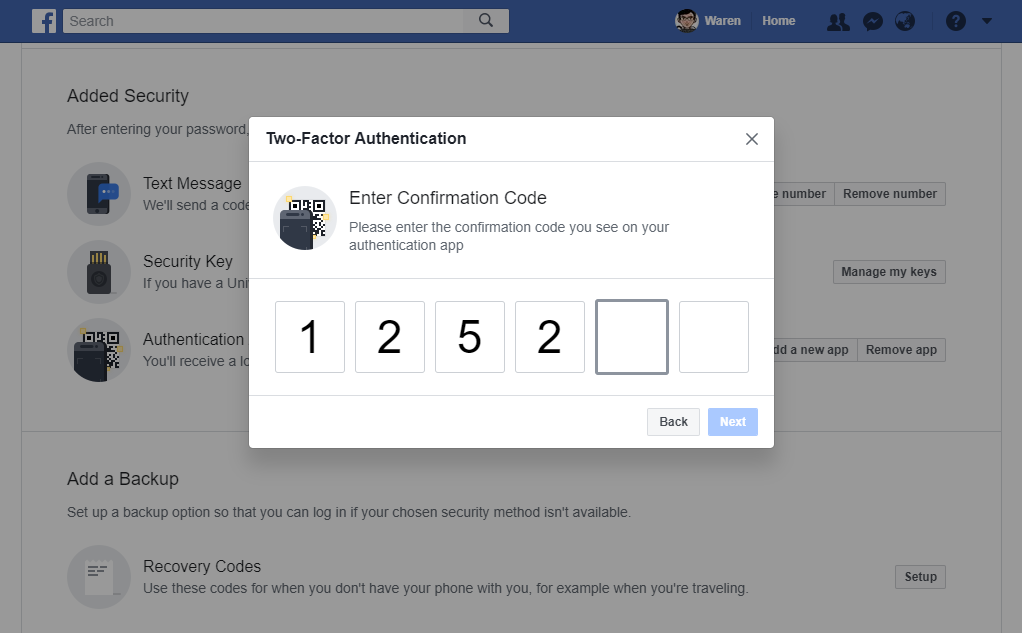
Now go back to your Facebook account settings on the Two-Factor settings. I assume that the popup window is still there, all you have to do is to scan the QR code from the popup window using the app. To do this, click the plus icon on the bottom right of the application then select scan barcode then focus your smartphone camera on the popup window from your Facebook account and wait for the app to recognize the barcode and it will auto register on your authentication app. Then hit next on the popup window after the app recognizes the QR code. Then, the next page would ask you a six digit code generated by the authentication app, now get the six digit from the app and put it in the popup window as shown from the image below. I have no image from the app because it is screenshot protected.
If you correctly configure your authentication app then it will automatically confirm the code from your app and it will show the success page as shown below. If you have any problem in connecting your authentication app to your Facebook account then you can check the guide on LastPass website.
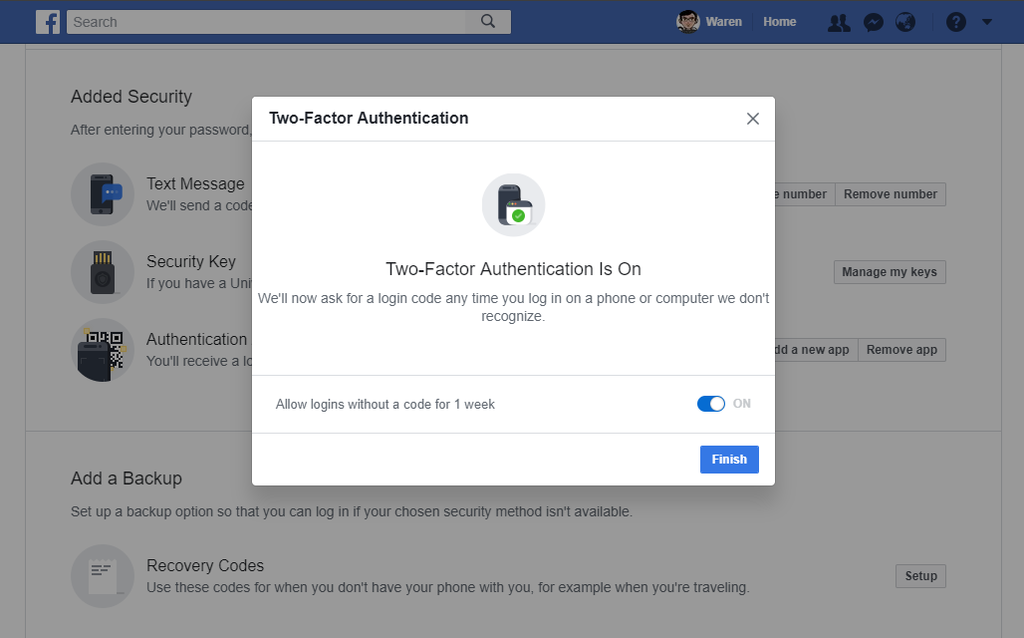
Now you should see the image above if you correctly connected your Authenticator app to your Facebook. Tick to ON the "Allow logins without a code for 1 week" this should be not asking you after 1 week if you log in to a device and choose to save it. I will give you more detail about the proper login but for now, just make sure that you only allow 1 week before you will ask again for the code. Then click the "Finish" button when you're done.
Congratulations! Your account is now more secure because you have more than one security option. We are still not done in configuring your security, we will now make a backup code to our Facebook in case that our smartphone is unavailable. You are thinking of in case that your smartphone is missing or stolen right? Then, don't panic because in this last part of this step I'm gonna guide you how to make backup codes for your login. This is useful if you have no access to your smartphone or in case your phone is stolen or missing. Proceed to the last part below!
Recovery Codes
Having backup codes to your Facebook account is another way to access your Facebook account without your smartphone or in case your smartphone is not available or something like it is stolen or missing or might you are traveling. Sometimes some of the security methods you choose are nor working or having a problem then recovery codes are the last option you need to use. This code is auto-generated by Facebook. It is completely offline and you can print it and keep it in your wallet so if you are in a public place you can use it instantly to access your Facebook account. To learn more about recover or backup codes then you can go here. Otherwise, you can continue below for more information and how to get your codes.
To get your recovery codes then follow me, now let's go back to your Two-Factor Authentication settings the last security method from below is the recovery code security option. It is not yet activated so we need to get the codes to be able to activate it and enabled. You can click the image below to redirect to your settings as usual or if you are already in the two-factor authentication settings then click the button as indicated by the red arrow below.

When you click the "Setup" button another popup window will appear on your screen and it should look like the image below. Probably, you will ask for your password before you can generate a code.
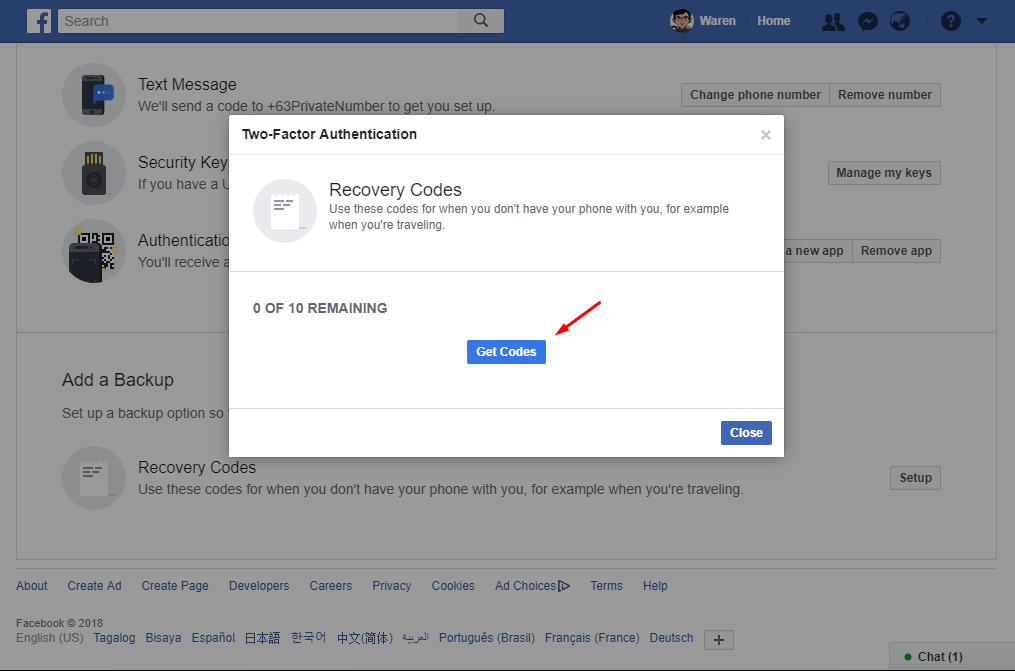
Click the "Get Codes" button to start generating your login code as it is indicated by the red arrow. Another popup window will appear to show you the codes you've generated. You will receive a 10 codes for your Facebook account. You can regenerate new code if you think that someone has your security codes. They have your codes but they don't have your password, the code is completely useless if they don't know your password. You should see the image below the list of all codes you've generated for example this is my codes...
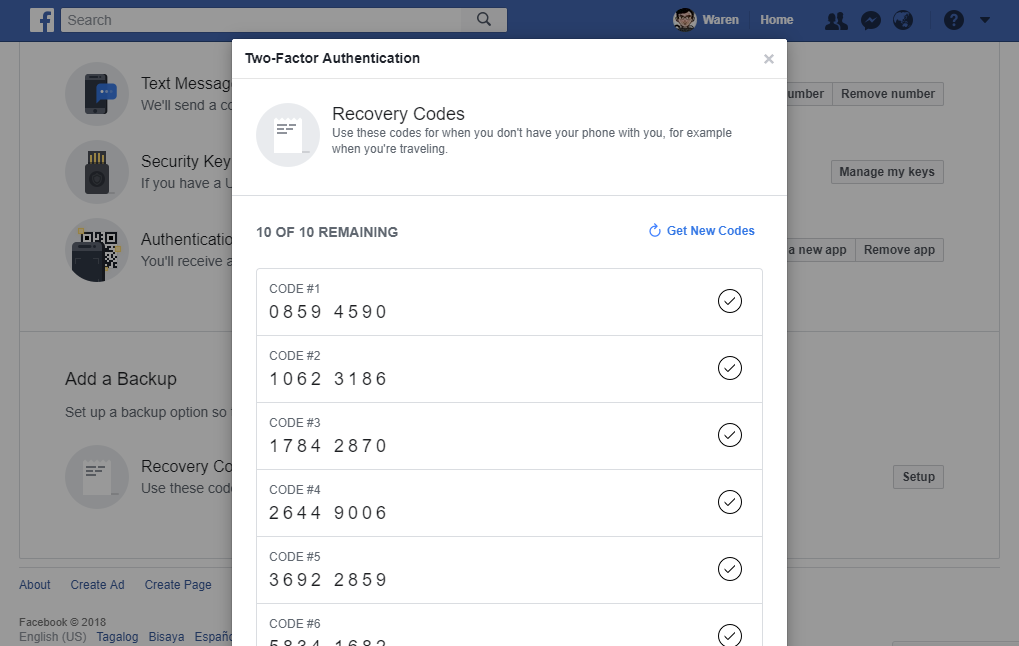
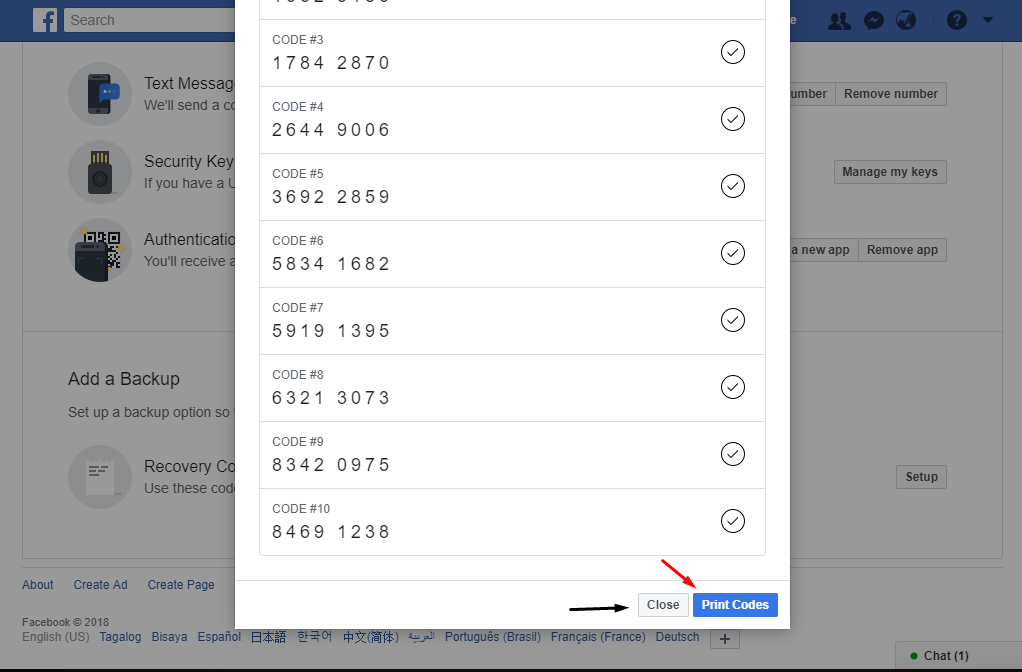
Now you are looking to the generated codes. To keep it or print it, please scroll down below and look for the button as shown above, then click the button indicated by the red arrow. You should have the copy of your recovery code because it is very important to regain access to your account. Did you know that? There is one time that my Facebook account is completely I have no access to it because of my strong configuration to access it. So that, I learned too much about how to properly configure your Facebook security without having any problem to regain access. Always provide backup on your security in case your methods are not available or working. It is better to have a secure account instead of having an account that is easy to hack and access by someone else. Facebook accounts hold sensitive data so it deserves to be protected.
When you print your recovery codes then the print out should look like the image below. Please keep it in a safe place to avoid unwanted access to your Facebook account. If your print out is missing immediately get new codes with the same option we use. I will assume you can regenerate new codes or if not just comment down below.
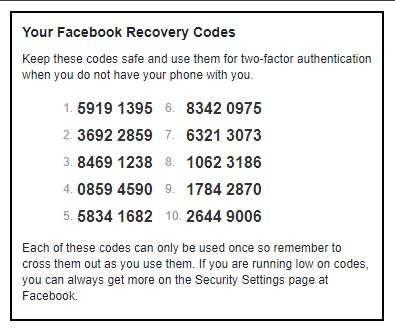
Now keep that printout and you can use it to log in to your account. Your account now is more secure and has a proper configuration to its security. Your account is safe from any known attack, for me Facebook is still working to improve the security of Facebook users to better keep their information and data safe from unauthorized access. More security options will be available more in the future this is some of the basic security methods you need to enable and activate on your account. Your two-factor authentication settings should now look like the image below.

Congratulations, you have now the basic security you need to secure your account. This is the most basic security settings for Facebook accounts. These security settings are properly configured to my account. Also, I am aware of the information I share with you guys you can't use this information to get an access to my account. All the information I share are manipulated and it is for demo purposes only.
There is a new security option available in our Two-Factor Authentication which we do not configure or edit. You notice that right? Well, in the image above you can see the "Security Key" security method, this one is for those who have Universal 2nd Factor security, for example, having a Yubikey. What is Yubikey? You will learn more about it on the next step! I recommend having this key to your Facebook account for a more secure account!
Have a security key? You can go now to the next step to learn more about this awesome and latest technology for online security this is the future of strong online security!
Step 8: Use U2F Security Key!

Have you ever heard about security keys? These keys are very useful and reliable in cybersecurity. It is your two-factor authentication key for your Facebook account. This is not only limited to Facebook, it can be used on different popular online websites such as Google, Github, LastPass and more. You can visit their website to learn more about Yubico and their Yubikey.
I have a security key from Yubico I purchase it last year and I am still using it for my accounts online. Based on my experience of using it, it is a super reliable way to use as your modern authentication. It is easy to use and easy to log in to your account. It is a kind of passwordless way to log in to your online account. Facebook has now supported this key and everyone should afford and have this. Sadly, this device is not affordable in my country so few people have access to it. I bought it because I am a security researcher and want to explore latest technologies related to cybersecurity. I'm so amazed when I receive my first key which is the blue one. Check the image below this is the U2F Security Key designed for Facebook.

That's the key I have now... I have one connected to my Facebook account. I'm suggesting and recommending to use this key for your online accounts. By having this you are more secure and you have protected from phishing and account takeovers. This is like an ordinary key but it is a key for your accounts online. Wanna know how to use this and how it works? I prepare a video below from Yubico company on how to log in using your U2F Security key which is the blue one. Check out the video below!
What do you think? Easy login right? That's how U2F Security works and how to use it. You can buy this key on their official website or you can contact me so I can give you a discount if you are ready to purchase it. Having key like this will prevent you from any costly data break from your account. So it is better to spend money on this kind of device to protect your online accounts from hackers.
I am highly recommended to have a key from Yubico and connect it to your Facebook account.
When you have your own security key then we are now going to connect it to our Facebook account. I will guide you how to connect it. Please go to your Two-Factor Authentication and look for the "Security Key" security method. You can click the animated image below to go to your two-factor authentication settings.

The animated image above is the complete guide on how to add your security key to your Facebook account. This time I'm gonna add my latest key which the Limited Wired Edition Yubikey 4 from Yubico. I already connected my two U2F Security key on my Facebook. Wanna know the difference between U2F Security key and the Yubikey 4? Well, check the link below for more information!
Now you have the information about the difference between two products of Yubico. Now let's proceed to our topic about security keys. Now we already added a new key to our Facebook now I will show you my own review how I log in using keys on my Facebook account. I have two version of the video. The first version is Tagalog or Filipino version and the other one is English version (I am bad in English, sorry for bad quality) you can watch the video on my Facebook page. You can click the link below to go to my Facebook page!
How to use Facebook Security Key! (English)
How to use Facebook Security Key! (Filipino)
Sorry for the bad content on my Facebook page and my videos above about security key I recorded that video last year. I will assume that you have now the idea and you know about security keys and you are ready to use it. If you want to buy it you can actually order it to me directly and/or you can pm me for the discount.
I have extra security keys here if you are living in the Philippines please contact me via email or Facebook. Check out the last step of this Instructables so you can get yours and have a chance to meet me in person! Thanks!
I will congratulate you for taking time to improve your Facebook security. Again, this is up to you to follow my setup or not. For me, this is the most secure way to protect your Facebook from phishing and account takeovers. If you have questions regarding this step or have a suggestion or even improvements to this step please let me know as soon as possible. I love feedback from people who support me. If you think that the information here is wrong or insufficient please let me know by leaving it as a comment below.
Bonus Pro Tip! (Underwater Access)
Did you know that you can log in to your account underwater? Don't believe me? I have the article from the Yubico demonstrating how to access your account underwater within 20 meters below. You can watch the video below or visit this article so you can learn more about it! Alright!
Fun fact! Did you know that? The video above is filmed on the water of some part of the Philippines! Alright! That's fascinating! I live in the Philippines and I am proud that the YubiKey Neo is first tested on the water in the Philippines. So yeah, I am so proud of it...

Now, if you activated Security Key as your Two-Factor Authentication then the image above will appear on your screen after you log in using your email and password. All you have to do is to insert your security key and then when the light shows on your security it is the time to touch is and boom! you will now successfully gain access to your Facebook account. It looks like your Facebook has door or padlock before you enter. Alright! Awesome!
The next step will be more about the proper login and log out of your account! You will learn how to log out your account remotely or log in on unrecognized computers. By having a knowledge about this then you are now ready to deep dive into an online world and confident to surf without worrying about your online privacy and security!
Step 9: Proper Log in and Log Out

In this part, you learn how to properly log in and log out on your Facebook account. If you are confident that you can log in and log out on Facebook account safely then you can skip this. I would recommend to still read this because you might not know some of the information I share here.
I know that everyone can log in and log out on their Facebook but the question is... are you doing it right or you doing it safely? Some of the users I encountered they don't know how to log out their account in a public place. Sometimes these users save their information in the browser they've used. I encounter this on any public internet cafe. They don't know that their account is vulnerable from account takeovers or hijacking.
I will make this step more detailed and direct, let's proceed with the things you must know about the proper login and log out on your Facebook account. This step requires your account to be two-factor authenticated. I will assume that your account is already protected by the help my previous steps. This step is for two-factor authenticated only, this will be not applicable to your account if you have no any basic security on your account. Why? because the information here is for account's that has extra layers of security. So let's proceed...
Proper Log In (Common Sense)
There is two different situation in accessing your account, the first is accessing your account on your personal device or computer you own and accessing your account on a public computer or shared device. This time, I will guide you how to log in properly on your private and personal computer or device.
Personal Access:
Do you have your personal computer right? If yes, you can instantly use your Facebook account just make sure you are the one who has access to it. By allowing others to use your computer then your account might be in great danger and access by someone else. Now let's do it...
Log in to your account like a normal thing, input your username or your mobile number and your password. After that Facebook might ask you for security method this might be an SMS code, a code from authentication app, or might be a security key.
- SMS Security Method - If you choose to receive an SMS code from Facebook then it would be so easy. All you have to do input the code you receive from Facebook to the corresponding field on your security method screen for two-factor authentication.
- Authentication Application - Open the authentication app that is connected to your Facebook account. Now get the code showing on your authentication app and then input it to the corresponding field on your security method screen for two-factor authentication.
- Security Key - Inset your security key on your computer's USB port and then if the LED blinks on your security key then touch that and you should be able to log in.
Now, after your successful login... a security checkup will show up on your screen! Don't click anything!!! You must understand this feature on your Facebook and what is the purpose of this on your security. To learn more you can click this.
Here's what it looks like... you should choose "save browser" then click continue!

Since you are using your own computer or mobile device to access your account then you should save your session. What does it mean? When you choose "save browser" on your personal computer or mobile device then it means next time you open Facebook on your browser then you will not ask for the password or you will not be required to log in or ask for your username and password again. Please keep in mind that if you save your browser it will automatically log to your Facebook security activity which means you can track and monitor which devices accessing your account. Super cool? Might be the image above has more question about your unusual login. You might see the image below after you ask if you want to remember the browser you're using or not.

Now you know the proper login? As additional, if you choose to remember the browser you use to access your account, the good thing is even if you log out your account and log in again, Facebook will not ask you to confirm your login using two-factor authentication security methods. It means you are using a permanent browser or device which is yours and no one can access it. The two-factor authentication is happening if you log in to a device which is not recognized by your Facebook account that's why it needs to verify your login. That's it!
Now let's move on to the public access, this means you are accessing your account in a computer shop, internet cafe or a shared device which does not belong to you. I'm gonna give you some tips on how to log in safely in that situation. Let's get started!
Public Access:
Don't have a personal device or have no computer to log in to your computer? Well, I am here to give you an idea on how to log in properly and safely on public devices and computers. I know you are scared of accessing your Facebook account on a computer that does not belong to you. Even me, I scared at first because I don't have any idea and knowledge on cybersecurity since I study it and gain knowledge then now I am not worrying to log in to my account even in public area.
This part is similar to accessing your account on your private computer and devices. This time there is a slight difference in the last part of your login. I will assume you are using a shared computer let's say a computer in the computer shop or internet cafe. Now, you are logging on your account and asks for two-factor authentication based on your chosen security method, for example, you choose a security key security method to authenticate your login. Now after that, a similar question will pop up on your screen but this time you will provide a different answer or response.

In public situation, you MUST choose "Don't Save" option and then click continue! Why is it important? If you mistakenly remember a public browser on your Facebook account then someone can potentially access your account without your knowledge. There is a less chance to hack your Facebook in that way because you have two-factor authentication enabled in your account. In your full security, you must not save a public browser on your Facebook account.
Now, you have the idea on how to properly log in to your Facebook account. In this way, if you choose not to remember the browser then if you log out your account and log in again then a two-factor authentication will appear on your screen this means the public computer is unrecognized and unusual login detected by your Facebook account.
Hey Waren! The proper login is common sense thing! Yeah, indeed it is common sense and easy to understand by reading the things in your front, but for a non-technical person, this thing is hard to understand for them. Instead of understanding what is going on they will skip it and continue to use without understanding the purpose. That's why I still make a clear explanation and discussion about this part. There are so many users that they don't know what is the real purpose of "remember browser" thing when they are successfully authenticated or login in. They don't know that this is a part of cybersecurity feature of Facebook that might help them to recover and protect their account in case of account takeover or account hijacking.
So now, since we are ready and we know the basic of proper login in private and public situation then we should continue to the proper log out of your Facebook account.
Proper Log Out (Common Sense)
Here we go and I am very excited to share with you my experience and knowledge about using Facebook. You will learn how to properly log out your account from both public and private computers you use to access Facebook. You will learn how to remote logout your Facebook account using your personal computer or your personal mobile device. By learning it, you will have a confidence in managing your access to your Facebook account.
I will list down some questions below regarding proper logging out of your Facebook account. It will look like an FAQ for Facebook users. Alright, let's get started!
How to log out on Facebook safely?
- A pretty basic thing, log out on your Facebook in a usual way by using Log Out button on your Facebook. Your session information and data is stored on the browser you use to access Facebook. Your browsing activity is still there and might be the two-factor authentication tokens are might be stored in there. What does it mean? It means, for example, you are using a private computer then probably you save the browser to your Facebook, so when you log in you will not ask for two-factor authentication.
If you are using a computer or mobile device that belongs to you then you don't need to do something. But, if you are using a computer or mobile device that is not yours then you need to clear your traces and your browsing activity there. How? To do that, you need to clear your browser's cache, cookies, and history.
A good guide below is perfect to follow for desktop users...
The video above is from Anson, follow that to erase your online activity. For the mobile devices and you are accessing your Facebook using Google Chrome app the follow the video below. Then if you are using different browser app on your mobile device then learn how to use Google, just Google it!
Now, for those who use Facebook app to access Facebook then just log out. After that go to your application settings then look for Facebook application and tap for the "Clear Data" button. Then you're good to go.
How to log out on Facebook remotely?
- There are some available methods to do that, I've used these methods to remote log out my account from a shared computer or on my office computer. This time I'm gonna show you how to do that on your Facebook account. We will use the security features of Facebook to remote log out our account. Might be you already did this on your account. Let's get started.
Method 1: Lost Your Phone
I already share this method on step four of this Instructables with the title of "Use Multiple Mobile Numbers." This one is the easiest way to log out all of your accounts to the devices you've used. I know this one is intended for logging out your account to a mobile phone that is lost. Which is very helpful for keeping your account safe from unauthorized access. You can also use this to intentionally log out your account remotely.
This method is useful if you forgot to log out your account from your friend's mobile phone or computer. Very helpful? Well, that's cool! Let me know what do you think about this method in the comments below.
Method 2: Where You're Logged In
This is the right way to remotely log out your Facebook account. The real purpose of this is to monitor and manage where you're logged into Facebook in Security and Login settings. You can use this to log out of Facebook remotely on another computer, phone, or tablet. Awesome? Now, go to your settings and click "Security and Login" settings' tab after that look for "Where You're Logged In" or click the animated image below. Check out how to log out all the session on your Facebook account.

Now you know the purpose of this setting on your Facebook account? This is how I log out my account from my office computer. Sometimes, I log on a shared computer and then after that I go home and open my computer at home then simple I will remove them or kill the session of the specific computer I use based on the location of that computer and also what time I logged in. This is very useful to kill suspicious unauthorized access to your account. Instead of clicking "Log Out" you may click "Not You?" the security checkup will show up on your screen and Facebook AI will help you to decide what you should do about the unauthorized access. What do you think about this part? Let me know in the comments below and proceed to the last method for remote log out.
Method 3: Authorized Logins
We are now in the last method on how to remote log out on your Facebook. Do you remember this part of the previous steps? If yes, I will assume that you have the idea of what is the function of this on your Facebook. This is your setting to manage the devices that have authorized access to your account without asking you a code or kind of two-factor authentication to log in. If you remove the listed devices in this setting it automatically kills the session on that device or your Facebook on it will be logged out. This is useful if you want to remotely log out your Facebook on a computer, mobile, or tablet that is not yours or stolen or lost. To do this, go to your Facebook settings and then click on the "Security and Login" settings' tab and then look for "Two-Factor Authentication" section and then click view button beside "Authorized Logins" or you can click the animated image below to go directly to the settings I am talking about...

The animated image above shows how to remove a computer, phone, or tablet on your list of Authorized logins. Which means you are removing their access to your Facebook account. They are not able to use your Facebook unless they will authenticate themselves that their login is valid. You can use the function to Authorized Logins as your remote log out method.
Bonus Tip! (Revoke All Devices)
There is no option on Facebook to kill all the session active on your account. So this time I will give you a simple idea on how to revoke all the devices you trust or undetected device connected to your Facebook account. To remove all the connected devices to your account simply do all the methods above. From method 1 to 3 follow all the steps and you are ready to go. Super easy to do... by doing this you can discover if there is an unknown device using your account. It will result in a secure Facebook account.
After removing all sessions or access to your account, then the image below should see if you trying to use the device with an expired session.
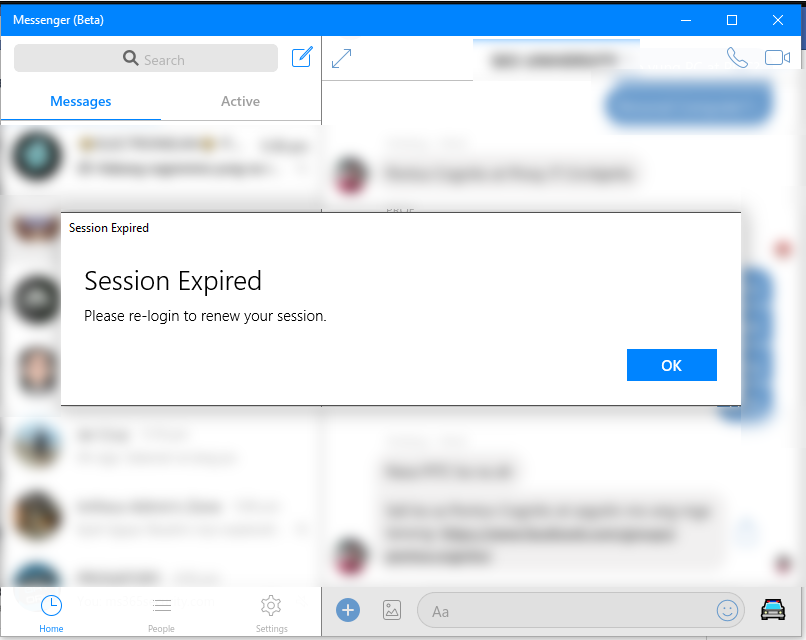
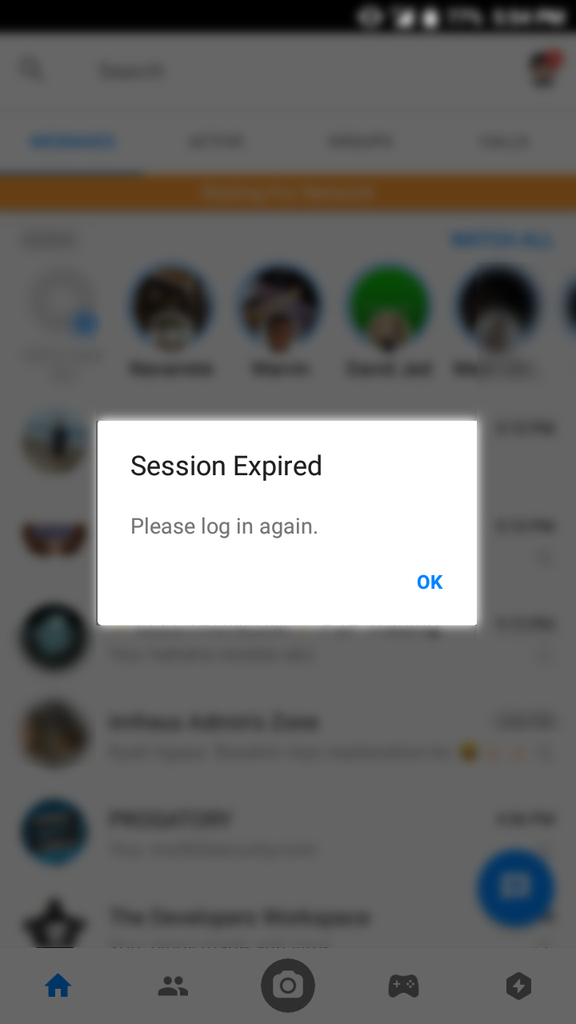
Congratulations, you learn how to log in properly and log out remotely using another computer, mobile, or tablet. By having this skill and idea on Facebook, you can protect your account from phishing and account takeovers. If you already know the information above let me know what you can add. You can also comment your thoughts about this step. If you have questions and suggestions just personal message me or comment it down below alright!
Step 10: Maintaining Your Security

Hello there! Now you know how to protect your account from hackers right? I think you have the basic and some advanced knowledge to defend yourself from cyber attack. Let me share it with you guys, I am not fan or users of any antivirus because I don't use windows. If you detect that I am using windows computer then you are wrong because the windows I am using is running on a virtual machine under Linux host. Cool? Yeah, a pretty cool setup that's how I protect myself from possible cyber attack. Another thing, the best antivirus you will have is your brain! Why? because it depends on you how you use the internet daily. It also depends on you what to click what to install and whatsoever. Wrong moves on using computer or Internet will result in you a big damage.
Now, in this last tutorial, I will teach you how to maintain your security on your Facebook. This is not only for Facebook but for all of your account and for your online activity. This is a very important step in this Instructable. I will give some important knowledge on cybersecurity. This is free and always be... but in exchange for this information to be free is all I want is to support me spread this Instructable to your social media accounts if possible. I spend a month to write it all so you should or must support me!
Let's proceed now to the topic...
You have now the knowledge on Facebook Security and how it works then you can even improve it by learning also how to maintain your security. Imagine, your car or motorcycle, if you use them every day then there is a possibility that it will have some malfunction. What I mean, you need a maintenance to your car or motorcycle because maintenance will prevent any accident might occur and will keep your safety.
Like on computers and on cybersecurity you should maintain your security by monitoring your account. How? I list the things you should do to maintain your account and prevent any cyber attack in the future below.
Don't Click Any Suspicious Links
The number one cause of Facebook account hack is the Phishing and Social Engineering methods. These methods are popular in the cyber world. Even self-proclaimed hackers are using these methods even without learning how to program. If you your friend or a stranger sends you a link to click then don't do that! If you are really curious about that link then pull another web browser not your current browser because your cache and cookies are there that holds your account information. For example, you are using a Google Chrome then open a Firefox on your computer copy and paste the link to the Firefox and try to load it. If the link is requiring you to log in using your Facebook then think twice. Check the URL if it is "HTTPS://FACEBOOK.COM/" and if it yes then it is safe to log in. If not!? then that's a fake Facebook login and you should avoid to log in on it.
What if you accidentally put your credential on the fake Facebook login page? Don't worry, your account is two-factor activated and if the hacker uses your credential to log in your Facebook account will ask the hacker to validate himself and the hacker will not enter your account unless he has some methods to remove your two-factor authentication. The best thing is to change your password immediately. So don't click any suspicious links sent to you by strangers or by your friends. Be safe!
Always Make Sure Your Connection Is Secured!
Are you in a public place that is connected to a public WiFi? Well, make sure that you are using HTTPS while you are browsing because the unsecured connection will be dangerous. Your connection to the WiFi router is live and someone can receive your browsing activity anything that you are doing on your mobile or computer. Hackers like me have a very special tool that can monitor data packets flying in the air we can convert it to usable data and information. We can see the picture you are looking and the information you are reading also the account credentials you input to log in to your account. So be sure to make your connection secure!
Change Your Password Frequently
You need to change your password frequently because having password unchanged a year or more will bring you into a big disaster. Just always change your password every month or every quarter of the year. I recommended changing your password every month for more secure digital life. You can use the LastPass password generator to generate your next password. Alright!
Update Your Email
Always check your email connected to your Facebook make sure everything is working correctly. Make sure your email is active on your Facebook account because it is the most important on your Facebook recovery this is your last option to recover your account in case someone gains access to it. Better to double check that one!
Update Your Mobile Number
Better to check if your mobile connected to your Facebook is working and updated. Your account will lock if you fail to do this because of active two-factor authentication. It will give you a pain if you fail to check this. Be sure that you are using an active and latest number of yours.
Monitor Where You're Logged In
On previous step you learn about this one, It is better to check your settings and remove all the sessions that might not you or you don't want to have access to your Facebook account. This way, you are making sure that your devices have the only access to your Facebook account. Double check this part and remember only your devices should have access to your Facebook.
Monitor Authorized Logins
This is important to monitor, on the previous step you know this as a list of authorized devices to log in to your account without asking your code or any type of two-factor authentication. Always check this one and remove from the list the devices that you don't want to have a direct access to your Facebook account. If you think that the devices on your list are yours then leave it alone and if you see something weird on your list immediately change your password and remove all the connected devices on your Facebook and start re-log into your Facebook. That's more even safer at all.
Use Incognito Browser If You're Using Public Computer
In computer shops or internet cafe, you probably log in on it using the default browser the Google Chrome right? Well, that's dangerous! Google Chrome records your browsing activity along with your Facebook account and your cookies and cache are stores in there. So, for more safer and secured online activity use Incognito and log in to your Facebook just always make sure that your account is two-factor authenticated because if some recording your stroke then they are not able to have access to your account directly you'll be warned immediately if someone is trying going inside to your Facebook account. Just immediately change your password if something wrong with your Facebook. Alright!
Make Your Life Private and Don't Be Like a Famewhore!
Probably you heard about this, these are the users that are actively sharing their private information on Facebook. For example, they got a new job and they posted their ID. That's a completely F for Fantastic! Why? because they don't know that some can use their ID to take over their account! Also, their ID information can be used for any evil thing. There are also some users posting their financial credentials such as Credit Card. They are posting the front of their credit card, they don't know that the numbers on your credit card can be recreated and generate a new valid credit card that can be used to purchase anything online. Your account might be used for unauthorized purchase online so be sure not to share everything in your life please make your life more private don't share too much your information on social media. If you follow the setup here in my Instructable then your account automatically a private now. So thanks to me for that alright!
Don't Post Anything That is Against to Community Standards
Facebook is the best place to connect with your friends and families. This means you are not able to post anything that will violate the community standards. This the general rules on Facebook that everyone should follow it or else your account will be deactivated, removed or might receive a restriction from Facebook. By avoiding posting useless things on Facebook your account will be safer from any kind of reports on Facebook. Also, allow on your profile to followed by everyone on Facebook because having a follower on Facebook will save you from any kind of reporting. This means you are legit personality. So please take care of your account and make your profile clean as much as possible and use always two-factor authentication on your account.
Now you're all set!
Congratulations you're all set now, that's for now. The above information might help you to maintain your security and also to protect your account from any known cyber attack or hacking. Keep in mind that Facebook is still working to improve our security so we are the one who really responsible to our privacy and also to our security. Facebook provide the tools we need to protect ourselves from these known attacks. So, use these tools from Facebook to make our data and information more secure and safe. That's for now guys! The next step would be the summary of you've learned from here. Alright!
Step 11: Wrapping Up!

Thank you for taking time to read this Instructable for securing and protecting your Facebook account from any known cyber attack or hacking that exists today. I hope you learn something here or if not please let me know in the comments below or if you have any tips and tricks on Facebook please let me know by leaving it on the comments down below. Make sure your suggested tricks are valid and not a way to bug the Facebook.
I will sum all of the things and highlights on this Instructable, on the first part, I introduce to you the Facebook and how important to have a secured Facebook account. Also, I discuss the Facebook–Cambridge Analytica data scandal which leaks the information and data of almost 87 million users.
I suggest some useful things to use to protect your account from hacking. I recommended to use LastPass and also have a Security Key connected to your account. By doing this, you are more secure in the cyber world. I have both of this cybersecurity tools and they are very reliable in protecting your account from any form of hacking. If you have these tools then you are Phishing and Account Take Over Proof.
We check the most common and basic settings to check in your Facebook account. By the help of it, your account is now private and untrackable with ads on Facebook. Facebook uses cookies to record your browsing activity. Now you can use Facebook without ad tracker.
You've learned that having dedicated emails and multiple emails are more secure than having one centralized email. Also, you've learned that having multiple mobile numbers would be helpful in event of losing an access to your Facebook account. In this way, you are sure that you can regain access to your account. Even having an active email would be also a great way to regain or recover your account from hacking and Phishing. Your security will depend on your password! In this Instructable, you also learned that having strong password will make your accounts more secure and having a second layer of defense which is having a two-factor authentication activated on your account is another thing should be considered to add on your Facebook account.
You have now basic understanding and setup on your Facebook security settings. Anyway, it is up to you if you follow my setup but that's how I secured my account. Don't blame me if your account has been hacked by others. I provide all the information you need to know in your security settings also I show how to use the universal second-factor authentication security key which is the U2F Security Key for Facebook or the branded one from Yubico which is the YubiKey 4.
I share my knowledge on how to log in and log out. I know you know how to log in and log out but I have some recommendation on how to do that right and also I give tips for your security. Sometimes, I encounter an end user that they are not aware of their computer they are using. Sometimes, their password and email are saved on the computer which is risky. That's why I prepare things that might help them to log in properly. My favorite part in this Instructable is the remote log out. I share the information on how you can remotely log out or kill all the sessions on your Facebook account. This one is the important feature on Facebook and super awesome. This is not a hack or what is in in the Facebook settings waiting for you to use it.
At the end of this Instructable, I give the most basic way to maintain your account. Since you know the security part then why not to maintain it and develop it. I am no longer with you to help you (except you hire me as your personal cybersecurity consultant) that's why you need to take care of your account and just make this Instructable as your reference on security. I believe that the real best antivirus is your brain!
You can check the last step for more information about me and how to support me! Alright! Thanks for your time to read this simple Instructable about Facebook Security. I like to help so that no one Facebook account is vulnetable to any known attack such as Phishing. Have a great day!
Step 12: Thank You Waren!

I know you are being curious about the author of this Instructable because of the information he shared on the Internet. Hey reader, this is not amazing, this Instructable is based on my experience and understanding of how Facebook works and the things here can be found on the Facebook help center, it is better to check it out. Also, this is a big common sense post.
Who is Waren Gonzaga? First of all, I am a cybersecurity researcher and senior web developer in a cybersecurity firm here in the Philippines. I have the basic knowledge in cybersecurity mostly on ethical hacking. I am currently studying some course online about ethical hacking and my greatest mentor is Zaid. I am preparing myself to get certified as CISSP and CEH. Aside from being an ethical hacker, I am also a popular and award-winner DIY blogger here on Instructable and also featured in the sixth issue of Hackspace Magazine. Aside again being DIY Blogger I am a plain average programmer and developer as my profession and my work. I am a simple guy that really loves to create something new. I am an average guy that has dreams to chase!
This Instructable is a sum of all research, and experience I gain from using Facebook. I finally share the things that every user should know. I give this information for free of cost I hope the reader of this Instructable should share this and spread the word about cybersecurity to help others to protect themselves from the threat of hacking. Don't be afraid of script kiddies spreading and occupying on Facebook they are just kids that proclaiming that they are real hackers but they're not. Real hackers, they don't have time for threatening others users that they can hack it or what. So better to ignore them.
I spend weeks to write this Instructable and I am very disappointed because of the contest for Pro Tips, they ended up so quickly. This Instructable should be published before the deadline at the end of the month of April. In bad luck, I didn't submit it and Instead of losing hopes I still push to finish and improve it because why I am writing it? For the contest prizes? No! I realize, that I am writing it is to help users to protect them from any hacking. So now, in exchange, please share this Instructable and hit the heart from above. It would help to make more cybersecurity blogs in the future...
To support me you can buy me a coffee using the button below. :)

Be my patron on Patreon! To see my upcoming projects, blogs and more!
https://patreon.com/warengonzaga
You can also send your donations from my official PayPal account below!
https://www.paypal.me/warengonzagaofficial
If you have some Bitcoin, Etheruem or Electroneum, you can send some of it as a donation and support...
Bitcoin Address: 39qo5h3aic9K2aTFRzdGSVNuqtS8uMBKJu
Ethereum Address: 0x10a6488f3575da7107f1935560a993b82c7ef2c6
Again, thanks for reading this Instructable I really appreciate it. If you find this useful and informative please share it with your friends and on your social media accounts. Help me to spread the cyber security awareness to the end users of Facebook. Not only for Facebook users but for all popular website out there like this Instructable!
I would like to thank my sponsors!
LastPass - The number one and best password manager.
Yubico - The global leader in authentication.
Better to check my sponsor's website for more information. Support them as they support me!
I would like also thank my beautiful Girlfriend as one of my Inspiration to publish this Instructable.
Have questions, suggestions or even ask for improvements or simply want to say Hi? You can send me a message using my contact details below.
Email: warengonzaga.dev@gmail.com
Facebook: https://facebook.com/warengonzagaofficialpage (Like and Follow)
Twitter: https://twitter.com/waren_gonzaga (Follow)
Wanna hire me as your cybersecurity consultant?
Follow me on my social media accounts!
LinkedIn: https://linkedin.com/in/warengonzagaofficial/
Github: https://github.com/WarenGonzaga
CodeTrace: https://codetrace.io/users/WarenGonzaga
CodeFights: https://codefights.com/profile/waren_gonzaga
SoloLearn: https://www.sololearn.com/Profile/639127
Kit: https://kit.com/warengonzaga
Instructables: https://www.instructables.com/member/WarenGonzaga/
Alright! Thank you guys for having your time to read this Instructable and have a great day!
You can check my previous projects from below!
Electronic Matrix — I Love You
Rocket Science: Make A MatchSticks Rocket


