

Introduction: Feedme, an Electric Vehicle Plug in Reminder


You've been there before: you get ready to go to work, hop in the car and realize you forgot to plug in your electric car to recharge it. Wouldn't it be great if you had gotten a text to remind you you forgot to do so? Two years from now, it is very likely that all Level 2 home chargers and electric cars will do just that, but for now, they are still the exception.
Do you have a Photon or Arduino and one of those distance sensor you couldn't find a use for laying around? If so, let's build Feedme, the smart reminder for your electric car charger.
We will build it using a Particle Photon microcontroller (Arduino compatible), with builtin WiFi and cloud connectivity combined with an IFTTT recipe to get this feature today.
Step 1: You Will Need


You will need:
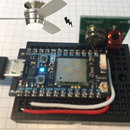
- A Particle Photon, an Arduino compatible microcontroller with WiFi. Full specs here. $20.
- A Sharp xyz IR sensor. $10.
- A mini 170 point breadboard. $2.
- A 5V USB power supply with a micro USB cable. $3.
- Some enclosure
Step 2: Connect the Sharp IR Sensor to the Photon


The specs on the Sharp IR distance sensor can be found here. It allows distance measurements from 10 to 80cm, but we will be using it as a simple presence detector.
No special library is required to use it: we just need to connect its output wire to an analog port on the microcontroller and the analog reading will represent the distance to the nearest object detected.
Connect the Photon to the distance sensor using pin A0 of the Photon. Connect power and ground of the sensor to pins 3V3 and GND of the Photon.
Install the breadboard in the enclosure and create an opening for the micro usb cable and the sensor.
Note that we chose to install the sensor on the enclosure, but that it does not have to be that way. The sensor can be installed away from the Photon and closer to the object whose presence we are trying to monitor.
Step 3: Software
Using the web IDE, create a new project and paste the attached file. Assuming you have already registered your Photon, select the target Photon and Flash the code. Note that this process automatically upgrades the system firmware to the latest version too.
What the software does: At regular intervals, the main loop() checks the analog voltage on pin A0:
distance = analogRead(constAnalogIRSensorPin);
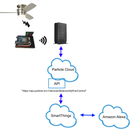
If the measured distance is greater than a given threshold, which can be adjusted based on the distance of the handle to the sensor, it turns on the built in blue LED (object within proximity). At the given time (8PM in this example), it publishes event "Detected" to the cloud if an object is within proximity (I.e. the charging cable is not plugged in the car). Publishing an event to the Particle cloud is easy:
Particle.publish("Detected");
The rest of the code accounts for a failure to publish the event, and it will try to publish again at regular intervals until it succeeds.
Attachments

Step 4: IFTTT


We just need one more step: create an IFTTT recipe to alert us if the event "Detected" has been published.
Create an account on IFTTT if you don't have one already and create a new recipe where the trigger is a Particle channel event (event detected on "your photon name") and the action is a notification to the IFTTT app ("car says: feed me!").
That all there is to it. At the prescribed time, the microcontroller will check for the presence of the charger's handle and if detected, will publish an event which will be caught by IFTTT and result in an alert on your phone.
The presence detector was used here to detect the presence of the charger but could be obviously used for other purposes; for example you could get an alert when there is mail in your mailbox, or maybe when someone walks by your entry way...
Have fun!


