

Introduction: Flashing Bike Bottle Light


The Flashing Bike Bottle Light!
Not only can you produce flashing red luminosity, but you can actually drink from it, too! It is powered by two AA batteries that are easily accessible from the side of the bottle. It also has a fully waterproofed LED/switch assembly hidden inside the lid, all while still retaining the ability to be drank from! The part are inexpensive and minimal, so let's get started!
Step 1: Parts and Materials


Many of the parts I used to make my bottle light could easily be swapped out for similar ones if necessary. The main parts you'll need are:
- A plastic water bottle (size of the bottle depends on the size of your bike's bottle cage)
- A flashing LED that takes about 3 volts
- A 2x AA enclosed battery case
- A small toggle switch
- Two AA batteries (rechargeable is better)
- Velcro (to attach battery case to bottle)
- 150+ grit sandpaper
You'll also need a hot glue gun, an X-acto knife, an electric drill, and a soldering iron
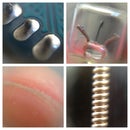
Step 2: Modifying the Cap


The first thing we'll do is drill a hole for the toggle switch. Depending on the switch you use, the hole size will be different, but most of the time, the manufacturer will print the diameter on the packaging.
After drilling a hole in the center of the cap, screw the switch securely into place. We won't be needing to take it out again.
Next, poke 2 holes to the side of the switch for the battery case leads, and push the leads through.
Step 3: Wiring


After pulling the leads through, solder one to a tab on the toggle switch. Then snip the leads of the LED and bend one so it hooks the other tab's hole, then solder it in. The other lead from the battery case will go directly to the LED.
After wiring, test your circuit to make sure your LED is flashing properly. If it works, go on to the next step. If not, examine your circuit and individual connections to troubleshoot the problem.
Step 4: Potting the Circuit


In order for water to not short the circuit, we need to waterproof it. Start with the lead holes in the top of the cap. Next, keep the cap upside-down and add multiple layers of hot glue. Between layers, allow time for the previous layers to dry. After applying the top layer that covers the LED, run it under cold water to make the glue dry clear(er).
Note: the switch itself is not waterproof, so be careful when you run the water over the cap.
Step 5: Frosting the Bottle


To make the LED diffuse properly, we need to do something to the bottle. I used a piece of 180-grit sandpaper to frost the outside of it, then wrapped it around a metal rod to get in the dimples of the bottle.
Step 6: Battery Case Attachment


To attach the battery case to the bottle, I used velcro. Cut a strip slightly shorter than your battery case, then apply the hook side of it to the bottle (for washing purposes) and the fuzzy side to the battery case.
Step 7: Show Off!
Participated in the
Keep the Bottle Contest


