

Introduction: Floating Barnwood Shelves


Given the right wood (100 year old barn wood from friends' grandfather) that has weathered for decades to centuries without rotting, you can sand the gray away to reveal beautiful patina, cross-cut milling saw marks, sap-filled knots, nail holes and in this case a very fun "bit" where his horse enjoyed biting and chewing on the wood from time to time. These pieces have some awesome character that was exposed through this process and tell a very cool story of their own during dinner conversations.
What you will need for this project:
1. Dimensional, Aged Lumber (dimensional in this case means two things- in old lumber like this it means that the sides and faces are actually true to their measurements i.e. 2x6x8 is exactly that, rather than the modern system of rounding up to a "2x4" that is actually less wood in both of the measured dimensions- and that they can truly be of any dimension you would like as long as you can secure them safely.
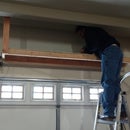
2. Steel brackets to secure the shelves to the wall- I used 2x3 inch mending braces that I screwed into the shelf, and then into the wall studs as well as two L shaped brackets on either end also into studs
3. I recommend no less than two 1/4" lag screws into a stud through a minimum of two L brackets for shelves up to 8' long that will not be holding heavy items (liquid filled bottles, heavy stones, books etc. have no place on the shelves in this instructable without a minimum of two larger L brackets into studs for each shelf)
4. Metallic Oil Rubbed Bronze spray paint for coating the steel brackets and lag screws.
5. Handheld power sander with 50, 80 and 120 grit belts... or sandpaper and a truly silly amount of time on your hands. I highly recommend purchasing a 3x18 (or larger) belt sander. I went back and forth for weeks trying to research between getting a handheld electric planer (chips away wood with solid blades to create a smooth surface) and a power belt-sander. I settled on the Belt-sander because it gives many more options/diversity of projects it can help with whereas the planer would be for very specific jobs. I am incredibly thankful that I went with a nice sander instead!
6. Gloves, Eye Protection and Dust Mask- A power sander is to a circular saw as a children's spoon is to a ginsu knife in it's ability to do lasting harm to a human hand, but that said- it is still a power tool. Please be very careful. If you enjoy waking up to cough and remove sawdust deposits from your very dry eyes, feel free not to wear eye protection or a dust mask as well.
6. Linseed oil, or your favorite revitalizing oil. I use IKEA's "Behandla" wood block oil because it is inexpensive, food-safe (like many natural seed oils), can be brushed on and has always shocked me with the richness of color saturation it brings out in natural wood. There are many options here, you can't go too wrong. SAFETY WITH LINSEED OIL- keep away from open flame, apply any coatings in a well ventilated space, do not bundle rags that have touched linseed oil in a pile- they can spontaneously combust.
7. Polyurethane. I use the water-soluble indoor kind for projects like this. but halfway through these pieces I noticed it was actually dulling my results that the linseed oil had given me so I stopped and am very happy with the lumber remaining unsealed. We'll see if I need to reapply any linseed oil, but again- stuff's cheap.
8. Brushes for applying linseed oil and polyurethane.
Step 1: Just Look at This Super Old Wood

It's old. It's gray. Let's see what we can find underneath the surface!
Step 2: Belt Sander Time


Depending on the level of gnar that has built up on your over time and how much of it you want to remove, you can start with 50 grit (takes a ton of wood off quickly) 80 grit (takes slightly less wood off, but also very quickly) or 120 grit (takes a moderate amount of wood off at an even pace) and move up to more fine grits (higher numbers) as you go for a smoother finish, if you like that sort of thing.
Step 3: Look at This Gorgeous Wood!

This is after a few passes with 80 grit. It turns out that these boards are likely Ponderosa Pine (the barn lived in Idaho when it was still standing) which is a fun difference between this project and the oak mantle piece I did in a similar fashion in another instructable. The oak mantle required 50 grit to get into the beauty of the wood.
Step 4: Both Shelves After Linseed Oil and Polyurethane


These are the products that brought the beauty out of this old wood. Mostly the linseed oil though.
Step 5: The Finished Product


I was thinking about doing some kind of pun regarding the "Finnish-ed Product" here, but it's a stretch because my wife's grandfathers' oars that are displayed here actually have the Swedish crown depicted on them. Enjoy!

Participated in the
Shelving Contest 2016


