

Introduction: Generate Electricity Using Footwear-Charge Your Mobile(Piezo Generator)


Could walking or running generate enough energy to power your cell phone or GPS device? Do you walk enough in a day and use your phone regularly, in that case you may lookout for a power outlet to charge your phone.
Now what if you can charge your phone for free or in simple words you can get enuogh power supply to charge your phone or Lighting up LED by your footwear while running or Jogging.
So In this instructable I will show you how to make a footwear that generates electricity in super easy way. Before going to hands on let first understand sone Basic science behind it.
If you liked my project please CLICK Vote!
Lets get Started!
Step 1: Concept and Principle

Piezoelectric materials have the unique and useful property of being able to transform mechanical energy into electrical energy, and vice versa. This gives piezoelectric materials a wide range of potential applications from sensors and actuators to artificial muscles. One of the most interesting applications is in the field of energy harvesting, where piezoelectric materials are used to convert mechanical energy that is typically wasted into a source of electrical energy. However, the technology of currently available piezoelectric materials and methods is able to produce a sufficient amount of energy that is enought to charge a Phone or Liht up a few watt LED.
Piezoelectricity is the electric charge that accumulates in certain solid materials (such as crystals, certain ceramics in response to applied mechanical stress.
***If you like my project please CLICK Vote!***
Step 2: Our Project

Piezoelectric materials are placed in the bottoms of the shoes, but they do not store any energy. So from where does the energy come? The energy comes from you! Whenever you walk, your movements are mechanical energy and some of that mechanical energy can be converted into electrical energy by piezoelectric materials. In the case of the light-up shoes, that energy is used immediately to light-up some LEDs, which brings up an idea.
Step 3: Ingredients


Materials:-
1. Piezoelectric Transducers
2,. 1N4007 Rectifier Diodes (4x)
3. Old Pair Of Shoes
4. Connecting Wire
5. Hot glue
6. Sticky foam tape
7. USB port
8. Capacitor or Battery (Lipo,etc)
Tools & Equipment
1. Digital Multimeter
2. Multitool
3. Rotary Tool
4. Cutting tool
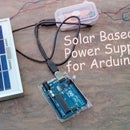
Step 4: Let Make!

When force is applied to it it generates a small voltage in alternating current. Because most small devices use DC we need to convert AC to DC so to do this I have a bridge rectifier. Now that we have DC power we still need to charge the internal battery in the shoe/footwear so we need a battery charger so we don't damage the battery. Since most small devices use 5v we can convert it using a 5v step up converter. Now we have constant 5v power coming from the Shoe.
We can power USB lights or other small gadgets, can power a flashlight aslong as you are walkng and will last for about 30 minutes after you completely stop walking.
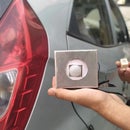
Step 5: Prepare Footwear


The foot wear is a heart of our project so try to take good quality of show such that while operating on it, it should not tear or get damaged.
Note : Try to take Footwear/Shoe of High Heel/sole such that we can have much space to put our battery inside.
I have taken a size of my sole on paper so that i can confirm my circuit is going to be fit inside the pit made.
Take cutting tools and dig a hole around high heel to make a pit according to your circuit sice and shape.
Step 6: Built Circuit


The circuit is made according to given block diagram.
Since the generated voltage is AC in nature hence we need to convert this AC voltage into dc voltage to store it into battery.
Once the circuit is made its to to assemble them into our footwear.
Step 7: Assemble
Take the circuit, battery and try to adjust this whole circuitry in shoe such that it get fits into the footwear within the permisible height of sole.
Attach USB port at its desired location as shown in diagram (You can add a small Cardboard/Plastic piece to cover the usb while not in use).
Glue them and let them Dry.
Step 8: Test and Success


Turn the multimeter to the 20V DC setting and start tapping on the piezo element. Expect to see the voltage across the capacitor increasing, which indicates that it is storing energy. If not, try flipping the switch to the opposite position. Once the capacitor has stored sufficient voltage, flip the switch and the LED should come on briefly. Note: The required voltage across the capacitor will vary, depending on the exact capacitor and LED used. As an example, using a 220 μF 35V capacitor and the LED light bar, required about 8.5V across the capacitor, while the standard single LED only required about 3V.
Now you can Enjoy free Energy to charge your phone or anything you want to respectively.
This marks the end of this instructable. Hope you liked it.
Please vote for the project and share if you think it was awesome.
Don't forget to follow for more cool projects!!
Fell free to have any query. Hope you liked my instructable.
Share and Vote Thanks.
***If you liked my project please CLICK Vote! ^ Above ^ Thank You***

Runner Up in the
Summer Fun Contest 2016

Runner Up in the
Footwear Challenge

Participated in the
Backyard Contest 2016


