

Introduction: Geometry Kit From Trash


Hello friends, people like you want to make interesting and useful things. for this these inventor's also need a kit where they can store there parts and small tools.
So in this instructable i'm going to make a kit from useless material and recycle it to a kit.This kit can be also attached to metal bod.so you can throw it to a metal body and it will easily get attached to it.But we're not going to make a simple kit.
For our complex inventor's i'm going to make different type of kit.So follow me to make this project.
Step 1: Tools and Materials

I'm going to make this project from useless material it mean's we're recycling the useless material .for this project ,i recycled a plastic ball which is teared in two equal pieces.you also need a magnet,a metal strip and scissor and tape as a tool.
Step 2: Making the Shape


I used a old plastic ball to make the structure of the kit.this ball is very flexible to fold.so hold the ball the ball piece in your hand as the ball get a cone shape from both side.hold it for half or for 1 minute in your hand as that exact shape so the ball get stuck at that shape.Do this with both two pieces of the ball.
Step 3: Placing the Pieces of Ball

After holding the the both two pieces of ball put one piece of ball inside another piece of ball.Be sure to check that the ball which is inside another ball is rolling inside it.if it rotate easily then all thing is ok but if it not rotate easily then just increase the size of the outside ball piece so the inner ball get some more space to rotate easily.
Step 4: Pasting the Strip of Metal


Like all geometry or kit they have a locking system which prevents the geometry or kit from opening.i'm going to use the magnetic locking system for our kit.so first we need to paste the strip of metal outside of the ball where magnet will attach.To paste the metal strip on the ball use a powerful glue to do this.Paste it on the middle of the outside ball from on side.
Step 5: Placing the Magnet


To make our magnetic locking system ofcourse we need a magnet.use a powerful magnet for the magnetic looking system.now take a tape i used a tape which has a layer of paper under it but you can also use a normal tape to do this work. now place the magnet between the magnet and paper and then close it tightly.also cover it from another side to prevent it from escaping from the tape and then remove the small amount of paper from another side and use a powerful glue to paste it to another side of the ball.
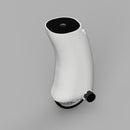
Step 6: Completed
Now our kit is ready to use now you can put your little tools or things inside it and attach it to any metal surface to get attached there.

Participated in the
Trash to Treasure Contest 2017


