

Introduction: Gesture Controlled Mouse


You are watching a movie with your friends on a laptop and one of the guys gets acall. Ahh.. you have to get off your place to pause the movie. You are giving a presentation on a projector and need to switch between applications. You have to move across the whole stage to the podium to use your mouse. How better would it be if you could control your mouse from wherever you were? Well, we have a solution! Gesture Controlled Mouse.
It is a mouse simulation system which performs all the functions performed by
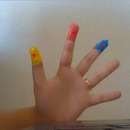
your mouse corresponding to your hand movements and gestures. Simply speaking, a camera captures your video and depending on your hand gestures, you can move the cursor and perform left click, right click, drag, select and scroll up and down. The predefined gestures make use of only three fingers marked by different colours.
Goal:
- Learn to handle mouse events in OpenCV
- You will learn these functions :
- cv2.VideoCapture()
- np.array()
- calibrateColor()
- cv2.contourArea()
Step 1: Install Anaconda and Packages Required


Anaconda is essentially a nicely packaged Python IDE that is shipped with tons of useful packages, such as NumPy, Pandas, IPython Notebook, etc. It seems to be recommended everywhere in the scientific community. Check out Anaconda to get it installed.
Packages required:
- PyAutoGUI
- OpenCv
Installation of above mentioned packages :
- OpenCV :
click on this link for step by step installation for opencv
- PyAutoGUI :
PyAutoGUI is a Python module for programmatically controlling the mouse and keyboard.
PyAutoGUI can be installed from the pip tool
open your anaconda comand prompt and paste it :
pip install PyAutoGUI
Now we are ready to code......
Step 2: Technical Overview


It is essentially a program which applies image processing, retrieves necessary data and implements it to the mouse interface of the computer according to predefined notions.
The code is written on Python. It uses of the cross platform image processing module OpenCV and implements the mouse actions using Python specific library PyAutoGUI.
Video captures by the webcam is processed and only the three coloured finger tips are extracted. Their centres are calculated using method of moments and depending upon their relative positions it is decided that what action is to be performed.
Step 3: Getting Started With Videos


Goal one :
cv2.VideoCapture()
Capture Video from Camera
Often, we have to capture live stream with camera. OpenCV provides a very simple interface to this. Let’s capture a video from the camera (I am using the in-built webcam of my laptop), convert it into grayscale video and display it. Just a simple task to get started. To capture a video, you need to create a VideoCapture object. Its argument can be either the device index or the name of a video file. Device index is just the number to specify which camera. Normally one camera will be connected (as in my case). So I simply pass 0 (or -1). You can select the second camera by passing 1 and so on. After that, you can capture frame-by-frame. But at the end, don’t forget to release the capture.
The first thing that we do is convert the captured video into HSV format.
code :
# All packages needed for the program are imported ahead

import cv2
cap = cv2.VideoCapture(0)
while(1):

     # Capture frame-by-frame
    _, frameinv = cap.read()

    # flip horizontaly to get mirror image in camera
    frame = cv2.flip( frameinv, 1)

     # Our operations on the frame come here
    hsv = cv2.cvtColor( frame, cv2.COLOR_BGR2HSV)

     # Display the resulting frame
    cv2.imshow('Frame', hsv)

    k = cv2.waitKey(10) & 0xFF
    if k == 27:
        break
cap.release()
cv2.destroyAllWindows()
Step 4: Colour Ranges


Goal two :
calibrateColor()
Calibrate the colour ranges
Now the user gets to calibrate the colour ranges for three of his fingers individually. This is done by calling the calibrateColor() function thrice right at the beginning of the program.
The user has an option to use the default settings as well.
Code :
import cv2
import numpy as np
def nothing(x):
    pass
# Create a black image, a window
kernel = np.zeros((300,512,3), np.uint8)
name = 'Calibrate'
cv2.namedWindow(name)
# create trackbars for color change
cv2.createTrackbar('Hue', name, 0, 255, nothing)
cv2.createTrackbar('Sat', name, 0, 255, nothing)
cv2.createTrackbar('Val', name, 0, 255, nothing)

# create switch for ON/OFF functionality
switch = '0 : OFF \n 1 : ON'
cv2.createTrackbar(switch, name,0,1,nothing)

while(1):
    cv2.imshow(name,kernel)
    k = cv2.waitKey(1) & 0xFF
    if k == 27:
        break

   # get current positions of four trackbars
    hue = cv2.getTrackbarPos('Hue', name)
    sat = cv2.getTrackbarPos('Sat', name)
    val = cv2.getTrackbarPos('Val', name)
    s = cv2.getTrackbarPos(switch,name)

    if s == 0:
        kernel[:] = 0
    else:
        kernel[:] = [hue,sat,val]

cv2.destroyAllWindows()
Step 5: Remove Noise & Define Functions in the Video Feed


Depending on the calibrations, only the three fingertips are extracted from the video, one by one, using the cv2.inRange() function. In order to remove noise in the video feed, we apply a two-step morphism i.e. erosion and dilation. The noise filtered image referred to as mask in the program is then sent for locating the centres.
# cv2.inRange function is used to filter out a particular color from the frame
# The result then undergoes morphosis i.e. erosion and dilation
# Resultant frame is returned as mask
def makeMask(hsv_frame, color_Range):

	mask = cv2.inRange( hsv_frame, color_Range[0], color_Range[1])
	# Morphosis next ...
	eroded = cv2.erode( mask, kernel, iterations=1)
	dilated = cv2.dilate( eroded, kernel, iterations=1)

	return dilated
Location of each of the three centres involves:
- Finding contours in the mask relevant to that colour range.
- Discarding contours of irrelevant areas using area filters.
- Finding the largest contour amongst the remaining ones and applying method of moments to find its centre.
Generally the webcams we use captures video at a resolution of 640x480 pixels. Suppose this frame was linearly mapped to the 1920x1080 pixel display screen. If we have a right-handed user, he would find it uncomfortable to access the left edge of the screen as compared to the right edge. Also accessing the bottom portion of the screen would build stress at the wrist.
We realised that instead of mapping the whole video frame to the screen, we could rather consider a rectangular sub portion more biased towards right (considering right-handed user) and upper parts of the frame in order to improve comfort. This sub portion which measures 480x270 pixels is then linearly mapped to the screen with a scaling factor of 4.
# Contours on the mask are detected.. Only those lying in the previously set area
# range are filtered out and the centroid of the largest of these is drawn and returned
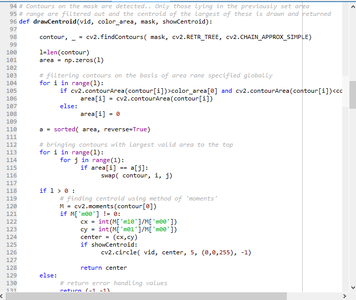
def drawCentroid(vid, color_area, mask, showCentroid):
contour, _ = cv2.findContours( mask, cv2.RETR_TREE, cv2.CHAIN_APPROX_SIMPLE)
l=len(contour)
area = np.zeros(l)
# filtering contours on the basis of area rane specified globally
for i in range(l):
if cv2.contourArea(contour[i])>color_area[0] and cv2.contourArea(contour[i])
<color_area[1]: area[i]="cv2.contourArea(contour[i])" else:="" a="sorted(" area,="" reverse="True)" <="" p=""></color_area[1]:>
# bringing contours with largest valid area to the top
for i in range(l):
for j in range(1):
if area[i] == a[j]:
swap( contour, i, j)
if l > 0 :
# finding centroid using method of 'moments'
M = cv2.moments(contour[0])
if M['m00'] != 0:
cx = int(M['m10']/M['m00'])
cy = int(M['m01']/M['m00'])
center = (cx,cy)
if showCentroid:
cv2.circle( vid, center, 5, (0,0,255), -1)
return center
else:
# return error handling values
return (-1,-1)
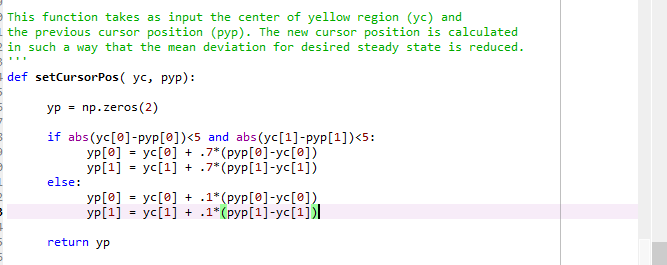
Due to noise captured by the webcam and vibrations in the hand, the centres keep vibrating around a mean position. On scaling up, these vibrations create a lot of problem with the accuracy of cursor position. To reduce the shakiness in cursor, we make use of differential position allocation for the cursor. We compare the new centre with the previous position of the cursor. If difference is less than 5 pixels, it is usually due to noise. Thus the new cursor position is inclined more towards the previous one. However, a larger difference in previous position and new centre is considered as voluntary movement and the new cursor position is set close to the new centre. For details, go through the setCursorPosition() function in the code.
'''
This function takes as input the center of yellow region (yc) and
the previous cursor position (pyp). The new cursor position is calculated
in such a way that the mean deviation for desired steady state is reduced.
'''
def setCursorPos( yc, pyp):

	yp = np.zeros(2)

	if abs(yc[0]-pyp[0])<5 and abs(yc[1]-pyp[1])<5:
		yp[0] = yc[0] + .7*(pyp[0]-yc[0])
		yp[1] = yc[1] + .7*(pyp[1]-yc[1])
	else:
		yp[0] = yc[0] + .1*(pyp[0]-yc[0])
		yp[1] = yc[1] + .1*(pyp[1]-yc[1])

	return yp
Now the three centres are sent for deciding what action needs to be performed depending
on their relative positions. This is done in the chooseAction() function in the code. Depending upon its output, the performAction() function carries out either of the following using the PyAutoGUI library:
- free cursor movement
- left click
- right click
- drag/select
- scroll up
- scroll down
# Depending upon the relative positions of the three centroids, this function chooses whether
# the user desires free movement of cursor, left click, right click or dragging
def chooseAction(yp, rc, bc):
	out = np.array(['move', 'false'])
	if rc[0]!=-1 and bc[0]!=-1:

		if distance(yp,rc)<50 and distance(yp,bc)<50 and distance(rc,bc)<50 :
			out[0] = 'drag'
			out[1] = 'true'
			return out
		elif distance(rc,bc)<40:
			out[0] = 'right'
			return out
		elif distance(yp,rc)<40:
			out[0] = 'left'
			return out
		elif distance(yp,rc)>40 and rc[1]-bc[1]>120:
			out[0] = 'down'
			return out
		elif bc[1]-rc[1]>110:
			out[0] = 'up'
			return out
		else:
			return out

	else:
		out[0] = -1
		return out
def performAction( yp, rc, bc, action, drag, perform):

	if perform:
	 	cursor[0] = 4*(yp[0]-110)
		cursor[1] = 4*(yp[1]-120)
		if action == 'move':

			if yp[0]>110 and yp[0]<590 and yp[1]>120 and yp[1]<390:
				pyautogui.moveTo(cursor[0],cursor[1])
			elif yp[0]<110 and yp[1]>120 and yp[1]<390:
				pyautogui.moveTo( 8 , cursor[1])
			elif yp[0]>590 and yp[1]>120 and yp[1]<390:
				pyautogui.moveTo(1912, cursor[1])
			elif yp[0]>110 and yp[0]<590 and yp[1]<120:
				pyautogui.moveTo(cursor[0] , 8)
			elif yp[0]>110 and yp[0]<590 and yp[1]>390:
				pyautogui.moveTo(cursor[0] , 1072)
			elif yp[0]<110 and yp[1]<120:
				pyautogui.moveTo(8, 8)
			elif yp[0]<110 and yp[1]>390:
				pyautogui.moveTo(8, 1072)
			elif yp[0]>590 and yp[1]>390:
				pyautogui.moveTo(1912, 1072)
			else:
				pyautogui.moveTo(1912, 8)

		elif action == 'left':
			pyautogui.click(button = 'left')

		elif action == 'right':
			pyautogui.click(button = 'right')
			time.sleep(0.3)

	elif action == 'up':
			pyautogui.scroll(5)
#			time.sleep(0.3)

		elif action == 'down':
			pyautogui.scroll(-5)
#			time.sleep(0.3)

		elif action == 'drag' and drag == 'true':
			global y_pos
			drag = 'false'
			pyautogui.mouseDown()

			while(1):

				k = cv2.waitKey(10) & 0xFF
				changeStatus(k)

				_, frameinv = cap.read()
				# flip horizontaly to get mirror image in camera
				frame = cv2.flip( frameinv, 1)

				hsv = cv2.cvtColor( frame, cv2.COLOR_BGR2HSV)

				b_mask = makeMask( hsv, blue_range)
				r_mask = makeMask( hsv, red_range)
				y_mask = makeMask( hsv, yellow_range)

				py_pos = y_pos

				b_cen = drawCentroid( frame, b_area, b_mask, showCentroid)
				r_cen = drawCentroid( frame, r_area, r_mask, showCentroid)
				y_cen = drawCentroid( frame, y_area, y_mask, showCentroid)

				if 	py_pos[0]!=-1 and y_cen[0]!=-1:
					y_pos = setCursorPos(y_cen, py_pos)

				performAction(y_pos, r_cen, b_cen, 'move', drag, perform)
				cv2.imshow('Frame', frame)

				if distance(y_pos,r_cen)>60 or distance(y_pos,b_cen)>60 or distance(r_cen,b_cen)>60:
					break

			pyautogui.mouseUp()
Step 6: Video & Code File :

Participated in the
Lazy Life Challenge

Participated in the
Automation Contest 2017


