

Introduction: Getting Started With Arduino - Two Player Arduino Pong


In this tutorial we are going to build an arduino-based controller that we can use to control a 2 player game of pong.
We are going to use a couple of dial potentiometers (turning knobs) to control the pong bats/paddles.
Step 1: Connect Arduino Power to Breadboard


Our two potentiometers are both going to need power, so our first job is to connect the 5v and GND pins on the Arduino to the breadboard power lines. Use a red wire to connect the 5v pin on the Arduino to the positive power line on the breadboard - this is the vertical column of holes marked with a red line next to them. Then use a black wire to connect the GND pin on the Arduino to the ground line on the breadboard - this is the vertical column of holes marked with a black (or sometimes blue) line next to them.
Step 2: Wire Up First Potentiometer


The next step is to wire up your first dial potentiometer - connect the left pin to the positive power line and the right pin to the ground line (as shown in the image above)
Step 3: Wire Up Second Potentiometer

Then do the same with the other potentiometer !
Step 4: Connect Potentiometers to Sensor Pins

Now we must connect the outputs of the potentiometers (the middle pins) to the input pins of the Arduino. Using white wires (so as not to get confused with the black and red ones we have used already) connect the middle pin of one potentiometer to pin A1 on the Arduino, then the middle pin of the other potentiometer to Arduino pin A0. See the photos above to see how this should look.
Step 5: Write Your Code
The next step is to write some code to read the current value of the two potentiometers and pass it on via the USB cable to your computer.
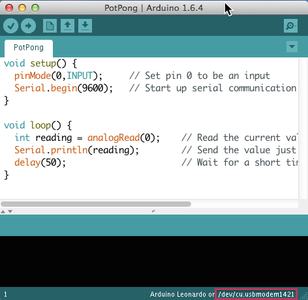
Download TennisController.zip, unzip it, open it up in the Arduino application and upload it onto your Arduino. Note: In order to connect to the pong game in the next step of this tutorial, you are going to need to know which serial port your Arduino is attached to. Make a note of the port name at the bottom right of the Arduino window (see the red box in the above screenshot). If you have a Mac, the name will start with "/dev" if you have a Windows computer the name will start with "COM".
Attachments

Step 6: Test Your Code

Once your have uploaded your code, it's a good idea to check that everything is working correctly. Click on the magnifying glass button at the top righthand side of the Arduino window. This will open up the "Serial Monitor" window, which should show all of the data being sent by the Arduino. If everything is working properly, you should see a stream of pairs of numbers, which should change if you turn the potentiometer dials.
Make sure you close the Serial Monitor window window before moving on to the next step.
Step 7: Run the Tennis Game

We have written a tennis game for you to use - download the TennisGame.zip file and unzip it.
To run the game, you are going to need to install the Processing programming tool
Once you have installed Processing, simply open up the Tennis project file.
Before you can run the game, you need to tell the programme which serial port your Arduino is attached to.
Find the line that starts with String arduino = and enter in the serial port name to which your Arduino is attached.
For example, on a Mac it would be something like:
String arduino = "/dev/cu.usbmodem1421";
or on Windows, something like:
String arduino = "COM1";
Attachments
Step 8: Play !
If everything worked, when you press the run/play button in Processing (found at the top left of the window) you should be able to control both bats using the two potentiometers.
Step 9: Game Changer

Bored of the retro style ?
Why not reskin the game using your own graphics and audio !
Simply open up the data folder in the TennisGame project and replace the background, the ball and the bat images (check out the space themed game in the image above). You can even replace the audio sound effects as well (by replacing the bat.mp3 and wall.mp3 files).
Step 10: Enjoy

If you enjoyed this instructable, check out our other tutorials
If you love this kind of stuff, check out our degree


