

Introduction: Getting Started With Instructables


Hello and welcome to Instructables!
If you're having trouble starting your first Instructable, this is the right place for you. We'll be going over how to create 3 different types of Instructables: photo instructables, step-by-steps, and video instructables. We will also be going over how to change your profile image and how to add photos to your image library.
Before we start, make sure you've already made an account!
Click here or the link below if you don't know how or if you'd like to know how to make an account.
https://www.instructables.com/id/Signing-Up-for-an-Instructables-Account/
Ready? Let's get started!
Step 1: Getting Started
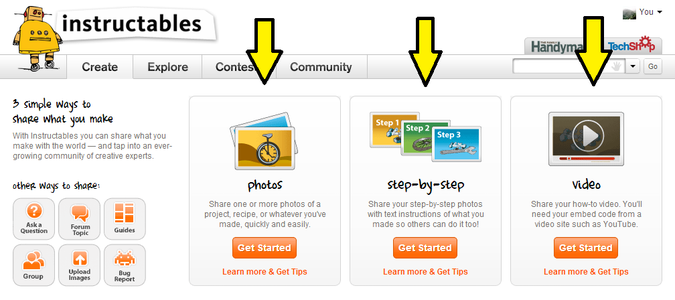
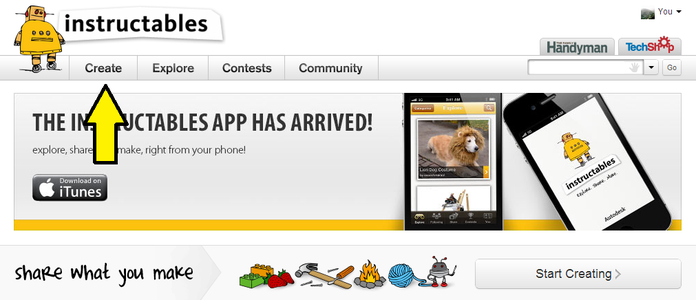
To create an Instructable, hover over the "Create" tab at the top of the page. You then have the option to pick one of three:
PHOTOS - Less than 10 photos + a description.
What you made, how you made it, why you made it.
STEP-BY-STEP - Minimum: An intro + 3 steps.
Photos & descriptions are needed in each step. If your project doesn't meet those requirements, make a photo Instructable.
VIDEO - Your video + a description.
What you made, how you made it, why you made it, and a breakdown of the steps.
CONTESTS: If you are going to start a contest, create it as a guide or a forum topic. Manage it yourself and provide it with prizes. Please don't create it as an Instructable!
Step 2: Step by Step

Each step requires photos and a description. If your project doesn't meet these requirements, try making a photo Instructable.
Always try and write descriptions that will make it easy for others to understand. The more details the better! Also stay away from adding too many unnecessary keywords when publishing your Instructable. This will mix Instructables up and make it hard for users to search for stuff!
Try and aim for sharp, clear, and well lit photos. You want to stay away from photos that are out of focus, blurry, too dark, or too bright.
Also, some things to keep in mind:
- Always have good lighting - grainy or dark photos are the enemy of a good project.
- Always have a main image of the finished product - the better the picture, the more likely you will be featured on the homepage.
- Remember, if you don't include photos, you won't be published!
Step 3: Photos
Same goes for a photo Instructable as a step-by-step: always have a nice description and awesome photos!
You don't want to give anyone a headache while looking at your blurry photos.
Also stay away from adding too many unnecessary keywords when publishing your Instructable. This will mix Instructables up and make it hard for users to search for stuff!
Remember to keep in mind:
- Always have good lighting - grainy or dark photos are the enemy of a good project.
- Always have a main image of the finished product - the better the picture, the more likely you will be featured on the homepage.
- Remember, if you don't include photos, you won't be published!
Step 4: Video


You can embed videos from the following hosts:
- YouTube
- Metacafe
- Howcast
- Blip
- Vimeo
- To find your embed code (we'll be using a YouTube video), first go to the video you want to embed.
- Hit the "share" button located under the video.
- Hit "embed" and copy and paste the video's embed code into the "Embed Video Code" box while creating your video Instructable.
Step 5: How to Change Your Profile Picture


Changing your profile picture is very simple.
- Go to your "YOU" page. This can be reached by clicking the link or clicking "You" in the top right corner of the page.
- On the left there will be link titled "change image(s)". Click that, or click this.
- Use either the "Choose Photos" or the "old uploader" to upload images into your image library.
- You can rearrange your photos. The first image will be your profile picture.
Step 6: How to Upload Photos to Your Image Library From Your Profile


You can also upload images to your image library straight from your profile.
- Start off by going to your "You" page. www.instructables.com/you
- On your left side click "image library"
- Upload images in same way as your profile picture, just don't add them to the Profile Picture section (unless you want to)
- Your images will now show up in your image library
Step 7: How to Upload Photos to Your Image Library From an Instructable

At the bottom of each Instructable you're working on, you have the option to add photos to your image library straight from the Instructable itself.
- Go to one of your Instructables and click "edit".
- Scroll down to the bottom where it says "attach images & files".
- Below that you will see the same upload options as uploading your profile picture.
- Upload images to your library.
Step 8: Start Sharing Your Awesome Projects!
Now that you know how to create a step-by-step, photo, and video Instructables, you're ready to start sharing!
If you have any questions, issues, or concerns, feel free to PM (private message) me and I'll get back to you as soon as possible.
You can also email our support group at support@instructables.com.
Welcome to Instructables!


