

Introduction: Giant Steel Skeleton Hand (and Coat Rack)


Bulid your own giant steel anatomic skeleton hand out of junky nuts and bolts! It makes a nice coat & towel rack too.
This is a perfect first welding project because you can make lots of mistakes and it will still come out fine.
Step 1: Find Some Scrap Nuts and Bults


This project was inspired by finding a couple buckets of large nuts and bolts at a junk yard, and then deciding that i wanted to learn to weld. This project is great for your first welding project because if the welds are a mess it won't ruin the piece. There is not much measuring to do and if you make mistakes they are easy to fix or else they don't matter. You have a lot of flexibility on your choice of parts and you can easily build the hand at whatever size you want.
note: do not use galvanized nuts and bolts because they give off poisonous fumes when you weld them.
all the parts you need are shown below:
Step 2: Make the Fingers and Thumb


Start by making the individual fingers and thumb. If you mess one up badly you can just make more! Use a vise or a locking plier to hold the fingertip, and hold the middle joint with the ground clamp. Choose the curve angle of your finger joint and then weld the two bolts together. Repeat to add the third finger joint. I made each finger with a different curve because I think it makes the hand look more alive.
The photos show the fingers already attached to the hand, but that's just because i forgot to take a photo before I attached them. At the end of this step you just have 5 loose fingers.
The carriage bolts are nice because you can choose the curve of the finger joint more easily and they look a little better. You can still choose your finger curve with a normal bolt but it is not quite as nice looking.
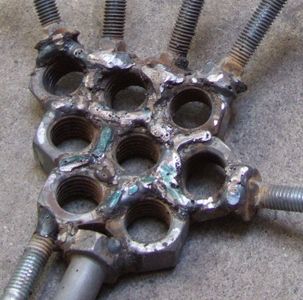
Step 3: Make the Palm of the Hand


I made the palm slightly curved for looks. This was a little trickier than a totally flat palm. First line up the hex nuts in rows as shown. Weld together each row flat. Then weld one row to the next while holding at a slight angle to get a curved palm.
Step 4: Attach the Arm to the Palm

First attach the head of the large bolt as shown. Then position the small bolt next to it and attach as shown.
Step 5: Attach the Fingers and Thumb to the Palm


Hold each finger at an angle you like and then weld to the palm. I used this size of hex nut in the palm because it made a good spacing and recessed attachment point for the fingers which makes the knuckles look more realistic.
Look at the various photos throughout the project to see the angle and spacing for the fingers and thumb. Of course you can choose your own finger layout!
Step 6: Welding Completed!


Some of your welds might be a bit sharp and pokey. you can use an angle-grinder or grinding wheel to grind them down a bit. I did this just on the palm a bit. use a wire brush wheel to clean up the surface of the metal so it will look better if you leave it as is, or so the paint will stick if you decide to paint it.
Enterprising medical students will notice that my anatomy is not entirely accurate. Real fingers have 4 segments, the first of which is inside the palm. Isn't it funny when fake reality looks more real than the real thing?
Step 7: Mount on Wall
If you want to hang coats or hats or towels, you can use the free end of the arm bolt to attach this to a wall. Here i just used a 3/4" pipe hanger to screw this to a wood post.
Participated in the
The Instructables Book Contest


