

Introduction: Googly Eyes Minion Clock


This is the Googly Eyes Minion Clock. Its eyes tell the time by spinning the eyeballs in the eye sockets and seeing where the pupil is pointing. The left eye are the hours, right side, the minutes. I came across this idea after seeing a clock made by the Oswald Company. They made these novelty clocks back in the 20's. The subjects were dogs, monkey, skulls, and more. I also found a googly eyes clock that is much less impressive. I decided to make one using a character that would live up to the goofy, googly eyed behavior, Dave the Minion. Dave is perfect for the project since he as two very prominent, perfectly round eyes framed in a set of goggles. And he has a great goofy personality.
I started with an existing 3D model I found on Thingiverse: Minion Dave. I increased its size to 200mm, added tiny hemispheres onto the goggles for the hours and minutes, removed the eyeballs, and cut off the back so I can get the workings inside.
The eyeballs are more or less hemispheres. Actually, they started out as hemispheres but then I squashed them down a tiny bit so they had less bulgy appearance. So, technically they're oblate hemispheroids. Because I used recycled steppers, that I pulled from something I don't remember, and they're not very strong, the eyeballs are about 2mm smaller in diameter to the eye socket. This prevents the eyeball from catching on an edge inside the socket preventing the stepper from rotating them.
Step 1: Parts, Materials, and Tools
Parts
- Stepper motor, qty 2; 24.8mm diameter x 15mm tall (sans shaft)
- Arduino Uno
- Adafruit Motor Shield V2
- Momentary switches (buttons), qty 3
- 5v 2A power adapter
Materials
- 3D Filament, white or yellow
- Gesso
- Acrylic paint
- Hookup wire
Tools
- 3D printer
- Hot glue gun
- Emery board
- Soldering gun
- Paint brushes
- Screw drivers
- Drill
Caveat: I used an Ultimate 2 (not 2+) to print my parts. All of my printing instructions and measurement tolerances are particular to that printer.
Step 2: 3D Printing


Models
Minion, full, edited
This is the complete minion, enlarged to 200mm with face created face groups and removal of its eyes in MeshMixer file format.
Minion, front
This is the front half of the minion with the back half of its plane cut away in object, 123dx, and stl file formats.
Print time: ~18hrs
Eye bracket
This is the eyeball servo bracket. It is sized exactly for the minion that's was increased to 200mm. The provided models are in 123dx and stl file formats.
Print time: ~1.5hrs
Eye
This is the hemispherical eyeball. Its shaft coupler size assumes there is a pinion gear on the servo shaft. The provided models are in 123dx and stl file formats.
Print time: ~1hr
Cura Slicer Settings for Ultimaker 2
Both the minion body and the eyeball have overhangs. This requires that supports be added. For my printer, I do not use retraction because that always causes problems. Density is at 10%. Print speed, 50mm/s. Lastly, I always print with a brim. These settings tended to provide consistent (not necessarily accurate) print jobs.
Download
Step 3: Electronics

Hardware
The hardware aspect is trivial. Atop of an Arduino Uno sits an Adafruit motor shield. Connected to the shield are 2 servos, one for the hours eye and one for the minutes eye. There are 3 buttons, one to set the hours eye, one to set the minutes eye, and one to make the eyes go all googly! I figured that it is somewhat rare to see the eyes move in a googly fashion give that time moves so slow, so why not force some googliness. Each eye will randomly either rotate forward or backward at full speed. Press the button enough times and you'll go through all the possibilities.
Although I show a fritzing diagram indicating that the buttons are on a breadboard, when assembled the electronics, I put them on the little prototype area on the motor shield.
Software
The code is pretty simple to understand. Timers are used to indicate when to step forward an eye. For the hours eye, its after 900 secs, and 75 secs for the minutes eye. As you will notice, the clock will not be precise to the second. It won't even be precise to the minute. But it should suffice for a novelty clock.
I've let it run for an hour or so and I didn't noticeable any significant deviation.
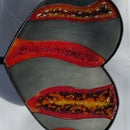
Step 4: Paint


I decided to paint my print. I had never painted a 3D print and I wanted to try it. I loosely followed Morena Protti's guide. I really like the not so polished or fabricated look. It turned out to be much harder than I expected. I definitely need more practice.
I used FrogTape thinking I would get cleaner lines. Unfortunately, the gesso seeped under the tape but not the top coats didn't. This left white patches at the seams. That was pretty hard to cover up.
Lastly, the gesso I used was not the thick kind. Even after 3 coats of gesso and 3 coats of a topcoat paint, the striations still came through. Arguably, I didn't use the highest quality paint. I used what I had laying around.
Overall, I'd say if one were to use a good quality spray on gesso and then hand paint with high quality acrylic paint, it might look like it had character and depth.
Step 5: Assembly


There's not much to assemble.
- Attach the eyes onto the stepper pinion gear (see below)
- Clear out the inside of the minion
- The steppers go into the eye bracket
- The eye bracket goes into the minion and glued down
- Drill a hole for the power adapter cable
- Feed the cable into the minion
- Connect all the wires as per the diagram
- Finally, put a piece of felt on the back to cover up the hole
The only unusual part is how to get the eye to stay on the stepper pinion gear. I used heat. I heated up the pinion and plunged it into the shaft coupler to the depth of the pinion gear, let it sit for a few seconds and pulled it out, then put it in, then pulled it out. This created a gear formation around the pinion. It worked nearly every time. However, if I plunged too deeply, it was impossible to pull out the gear without hearing the shaft coupler pulling away from the inside of the eye. So, a little goes a long way.
Lastly, I didn't seal in the electronics for a couple of reasons. Since I put the buttons on the prototype area of the motor shield, I needed some kind of access into the minion so I can push the buttons. Most importantly, I tend to recycle parts from project to project. I wanted to make sure I could easily get back into the minion and pull out what I need.

Participated in the
Design Now: In Motion Contest


