

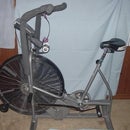
Introduction: Graber MAG Trainer – Spring Loaded Passive Vibration Isolation


Rounding the flywheel and the roller significantly reduced the vibration (roller bounce). The vibration now feels about like riding a street bike on asphalt.
I wanted to see if the felt vibration could be further reduced. The fixed connecting points looked like logical places to start to isolate the vibration. Replacing the compression adjustment knob with a spring loaded assembly seemed to be the easiest approach.
The spring loaded vibration reduction works, however, within limitations. Vibration has a frequency or frequencies. Changing the compression on the spring can damp a frequency. However, changing speed changes the frequency of the vibration. The compression setting will lose effectiveness with the speed change. The damper needs to be tuned to the riding speed. A light compression where the roller just connects with the flywheel to assure reliable rotation seems to be the best setting for a cadence of 70.
In version 2.0, I wanted see if there was an easy way to raise the roller off of the flywheel to prevent creating flat spots. I tried a spring under the unit to provide the lift. While the roller rests lightly on the flywheel, the spring does not overcome the mass of the flywheel. Trying to find the balance of two springs to get the lift and and the vibration reduction wasn’t appealing. The configuration was changed back to the single spring version 1.0 but retained the lower lock nut of version 2.0.
The lower lock nut was retained so that the unit could be lifted manually and rested on a slotted insert slipped over the bolt above the nut. This keeps the roller off of the flywheel when not in use and may prevent flat spots..
Note: Many of the photos are of version 2.0. Just mentally eliminate the small spring, small washers, and upper lock nut.
******************************************************************************************
2016-01-10 - for clarification, the MAG unit sits on top of the flywheel and is pulled downward by gravity, unlike the bike trainer where it is under slung and pulled up to the tire by the "L" bolt and adjustment knob.
Step 1: Parts, Tools, and Disclaimer

Parts
1ea - 7/32” (0.2187”) x 10” oil hardened rod
2 ea - 1/4” fender washers
1 ea - 1/4-20 nylon lock nut
1ea - Star knob, 1/4-20, 2 1/4” diameter, thru tapped
1ea - Music Wire Compression Spring, Steel, Inch, 1.1" OD, 0.085" Wire Size, 2.33" Compressed Length, 4.5" Free Length, 15.94 lbs Load Capacity, 7.3 lbs/in Spring Rate
1 ea - Cap for exposed end of “L” bolt to keep it from becoming a skewer (I used a spare 1/4-20 star knob)
1 ea - Flat stock about 1" x 5" for the slotted insert, probably a minimum of 20 gauge steel
Note: Don’t bother with 1/4” all-thread as a shortcut. Generally, it is brittle and will break before the bend is completed. Also, the fitting is 0.221” ID and the 1/4” all-thread would have to be filed down to fit.
Parts V 2.0 (not used)
2 ea - 1/4” SAE washers (5/16 ID, 0.734 OD)
1 ea - 1/4-20 nylon lock nut
1ea - Compression Spring, Stainless Steel, Inch, 0.625" OD, 0.054" Wire Size, 2.75" Free Length, 7.48 lbs Load Capacity, 4.39 lbs/in Spring Rate (The spring rate needs to be higher to actually lift the assembly).
Tools
Ruler or tape measure
Sharpie for marking
Metal cutting tool (bolt cutter, rotary tool with cut-off wheel, hacksaw, etc.)
Hammer
Vise
Flat file
1/4-20 die and handle
Cutting oil
Gloves, eye, and hearing protection
Drill and 9/32" bit (step bits are best for thin steel)
Alternate
Sprinkler riser pipe
A scrap 2 x 4 board
Drill and 1/4" bit
Disclaimer
I like this disclaimer from the author Samuel M. Goldwasser (http://www.repairfaq.org/sam/captest.htm) - “We will not be responsible for damage to equipment, your ego, blown parts, county wide power outages, spontaneously generated mini (or larger) black holes, planetary disruptions, or personal injury that may result from the use of this material.”
Add to that the usual admonitions to use safety equipment, be careful of hot, sharp, or rotating parts and equipment, and be cautious around electricity. Also, if you change it, and they can tell, it probably voids your warranty.
Step 2: Disassemble

1. Unscrew the compression adjustment knob fully while gently lifting the unit.
2. Remove the “L” bolt from its fitting.
3. Remove the hinge nut and bolt and remove the unit.
4. Unscrew the Phillips head machine screw in the center of the knob and remove the female threaded adapter.
Step 3: Make a New “L” Bolt


Note: options are presented but using a vise is really is the best way to go.
1. Mark the rod at 10” and cut off the excess. Bolt cutters can launch a cut piece and or rotary cutters can heat a piece that will burn you. If you are using a different sized spring, adjust the overall dimension.
2. Mark the rod at 1-1/2” for the leg that goes into the fitting. This leg will remain smooth like the original.
3. There are two ways to hold the rod
3.1.1. Securely clamp the short leg of the rod in the vise with the mark about 1/8” above the jaws. “Pad” the rod to minimize marking, especially with cross-hatched vise jaws.
3.1.2. Drill a 1/4” hole squarely through a 2x4. Slip the short leg of the rod into the hole until the mark about 1/8” above the board.
4. There are two ways to bend the rod to 90 degrees. In all cases, you want to bend toward the longest dimension of the holder to keep the vise or the board from lifting.
4.1.1. Bump fold the rod with a hammer. Multiple small bumps are better than a big bash. I like this method. I feel that it is easier and that I have more control. Strike close to the bend but not so close you are beating on your vise. Hold the end of the rod in a gloved hand to keep it from swinging to the side. You can also tighten the radius of the bend with a hammer.
4.1.2. Slip a pipe over the rod. Then, using the pipe as a handle, muscle the rod into the bend.
5. Remove the “L” bolt and test fit it to assure it is centered in the oval hole of the unit. You may need to bump the right angle radius tighter.
6. When you are satisfied with the fit, return the “L” bolt to the vise. File a slight bevel on the end of the rod to aid the die in getting a "bite". Thread the long leg of the rod with the die all of the way down. To cut the final threads, you will need the rod to be vertical to get the clearance for the die. Remember to use cutting oil.
Step 4: Assemble


1. Thread on a nylon lock nut until the threads are all of the way through the nut. This will cut threads in the nylon so you can thread it on “backwards”. Remove the nut.
2. Thread on the nut, starting from the nylon end, until it bottoms.
3. With the unit removed, slide the threaded part of the “L” bolt up through the hole.
4. Slip the smooth leg into the fitting.
5. Slide the hinge bolt through the unit and make sure the square shoulder is seated. Tighten the hinge nut.
6. Put on a fender washer, the spring, another fender washer, and the knob.
7. Screw the knob down so there is slight compression on the spring.
8. Ride and adjust the compression for the smoothest ride.
9. Put a cap on the expose end of the “L” bolt to keep it from becoming a skewer.
Step 5: Make the Insert

1. Cut the steel to 1" x 5". Break the edges with a file to remove burs and round the corners.
2. Drill a 9/32 hole in the center of the piece.
3. Cut the side of the piece into the hole. File the edges to remove burs and round the corners.
4.When not riding, lift the unit and slip the insert on top of the lock nut. Lower the unit until it rests on the insert. This will keep the roller clear of the flywheel to prevent flat spots from developing.
5. Remove the insert before riding.
Step 6: 2016-01-20 Edit - More Vibration Damping

Adhesive backed neoprene foam (1/4 inch) was added to both sides of each washer. Subjectively, there is some reduction in vibration and noise. The foam also keeps the spring centered.


