

Introduction: Grow Box - Novice / Entry Level


hello everyone,
.
" update 9/2/2014;please check out the life box if you are interested in an advanced level grow box. thank you ! "
.
a friend of mine, after seeing how many apple / citrus trees I was able to nurse, was very interested in the idea of indoor horticulture. and he needed help to start his own apple orchard. so I decided to put together a very basic, entry level "grow box" for him.
.
in this instructable I will be sharing with you how to put together one of these machines by using materials that can be found laying around your house, thrift store, garage sales - and if all else fail; the hardware store..
.
this box can very easily be adjusted to suit the needs of the plant at different stages of it's growth period. it can also easily be upgraded as you put together more cash. so don't worry if you can't find/afford everything you see here, you can start simple and build on. if you were to buy everything here new, including the lights + fans, you would be looking at spending around $55 - which is not bad at all..!
.
In step 7 you can see a 2 year old citrus tree that was grown indoor with a similar setup.
Step 1: Find a Box

the size and shape of your box will determine the yield the box produces.
.
a skinny tall box may suit 1-2 plants that like to get tall, however a shorter but wider box can house more plants if they like to stay short and bushy.
.
finding a box is very easy, just bike around your neighbourhood and eventually you will come across something that will do the job. you can also use a sturdy, un-damaged cardboard box. or go to a thrift store and get an old bookshelf/night stand. or even better custom make a box yourself. this way you can drill holes for the cables before hand and make everything look nicer.
.
keep your eyes open and do research on what type of plants that you would like to grow so you can figure out the size requirements.
Step 2: Gather Materials


we will need,
.
1x outlet timer
2x light socket
2x y-splitter
4x light bulbs, CFL (5000 & 2700K)
1x surge protecting extension cord
2x DC fan
1x DC adapter
1x smoke alarm
1x AC cable
1x heavy duty aluminium foil (or white paint)
1x tape (packaging tape or ducktape)
.
I have also used flat foam boards as the door and the back wall of the box. they are easy to cut, very sturdy when used right and also very cheap. but this is optional and depends on the type of box you will be using.
Step 3: Seal the Box


we have to seal the corners and sides of the box to control the air + light leakage. we need to control where the air comes in/out so as the light. this will help us better adjust and be in control of our environment.
.
remember when you are growing plants you have to imitate nature as much as you can. you have to create;
- sun / day time
- wind
- temperature
- darkness / night time
- water
.
again depending on the type of your box, use the right type of tape to seal all the cracks.
after this is done, you can paint the inside white or cover the walls with heavy duty foil. DO NOT fold and create lines in the foil. this will shine the light very unevenly. heavy duty kind is very hard to rip and stays flat very easily.. BUT if you can, you should choose to paint instead of the foil. just plain white paint is up to 90% reflective in such a situation. paint will also last longer, where the foil may rip and have to be re-placed.
Step 4: Fans


in this grow box I chose to go with "passive cooling" - simplest way to explain would be that there ARE fans but they are both sucking the air OUT. and where the air comes IN to the box, there is just a hole and no fan.
.
so we are basically forcing the fans to suck the air out of the box through the opening we have created. if it was active cooling, then there would be a fan both at IN and OUT.
.
if you are to use just 1 fan, you have to always choose the passive cooling method as trying to pump air IN to the box will not be as effective as sucking it out.
.
heat rises. so put your fan/fans evenly on the back wall towards the upper part. and aim to make your hole at the front door, more lower. this way the air will be sucked in from the front lower part, travel through the inside of the box, hitting the plants and the lights, eventually exiting from the top back area.
.
connect your fans in parallel. you can find fans and a corresponding DC adapter from the thrift store (old desktop computers have at least 2 fans in them always! ) I always choose a lower voltage adapter then the fans ask for, this way I don't run them too hard. these fans will be on for many many hours.
.
i've decided to aim both my fans to the back of the box, sucking the air out from the front hole.
Step 5: Lights


this section can go on forever... the types of light, and how many you need is an equation that you will have to learn on your own as you get familiar with how everything works.
.
in the picture above you can see that this box can accommodate up to 4x 100W equal CFLs, putting out 400Watts of light. this is PLENTY of light for just 1 plant especially with the help of the foil/paint. but for a true beginner I will be using just 2x 100W CLFs. a good rule of thumb is 100W/plant.
.
YOU HAVE TO MAKE SURE, that the lights you are using are CFL and not incandescent. you can also use LED grow lights. also you have to choose the correct spectrum for the season you are trying to imitate. all CFL bulbs should have these numbers printed on them or the box;
2700 Kelvin; use for the flowering stage, yellow light, sunset style - end of summer
5000+Kelvin; for the vegetative stage, blueish light, daytime style - summer is just starting
.
this part is pretty easy with the socket bases i chose to use. they are perfect for this job. they hold the bulbs stable and leveled. and the lights can easily be hung.
.
connect the sockets in parallel running into a single AC cable with a plug.
Step 6: Additional Components


you can add a battery operated smoke alarm for extra security
&
you should always use a thermometer with a humidity sensor on it. this is the only true way of knowing what really is happening inside the box..
.
put the smoke alarm on the ceiling and the thermometer somewhere where it will not be getting wrong readings (too close to the lights, too close to the fans...)
Step 7: Different Stages of Growth


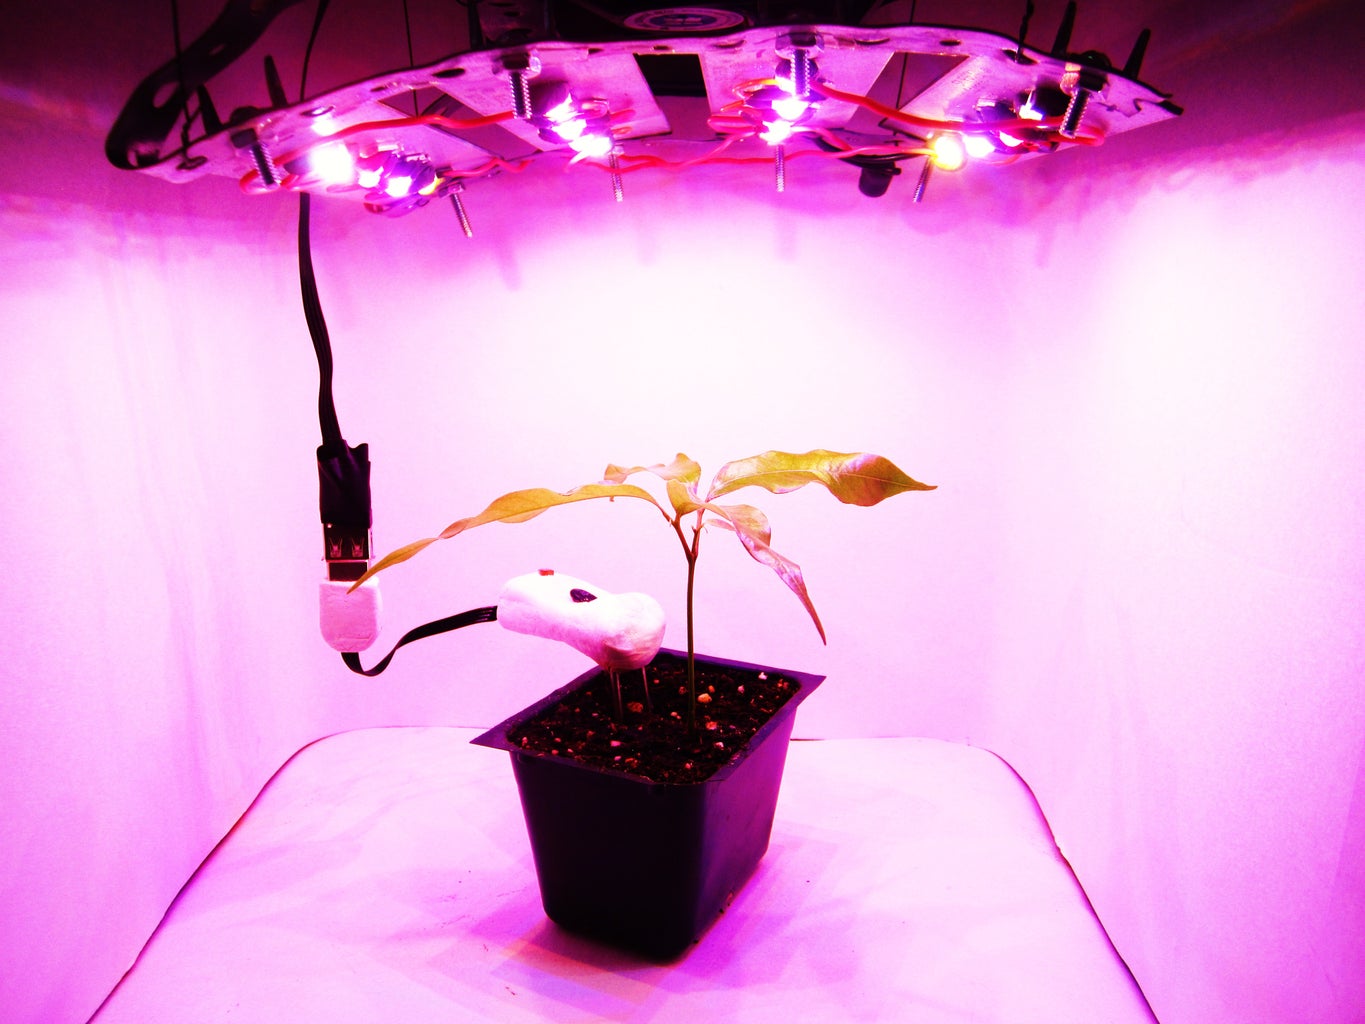

plant doctor can easily be attached to this system for people who are not comfortable with growing a sensitive tropical tree.
.
adjust the lights according to the plant size as it grows.
.
left and right sides can be adjusted separately giving you a much better overall light coverage.
.
keep an eye on your plants. if they are a type that likes to grow fast and tall, you may have to move the lights away faster, these CFL lights get hot enough that if your leaves are touching, they will burn. this won't kill the plant but will affect the growth very much.
.
Step 8: Conclusion + Upgrades


I can per request install "plant health monitor" to my indoor horticulture equipments .
.
this is a tall box, perfect for apple trees. apple trees can get up to 24-36" under perfect care very fast. in about 3-4 months approx.
.
just read the wikipedia page of your choice of plant and how to cultivate them, for example "apple cultivation" and watch some youtube seed starting videos and you'll be set for life.!
.
thank you for your time, please ask me any questions you may have
and make sure to check out my profile, I have many other instructables.!
love & peace
akin,
if you don't know about "The Venus Project" already, it is now time to do so...

Participated in the
Tech Contest

Participated in the
DIY University Contest

Participated in the
Teach It! Contest Sponsored by Dremel


