

Introduction: Hand Forged 2" Framing Slick


Years ago, I inherited my grandfather's tool collection. It consisted mostly of basic hand tools and a few exotic items. Among them was this 2" framing slick. This is a tool that timber framers use to cut mortise, tenons and other joints in large timbers. At the time I was enrolled in art school and I used it in several sculpture classes. I am a metalsmith though, and so the opportunities to use the slick since then have been few and far between. Sadly, it has sat quietly in my woodworking tool box ever since.
Recently I began working in a new shop with several professional woodworkers. They all recently collaborated on a small timber frame structure, which they discussed frequently in my presence. This got me thinking about the neglected slick that I had tucked away.
Coincidentally, I have also been on a tool-making kick lately and these ideas crashed into each other and motivated me to test my skills at making one.
Here is how I did it:
Step 1: Material

As I mentioned, I have been busy making tools for my shop lately including a couple of knives. I used a re-claimed leaf spring from a large truck because they tend to be made from 5160 steel. This is a good alloy for blades as it holds an edge well and retains some flexibility if heat treated correctly.
I figured the extra 5160 that I had from the knife project, would also be good for this slick.
Step 2: Annealing


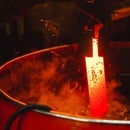
When using re-claimed steel, it is a good policy to anneal it before any major forging is done. Annealing is basically a stress relief technique that softens the crystalline structure of the material and makes it easier to work. This is done by heating the steel until it looses its magnetic properties (around 1545 degrees F for 5160 alloy steel) and burying it in some kind of insulator such as vermiculite or sand. The goal is to stretch the cooling process out for as long as possible.
I had already annealed the steel when I made the knives, so after some quick layout, all I had to do was heat it up and start hammering.
Step 3: Fullering


I began by forging a 1/4" x 2" x 9" rectangle blank of even thickness.
Next I used a top & bottom swage to neck the material in evenly on both sides.
Then I used a cross peen hammer to fuller (spread) out the material into a triangular(ish) form. This would eventually become the conical sleeve on the slick that accepts a tapered wooden handle. I wasn't paying too much attention to the dimensions at this point as I figured it made more sense to customize a handle to fit the slick, than futz around trying to make the slick fit a standard handle.
Step 4: Shaping the Cone


Once the material was fullered out to what I though was a sufficient amount, I began to form it up into a cone shape.
This took some some doing. Making a cylinder is difficult enough because the ends rarely want to meet up with each other evenly when they are rolled into position. A cone is a cylinder with a narrow end, which makes forming it into shape even more challenging.
Additionally, the mandrel I was using to support the cone had a slightly different pitch.
After a couple frustrating hours thought, I trued it up and welded it closed.
Step 5: Finishing Touches


With the cone all buttoned up I ground the weld smooth, re-heated and made a few final adjustments to make it sure everything was nice and straight. Once it was, I ground a bevel on the business end and filed the contours smooth. Lastly, I normalized, hardened and tempered the edge to a dark straw color.
All in all, I think it turned out decently. I have yet to cut any wood with it, which will be the real test. I think I'll give this one to one of my woodworking friends to be field tested.
-Stay Tuned
I realize that some of the info on heat treating can be confusing to those with no experience. Check my Instructables series on heat treating carbon steels for a deeper understanding of the process.


