

Introduction: Hangable / Desktop Cheap & Easy CD / DVD Organiser


Organise your loose CDs for under $3!! All you need is a hanger, a hole punch, CD envelopes and strong fingers.
Step 1: What You Will Need
Here is a list of the inventory you will need to make this modular CD Organiser:
- 1 Hanger
- 1 Hole Punch
- A bunch of CD Envelopes (You can buy a pack of 200 for around $1 at a computer store)
- Strong Fingers (or Pliars)
- Ruler
- Pen
Step 2: Hole Punching!
So go out and buy yourself a pack of CD Envelopes, they are usualy extremely cheap or come free with CDs you might already own. I can find them usually at $1 for a pack of 200.
There are even some tutorials online out there that show you how to fold your own!!
Nonetheless, take a normal three hole punch and make use of only two of the punchers. Try to center the envelope around the two punchers so that your holes look pretty evenly spaced out - you may have to sacrifice an envelope as you experiment.
** PUNCH ONLY THE BOTTOM SIDE of the envelope: which is the edge parallel to the flap edge.
Also try to get a routine and center all your punches so as to keep the envelopes looking uniform.
Step 3: Find the Middle of the CD Envelope
Take a ruler and mark off the middle of a CD Envelope.
Step 4: Take the Hanger Apart

Take the Hnager Apart with your fingers, or if that hurts to much you can untwist it with pliars.
Try to straighten the bends out as much as you can: thinner hangers are easier to bend, but thicker hangers make for a sturdier organiser.
When you have the Hanger unfurled, measure how long the straight edge is. In this case I got 81 cm.
Step 5: Get Out Your Sharpies.
Line up the midpoints of the CD Envelope and the Hanger.
Since the hanger edge was 81 cm, I divided that by 2 to find the midpoint at around 40.5 cm.
Find the middle of the holes on the CD envelope and mark those points on the hanger.
Step 6: Bend the Hanger.
Using either your fingers or pliars bend the hanger along your markings at a 90 degree angle.
Then measure about 2 cm from that 90 degree corner because you will have to make one more bend in the next step.
Step 7: Second Bend

The aim of this step is to create a protruding edge that will act as a lip. So on those new markings that you made in the last step, bend the hanger edges 90 degrees upwards.
**** Remember that you want to bend the lip upwards when the hook part of the hanger is facing downwards as shown in the picture's orientation *****
Step 8: Snipping Wire
You can go about this step two ways:
Either you can use the pliars to try and cut along the dotted lines, as seen in the picture, and then try and snap the end pieces of the wire off.
OR, you can bend along the wire a thousand times with your hands going back and forth until the metal eventually snaps off.
Either way, get the ends of the hanger off ensuring that you leave those elbows on as they will act like feet.
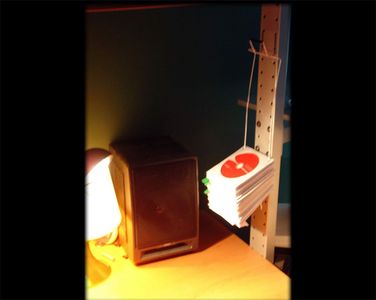
Step 9: Finito! and Words of Organisational Wisdom
Put your CDs in your envelopes. And you can start feeding your CDs on!
You can even hang this thing from the lip and the CDs wont fall off because the feet will hold your CDs in place.
Congratulations and have fun staying organised!!!
*** SIDENOTE ON ORGANISING ****
As it is difficult to pull out and insert envelopes without taking out a handful I suggest that you organise this into sections. I use post it notes to mark off Music, Drivers, TV etc... Also I add in like 10 extra blank envelopes into each section so that i can plop in a CD if I need to without having to move everything around. Hope you enjoy!


