

Introduction: Haunted Forest Bridge


This will show you how to make a simple pallet forest bridge for halloween!!
I got this idea from watching Pumpkinhead and i needed something to cover my driveway leading up to my witches forest cabin.
Items you'll need:
12-14 pallets. (8 for the main bridge and 4-6 to rip apart and use the top boards to close the gaps in the 8 pallets to ensure safe walking)
Screws 3" or 4" (for bridge)
screw 2" (for ramp and support boards for the bridge)
staples for air staple gun
air staple gun
sawzall with metal blade
circular saw
spade bit (1" or 1-1/4" for rope holes in 2x2's, depends on your rope size choice)
Screw gun (driver)
grey paint or stain
electric spray painter or gravity fed air sprayer
rope or chain (if using chain get hooks for the chain to attach to the 2x2's)
2x2's cut to 30" (qty 8)
fake or real ivy
1x6x40" boards (qty 8) for ramp
2x4 x 24" (qty 6) for ramp (cut at angle)
fog machine
fire and ice green/orange or orange/red
Step 1: Gather Pallets and Paint Them


Gather up 12-14 pallets that are in good shape. Ensure the 2x4's that create the structure are in good shape and not broken or cracked. Your patrons will be walking on this.
I painted each pallet top and sides with a custom gray mixture, but you can use gray stain or grab some grey latex paint and add a little bit of black or dark brown and then pour a bit into the electric spray gun (bought from harbor freight). Dilute it with water according to the manual. You can basically paint this however you want. I wanted a weathered look and it matched the gray i used in the rest of the haunt. Spray even the pallets you are not using for the bridge as you'll need those pallet top boards to fill in the gaps.
Once dry move on to the next step.
Step 2: Close the Gaps in the Walking Surface of the Pallets


I cut all the top boards off the extra pallets with a sawzall with a metal blade and then cut alot of the actual bridge pallets so i could close the gaps between the boards. I arranged the boards so there were gaps still but for safety they were much closer together. Once you arranged the new boards and the original boards onto the pallets, use an air staple gun to secure the boards back to the pallet 2x4's. This is quicker and cheaper than screws.
Take random 2x4's and any extra 1x6's you may have and run them down the left and right sides of the middle 2x4 of the pallets. This will add alot of stability to the walking surface and eliminate most of the bowing in the boards when you walk on it. It still bounces a bit but a safe amount. We had over 300 people walk on this bridge in the week it was up and it rained much of that week. I would recommend installing this decor piece closer to halloween to reduce the amount of traffic on it.
Step 3: Arrange the Bridge and Secure the Pallets Together

After i got all the pallets safely supported, i arranged them to ensure no tripping hazards existed between the pallets. This may require shims under the lower pallets or arranging them so the higher pallet is at the beginning of the bridge.
Take two pallets and push them together on the long side 48" and screw them together at each end where the 2x4's meet. Slide them into the location and take the next 2 pallets and screw them together and slide them up to the first pallet. Do this with the last 2 sets of pallets (or however many you are making).
Step 4: Build the Ramps for Both Ends


Of course for safety you'll need a ramp on each end. This actually made the bridge ADA compliant as well, but for a home haunt you don't need to be. We had one person who has no arms or legs and he navigated it perfectly and another lady on crutches walk up and down several times!
Take some 2x4's and cut them to 25" and then cut them at an angle from the top of one end to the bottom of the other end to create a wedge or slope. Do this with 6 pieces. The 2x4 is at the right height for the pallets!
Cut 8 of the 1x6" to about 40" unless you want to go the full 80" (if so add more 2x4's for support).
Screw them to the sloped 2x4 pieces and then take some scrap 1x6 pieces and screw them to the middle sections between the 2x4 slope pieces.
put it up to the ends of the pallet bridge and shim as needed.
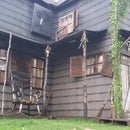
Step 5: Add Uprights, Rope, and Ivy for Rope Rails


Once your pallet bridge is assembled it's time to add rails. You can use rope or chain or anything you want but for my haunt theme it called for rope and ivy.
I cut the 2x2's to 30" which out of 3 pieces of 2x2x8 i ended up with 9 pieces. I drilled holes into them with a 1-1/4" spade bit for the rope. Paint or stain the 2x2's to match the pallets. You can beat up the upright or shave them down to age it to your liking.
Take 2 screws and secure each 2x2 to spots along the sides of the bridge. You can space them however you want, i didn't even measure them out, just eyeballed it. Put the screws in vertically with the board with a 2" or so space between the screws to ensure they stay up.
Take the rope and thread it through. I bought a 50' spool of rope from home depot and 40ft of it, so figure 20ft per side to allow some sag between the uprights. my bridge was 16' long so that allowed for 4' of sag length.
You could also do chain as well. screw in hooks to each side of the 2x2 and then cut the chain to length (allowing for some sag) and then hook them to each hook! All depends on your theme or setting for the bridge.
Staple the ivy at each upright bottom and snake it up the upright and then thread it along the rope. Do it with various lengths and not on every upright. random looks real!
Step 6: Add Lights and Fog and Test!!


I added a fire and ice green/orange led rotating bulb to each side of the bridge, but you should add 4 total to ensure each side of the middle 2x4 in the pallet gets light. I just did the middle two sides. This still worked to create a swap look. You could add them to each end of the bridge but i didn't want more wires.
I then positioned a 1600 cfm fog machine at the end of the bridge facing down the bridge toward the street. I put the nozzle right up to the middle of the pallet and the force of the machine would push the fog down the entire length of the bridge to all sides and up through the cracks and out the end. The look was amazing and was the hit of the haunt. If the air temp was right and the air was still the fog would run out the end and roll on the ground. It would seep out of the gaps and create a very cool scene.
Get creative and make it your own with your own touches but this bridge got lots of ooh's and "that's so cool" alot this year! It covered the driveway and made your eyes take in the haunt display as one piece!!
You could add the adhesive treads that they sell at home depot and such for safety if you are in a wet area but i didn't find that it was slippery when it was wet. I tried to slip and the wood was rough enough to not allow me to slip. I would not put an actor or animatronic on the bridge, just let the bridge be the creepy piece it. You could put an actor at the end or beginning to tell a story or make this your entrance to your haunt and the bridge keeper could tell the rules or hand out candy.

Participated in the
Halloween Decor Contest 2016


