

Introduction: Hot Wheels "Zoom In" DIY


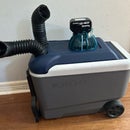


When I saw the Hotwheels "Zoom In" car that allows you to mount a GoPro I was incredibly intrigued. Having three kids means toys rarely last, and spending $100 or more on a GoPro Sessions Camera only to have it lost or destroyed just wasn't going to happen. This setup while lacking in styling cost less than $20 if you need the dedicated base, and a few dollars less if you are willing to sacrifice another car.
*Upon further investigation, the bases of the modern Hot Wheels are plastic, I suggest the car as shown "Zoom In" as the base is metal. Alternatively, finding a very low profile car or truck and installing the camera mount to the die cast portion of the vehicle would work as well. I attempted a second car today using this corvette as the base. Removing the silver plastic (in this case) allows for too much body roll.
Step 1: Gather Materials and Tools


You will need the following items:
SQ-11 Camera (Ebay $13)
A rigid plastic right angle. I used a corner of an $0.88 electical box with thicker walls
A car base which can be separated from die cast top by drilling out the rivets, or purchased as shown
*Upon further investigation, the bases of the modern Hot Wheels are plastic, I suggest the car as shown as the base is metal. Alternatively, finding a very low profile car or truck and installing the camera mount to the die cast portion of the vehicle would work as well.
2-56 screw/nut ($1.88 Home Depot)
6-32 1/4" screw
MicroSD card for the camera
Tools required:
Hacksaw/ bandsaw
Drill, bit and tap for 6-32
bit for a 2-56
Step 2: Cut Electrical Box, Prepare Base

For this step, you will need to remove the plastic clip in the GoPro Hotwheels, if you are using that model. If not, you will need to drill out the two rivets to release the shell from the base. Here is a video of the process (not my video)
Next you will need to cut out the 90 degree angle from the electrical box. I chose the gray box because it was thicker than the standard blue plastic boxes. After you base is clear and the angle cut out, proceed to the next step.
Step 3: Mount the Camera

The SQ11 camera comes with the clamp shown above. In the image, you can make out two plastic hooks on either side of the rainbow stripe. There are two corresponding ones on the opposite side that attach to the swivel back with a screw. Back the screw out, and drill for the 2-56 screw and nut into the interior side of the angle you can created. Mine has about 1/8" of clearance under camera when installed.
After that clamp is secure, you will need to drill and tap into the base of the car to hold the plastic angle in place. I only used one 1/4" 6-32 machine screw with a pan head. The clearance provided above is enough room for the screw not the rub on the camera.
Step 4: Done, and My Mistakes


After final assembly, you are all set. I made the mistake of incorrectly installing the micro-SD card. When I did, I tried to pry open the case I cracked the tabs...so don't do this. As you can see mine is slightly open when the clamp is attached. The drill hole/screw that attach the base to the angle is off-center. It doesn't make a difference, but try to drill they at the same time so the alignment errors are minimized.
Here is a video of it in action.
It is simple enough and robust enough that our 19 month old can use it easily along with our other kids. I have found it easiest to let the video mode just run and cut the clips together afterward. I will refine the design if it is not lost or destroyed soon.


