

Introduction: Hot Shoulder Dragon


This shoulder dragon protects you from the cold due to its belly full of cherry pits of and its microwave resistant skin. It makes a great companion on Halloween walks or warming your bed on cold winter nights.
My daughter came up with the idea to make dragon heat cushions in a workshop for children. As the target age for the workshop is 6 to 12, the design was tuned to be as simple as possible. It involves drawing from a template, cutting fabric and some basic sewing.
As for many heat cushions the power of the microwave should be limited to 700 W. For the relatively small size we made them, the heating time should be limited to about 1min20.
Step 1: Materials and Tools
Materials:
About 200g of cherry pits, flaxseed, uncooked rice, wheat, feed corn, buckwheat hulls, barley, oatmeal or beans. (i only have experience with cherry pits, but a good friend of mine uses flaxseed for heat cushions). You can get cherry pits at www.opitec.com.
A piece of fabric for the body, about 25 cm by 50 cm. In general natural fabrics like cotton or wool are recommended for heat cushion. I certainly would not use a fabric you cannot iron. And of course, avoid avoid any metals.
A piece of 3 to 5 mm thick felt at least 45cm x10 cm. Two pieces 10cm wide and roughly half the length work out fine too. Using more gives you more freedom in design of ears, wings and legs. You can also get this thick felt at www.opitec.com.
A couple of non-metallic buttons.
Some sewing thread, preferably in the color of the felt and some in the colour of the fabric
A textile label indicating the maximum power and heating time (700 W and 1min20 for about 200g of cherry pits). I had some iron-on labels made for the workshop. You can order them with your own text at different online suppliers. Of course you can make your own marking in another way (e.g. with a textile marker, embroid the text).
The template included below, printed at full A4 size.
Tools:
some good scissors for fabrics
an ordinary pair of scissors for papersome glue or cello-tape
a printer for the template
some (blackboard) chalk
a stick to help turning the "dragonskin" inside out (chopsticks ar perfect for that)
some pins
a hand sewing needleand preferably also a sewing machine
a microwave
Attachments

Step 2: Making the Template, Marking and Cutting


Cut out the template on the red lines only. And glue ore tape the pieces together as shown. Fold the fabric on itself lengthwise and inside out. Put on the template, with the straight side aligned to the fold. Mark out the contour and cut both layers of the fabric, but not the fold.
Cut the black lines of the large template and cut out the smaller parts. Position all parts on the felt in such a way you can fit them al in, twice for the small part. That works best when putting the large part in the middle lengthwise, with the hollow side touching the edge. If you have trouble fitting it all in, you can separate the wing-front-leg combination in a wing and a front leg (you will just need to do a little more sewing later on). Mark al parts with chalk and cut them out.
Of course you can use your own designs for ears, wings and legs. I came up with this design because the felt is one of the more expensive materials for the workshop and I wanted a reasonably good use of the available material. The thick felt I used came in sheets of 45 cm by 30 cm, which I cut in bands of 45cm by 10 cm, one for each dragon.
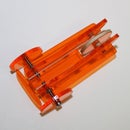
Step 3: Making the Body


With the felt in between the fabric (still inside out as shown), make a seam (with the sewing machine) with a hem of about 5 mm to 1 cm. Some pins can help keeping things together. Do not close the funnel end.
Turn whole thing inside out. This works best starting from the middle. Use a stick with a blunt end (e.g. a chopstick, a pencil is a little short) to do the tail. Take care not to pierce it.
Step 4: Filling and Closing


Now you can fill the body till about the dragon’s front shoulder level (see images). Do not fill too far as you need your dragon to be able to drape over your shoulder.
Close the body with a perpendicular seam (with the sewing machine) at the narrowest zone of the funnel.
Cut of the funnel part about 5 mm outside the seam.
Step 5: Making the Nose and Cutting the Back


Push in the “hem” at the nose end, till you no longer see it and stitch the layers together, forming a nose with two nostrils, as shown.
Cut the back "plates" to your own taste. Doing this after the body is filled makes it easier to avoid cutting the body.
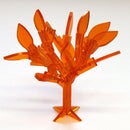
Step 6: Adding Eyes and Ears, Wings and Other Limbs


I prefer sewing the ears with a double thread with a not at the end. I start by seeming the two ends of the cut-out together, creating a kind of shell shape. At the hollow side continue sewing on a button as an eye, and still with the same thread sew on the assembly on to the dragon’s “face”. Working with a double thread allows for cutting one thread, making a final pass with the other one and finally knotting them together for a strong finish.
The wings and other limbs are sewn on like abutton, at a more or less central “pivot” point of the wing/limb. This gives some freedom to arrange them at will.
Cut out the claws the way you like them.
To finish, mark the maximum microwave power and heating time (max. 700 W, 1min20 for this size).
Participated in the
Halloween Contest


