

Introduction: How I Created a Heat Sink for My Greenhouse (2019)


I was given a greenhouse by a friend who no longer had a need for it. The location I could put it had a bit of a slope, which meant I needed to dig out foundations, and build up a wall to get it leveled out. As I had to dig out the soil anyway I decided it might be a good idea to incorporate a heat sink.
This Instructable should hopefully show how I achieved it. I am nowhere near an expert in any aspect of this build. Apart from the block walls and actual greenhouse, the materials used were obtained for free.
Materials -
blocks, cement, weed membrane, glass wine bottles of standard shape and size for a snug fit, other bottles various sizes to fill gaps, 75mm drainage pipe, roof tiles, old blue potable water pipes, cement anchor screws.
Tools -
shovel/spade, cement mixer, 1200mm level, cement trowel, soil sieve, knife, hammer drill, drill bits.
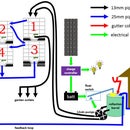
Eventually I hope there will be a 12VDC fan, powered by a solar charged battery, which will force hot air from the top of the greenhouse into the heat sink, heating it up. This heat will then be allowed to dissipate overnight. This circulation of heat should even out the spikes between day and night.
Step 1: Step 1 - Dig Out Foundations, Lay First Layer of Blocks


Initially I dug out enough soil, just to get the foundation and walls built. As I got further into it I decided to add the heat sink, which meant digging out the rest of the space as well. I knew I'd need some hardcore for the base of the heat sink, so spent many a happy hour sieving the soil to remove the larger stones, and put them aside. The soil was kept in old compost bags for later. I used a few bits of wood to determine the level height, which told me how many blocks I'd need to order in total. Blocks are laid on their side to be more stable as, being on the slope, I wasn't sure what the side loading would eventually be. I thought it was better to be safe, than have to redo everything in a few years.
Step 2: Step 2 - Build Up Remainder of the Walls, Add Insulation


After the walls were finished, I thought some sort of insulation between the wall and heat sink would be a good idea, to reduce heat loss. I used materials I had lying around the place. These included old pallets to make the insulation support frames, and plastic bags to hold the rockwool insulation in place. This was then covered in some thin shed roofing tarp, that wasn't really any use for anything, due to being quite old.
Step 3: Step 3 - Create Pipework for Air Transfer

Before getting ahead of myself, I decided I'd create the ring of drainage pipe that would form the backbone of the heat transfer system. The vertical pipe, shown in the top left of the first picture, is where the air would be coming down from the top of the greenhouse. Directly opposite there's an exit joint. This can't come straight up, as that is where the greenhouse door will be. This means the exhaust pipe is directed to a corner, before coming vertical again. Initially I had the secondary pipes (in blue) going straight across from side to side. I later decided to cut these, and have them of differing length, to enter the heat mass at different locations.
Step 4: Step 4 - Start Adding Heat Sink Media


The heat sink media I settled on was something I could get for free. I visited various bottle banks around the local area, for wine bottles which still had screw tops intact. The need for bottle tops was to prevent the bottles filling up with water and/or dirt over time. I did not empty the bottles personally. It took a few weeks to get the required number together. Monday mornings were best during the summer? I removed the pipework for this step. I laid down a couple of layers of weed membrane, and then covered this by a layer of hardcore to create a flatter surface for the bottles. Another layer of weed membrane was put over the hardcore. Bottles were laid, top to bottom, to create as little space between them as possible. At this stage it is easier to have even rows and layers if the bottles are equal in size and shape.
Step 5: Step 5 - Add Air Pipes and More Bottle Layers


The air transfer pipework was laid on the initial layers of bottles. The blue pipes initially went straight across from side to side. I eventually decided to cut them into different lengths, and insert them into the bottle layers at different angles. This will hopefully mean the air is able to percolate evenly. Laying bottles tightly becomes more difficult once the air pipes have been added. To keep gaps to a minimum, I added bottles of various sizes. These included vegetable oil bottles and other spirit bottles, which still had their lids fitted.
Step 6: Step 6 - Closing Heat Media In


I covered the last layer of bottles with some roofing tiles, I had left over from another project. This was simply to prevent soil falling into the air gaps between the bottles. Individually the tiles were quite brittle, but once they were laid in a layer they could take load better. On top of the tiles I laid at least 1 more layer of weed membrane, and finally, the sieved soil from earlier steps.
Step 7: Step 7 - Add Greenhouse


Once the base was finished I added the greenhouse. The greenhouse was secured to the walls, on top of plastic sheeting, using cement anchor screws. The blue pipes sticking out go down into the middle of the bottles, as I hope to have temperature monitors in the future. These will allow the sensor to get into the center. The greenhouse isn't very big, at 6ft x 6ft, but hopefully will be useful in the seasons to come.


