

Introduction: How to Design the Best Wind Farm Blade - Testing Provided Designs


To start, you will be testing our pre-designed blades.
Step 1: Prepare Your Models for 3D Printing

You will need to download our pre-designed parts so you can 3D print and test them as part of the lesson plan associated with this project. The Model Guide with part information and the .stl files are available here for you to download. There are also .stl files of print layouts already made with the required amounts. You can also view the original Tinkercad file here.
Instructions
- Download and save the models to your computer.
- Open the files in you preferred slicing software and arrange them to fit on your printer or use the pre-made layouts. Check the Model Guide to make sure to print the right number of parts.
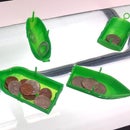
- Most of the parts do not require special print settings. A low infill setting will reduce material use and print time since the parts will not experience a lot of stress. The weights must be printed at a high infill setting (100% preferred) so they will have a decent amount of mass.
- Continue to the next step.
Step 2: 3D Print

Once you've prepared your slicer settings, begin your print. Depending on your printer, you may be able to print directly from the software if the printer is connected to your computer, or you may need to transfer your slicer-generated files onto a USB or SD card to print them. Refer to your 3D printer's documentation.
Instructions
- 3D Print all models.
- Break off the supports and any rafts, brims, or supports you/your printer may have added.
- Continue to the next step.
Step 3: Follow the Model Guide and Lesson Plan

The Model Guide provides step-by-step instructions on assembling the 3D printed parts. The Lesson Plan describes how to test the blades.
Instructions
- Follow the instructions in the lesson plan for how to test the pre-designed blades. In the next part, you will design and print your own blades to test and improve the design.
- Continue to the next part.


