

Introduction: How to Digitally Sculpt a 3D Printable Animal Bust


In this Instructable I will be teaching you basic step by step methods for Digitally Sculpting a 3D Printable Animal Bust!
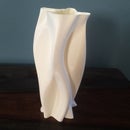
The Cover image is a Turkey that I had 3D Modeled and then printed earlier but I will be showing you steps through another bird I will be modeling from scratch!
I will be using the free 3D Modeling Program SCULPTRIS.
Sculptris is a great program in that is all organic and provides the user a lot of usability and very quick learning curve with it's simple interface.
In this tutorial I will be showing you basic tools within Sculptris that will allow you to experiment and create a Digital Sculpture of your own! In this example I chose to model a quick bust of a Bird, but you can use these techniques to make practically anything!
Step 1: Start With Sphere

Take a moment when Sculptris loads to familiarize yourself with the interface and be comfortable with the layout of the tools on the left-hand side of the screen.
For this example and for the majority of the objects you will be starting with the sphere as your initial object.
A good way to think about modeling within Sculptris is that you are working digitally with a ball of clay.
Step 2: Draw Tool

First we will use the Draw Tool to get a general idea of the placement of the features in the face.
Start by drawing a "nose". You will notice that the model is symmetrical, being that whatever is drawn on one side of the face is mirrored and copied onto the opposite side as well.
Step 3: Invert (X) to Indent

Next, let's get a general idea of where to place the eye sockets for the animal we are sculpting.
By pressing the X button on your keyboard, the tool you are using will performing the opposite.
Step 4: Define Above Eyes

Let's add some definition to the eyebrows located above the eye sockets we had just created previously.
My using the Inflate tool or the Draw tool we can start to bump out the area above the eyes to refine the look of our character.
Step 5: Inflate Tool

Next let's give this character a bit of a flare on the top of the head by using the Inflate tool.
Again, a lot of using the Sculptris program is experimenting, so you can play around with the tools and create any type of creature you are looking for.
Step 6: Grab Tool

Next we will use the Grab (Move) Tool to start to structure the face so that we are moving away from the basic sphere that we started with.
Brush sizes will most likely have to be adjusted in the top corner to be able to grab the right amount of the face that we are sculpting.
Step 7: Inflate Cheeks


Now we will start to Inflate the Cheeks and exaggerate the features because our end goal for this character is a Bird we will build up the front of the face for the beak to be added later.
Step 8: Move Beak

Next step is to Grab the beak and pull the beak away from the face.
This will start to form the shape of the beak that we will refine in the following steps.
Step 9: Flatten Beak

Now we will start to flatten the top of the beak. Beaks are all different shapes but for this example I am thinking of creating a beak similar to a duck with a flattened beak.
Step 10: Move Neck

Grab the Bottom part of the face and pull down to create the neck for our bird we are creating.
There is no exact science with this type of modeling so a lot of what ever looks correct to the eye and personal judgment goes a long way in this program.
Step 11: Shape Neck

Next we will shape the neck of the bird by moving the neck inwards to refine the character even more.
This will start to give the model more definition and is getting closer to what we would like the animal to look like.
Step 12: Move Head Up

This next step involves further tweaking of the head and lifting the top of the head up because the head looked a bit squished earlier.
Step 13: Lengthen Neck

We will lengthen the neck of the bird to create the final form of the head.
And if we are happy with the design we can continue to the next step to save and export!
Step 14: Export to OBJ & 3D Print


Final Step!
We can save our creation and export to OBJ.
Some 3D Printers have the ability to read OBJ files but most 3D Printers use STL file type.
What I typically do after this step is import the OBJ file into Rhino and then from Rhino save the file to an STL file type.
There are plenty of free programs that can convert OBJ to STL as well, my suggestion would be Autodesk's MeshMixer.
Thank you for reading through the tutorial! Enjoy!
I look forward to seeing all of your 3D creations using Sculptris!

Participated in the
3D Printing Contest 2016


