

Introduction: How to Forge a Katar Dagger (from Lawn Mower Blade & RR Spikes)


Hello everybodies.
As a maker, I am always looking for projects that expand my skillset and push the boundaries of what I am capable of doing. This was one of those projects.
I decided to tackle this dagger build because it involved a number of things that I need to get better at. Forging, welding, grinding, sanding, the whole deal. There are a 6 individual parts, each mini projects in and of themselves, that must be assembled and welded together to form the final product.
A very good challenge for myself.
Not much else to say for introduction, so let's jump right in.
(Btw, you can vote for this project in the Metal Contest.)
Step 1: Katar Design


So, what the heck is a katar? A katar is a south Asian weapon which was popular around the 17th and 18th century. To put it simply, it's a glorified punch dagger. Used ceremonially and in warfare because it looked so dang cool, historically it was forged out of one solid piece of steel. While I am not super convinced of the practical advantages of this dagger (there aren't any), one must admit the pure awesomeness aspect of such a weapon outweighs any objections. Check out the fourth picture. Some of these katars even had stinking PISTOLS built into them. Yep. Awesome factor right there.
Since I wasn't super confident in my forging powers (still a beginner there), and because I did not have a piece of metal large enough, my design was based around using a lawn mower blade as the (get ready for this) blade. The guard and 1st handle bar would be forged out of railroad spikes, with the side pieces and 2nd handle bar ground of some other scrap metal I had laying around. It would all be welded together instead of forged out.
Step 2: Tools and Materials
Every tool I can remember using:
-Angle Grinder
-Bench Grinder
-1x30" Belt Sander
-Dremel Rotary Tool w' sanding and grinding bits
-Innumerable assorted Files
-Stick Welder
-Forge
-A hecka lot of sandpaper
Materials I used:
-Old Lawn Mower blade
-2 RR Spikes
-1/4" mild steel roundstock
-A couple feet of 1/8" thick mild steel barstock
Lets get started.
Step 3: Flatten Out Lawn Mower Blade


The only problem with using lawn mower blades for knives is, well, they aren't exactly flat. They are designed with those funny looking twists in them to create an upwards lift, helpful for pulling grass up into the lawn mower, but completely useless for ancient Indian punch knives.
(If you're a nerd and want to find out exactly how the shape of a lawn mower blade creates lift, watch this video: https://www.youtube.com/watch?v=-GlJFVTzEsI&t=533s)
For our purposes, we will need to hammer the blade out flat. Fire up the forge, and get that metal red hot.
(If you wanna know how to build a gas forge like mine, check out this tutorial: https://www.instructables.com/id/How-to-Make-a-Propane-Forge/)
This step is fairly simple. Just pound it flat and make sure it's straight.
Step 4: Cut Steel to Size


After flattening the metal out we have good sized piece of stock to work with. As the blade of the katar will only be about 12" long, I only needed half of the lawn mower blade. I hot cut it in half using a cold chisel.
Side Note: I do not attempt to disguise from you the irony of "hot cutting" something with a "cold chisel". I think I'll leave that one for the philosophers.....
Step 5: Forge Blade Profile


Now to forge one end down into something pointy.
What you want to do is hold the blade against the anvil at an angle and strike at the opposite corner. This draws the corners out and pushes them together, forming a point. Depending on the thickness of your metal, this can be a tad difficult. My lawn mower blade was already very thin at the end, and after a few heats was reduced to the point that it would no longer squash, but just bent over (as you can see in the pictures).
Dat no good.
I ended up hot cutting the corners off, and then was able the refine the shape enough to work with.
Step 6: Forge Guard


We'll start off here by cutting off the head of this railroad spike.
Wow. That sounded unnecessarily violent.
Lets try that again: We'll start off here by cutting....... the large end of the rr spike off. Hot cutting. Yeah.
That was better.
Now take that beheaded RR spike and flatten it out, the goal being to widen it up a tad. Fairly straightforward, until we get to this next part. The next step is to bend it.
heh heh. get it?
Straightforward until we....... bend it? Funny? no?
Sorry.
I stuck it in the vice and hammered away. (last picture) Sorry the image is so dark, I was working at night.
Step 7: Untitled Step

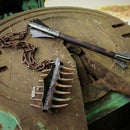
Here is the progress so far. The blade and guard are rough forged. (disregard the third item, I made a try at forging one of the handle bars, but it didn't turn out well and I decided to reforge it later.)
Step 8: Grind Off Scale


Now the fun begins, grinding off all of that nasty crap the forge decided to stick all over your metal. Fairly self explanatory.
One thing I will say, using fresh sandpaper and rough grits makes all the difference.
Step 9: Same As Before Just Different


Same as before, just now on the blade. Use 36 grit. Makes your life a whole lot easier.
Step 10: Hand Sand Your Heart Away


Ideally, it would not be necessary to hand sand at this step. However, after grinding off the majority of the scale, the blade stock was already getting rather thin. I didn't want to continue evenly grinding away material until all the low spots disappeared, because the blade would end up dangerously thin. This is supposed to be a dagger, not a chef's knife. (though now I think about it, a punch-chef's knife-dagger would be rather dope)
Instead of grinding away all the material evenly, I went to hand sanding. I was able to sand up all the low spots and make them look okay without removing too much material. It won't look the absolute best as you will still have those low spots, but they blend pretty well and under the circumstances that was the better option.
Note to self: Start with thicker stock next time.
And find something to listen too while you are doing all this sanding. It will take a while. Like a few years. You may or may not partially lose your sanity.
And forget your mother's second name.
Step 11: Grind Bevels


The bevel grinding can be accomplished with a regular ol' file, but I decided not to waste any more of the precious years of my life. Ideally, I would use a high powered 2x72 knife making grinder.
Less ideally but more realistically, I would also recommend the Harbor Freight special. Boasting an unbelievable full 1/3 HP super motor,this beast of an underpowered poorly constructed 1x30" belt sander by Central Machinery is your ticket to effortless grind perfection.
In all seriousness, for only $45 this is a must have tool for the beginner knifemaker. Yes, it is very underpowered (and I am MORE than ready for an upgrade) but you'd be surprised what you can do with it.
My list of tools for beginner knifemakers:
1. Angle Grinder
2. Files
3. This Ugly Thing (https://www.harborfreight.com/1-in-x-30-in-belt-sander-60543.html)
Step 12: Clean Up Bevels


It is very difficult to get a perfect grind on the Ugly Thing, and straight, even plunge lines are pretty much an impossibility. Thus, after grinding the bevels I usually find it necessary to clean them up further with files and sandpaper.
Step 13: The Fuller Project


I decided to try something I had never done before on this knife; a fuller (also called a blood groove). This is the groove that runs down the length of many knives and swords. Contrary to popular opinion, the "blood groove" has nothing to do blood at all, but was historically done as a fantastic way reduce the weight of a sword without compromising strength. When done well, swords with fullers could be about 20% lighter. Today (as swords are not much in use, more's the pity), it's mostly done for aesthetics.
Just like what I'm doing here. This dagger has a very wide blade with not much going on, and a fuller down the middle would make it look much more interesting. Seemed like the perfect opportunity to learn how to do it, so I watched a couple YouTube tutorials and gave it a go.
First thing to do is clamp the blade to the worktable with some sort of straight edge running down the exact centerline. As you can see, I used a piece of aluminum angle stock. Clamp it down SECURELY. Like for realsies, make sure it can't budge. It would be most tragic for the straightedge to move midway through the process (for some reason people think straight fullers are superior to curvy ones).
I then scribed along the straight edge.
Hopefully Helpful Tip: If you don't have a real scribe, I have found that the hardened tip of a punch works well.
Here is where it gets tricky. You need to remove the straightedge and carefully move it over just enough so that the cutting disk will cut down the center of the blade. If you don't move the straight edge, the groove will end up slightly off center. Go carefully down the line you just made with the cutting disk, being cautious not to go too deep. The purpose of this part is to start the groove and give you a large line that will be easy to follow with files and grinding bits.
After cutting the line, I removed the straightedge (since I now had a groove to follow), and began to enlarge the groove with a couple of chainsaw files and grinding bits on the rotary tool. When I had the groove up to the size I wanted, I went over it with sandpaper wrapped around the body of a mechanical pencil.
Step 14: After All That......


Annnnnnnnnnd the fullers aren't straight. I honestly have no idea how, but the fullers on both sides ended up slightly crooked. One of them is hard to tell, but the other is just plain off center. Frustrating.
Oh well. More practice required.
Step 15: Markee.


Now, using all the advanced technology available to me, I will carefully, extremely accurately, mark out the precise location of the guard onto the blade. I'll need my calipers, scribe, blue dykem, flat granite plate, and....
Ha.
No, I just eyeballed the angles with a sharpie.
Step 16: Cuttee.


Me and my self explanatory steps.....
Step 17: Cut Side Thingies


I had thought about forging the side pieces (I believe I'll start calling them arms) out of railroad spikes as well, but the thought of the forging involved positively chilled me to the core.
Which is ironic, because it's quite hot beside a blazing forge outside in the middle of Mississippi summer.
I had a length of 1/8" thick mild steel bar stock kicking around, and I decided to use that instead. I cut out two strips roughly 5/8" in width.
Btw, my deepest apologies to the metric world; but here in theUS of A we use civilized Imperial measurements.
I cut the arms to approximately 10" inches long.
Step 18: Forge 1st Handle Bar


The shape I decided on for the handle bar is difficult to describe. Basically it's a cuboid that has unfinished pyramids on both ends.
He he.
Just look at the pictures :)
The forging on this piece is pretty straightforward. I took another beheaded railroad spike and drew out one end. Since it was already square, it wasn't difficult to get that elongated pyramid shape. I guesstimated the amount of material I would need for the other end, then cut off the excess material and drew out the other end, making the two ends as much identical as I could.
Make sure when forging this piece out that you make it longer than it will need to be, so as to have plenty of material to work with.
(Rumor has it that Jake may have had to reforge this piece)
Step 19: Grind Off Scale and Mark Length


Grind.
Grind.
Grind.
Grind.
Check your email.
Grind.
Grind.
Grind some more.
Mark where the bar needs cut off.
Step 20: Cut to Size


Cut with angle grinder.
Or a solid karate chop if that's more in your line.
Step 21: Fancifying.


Most of katars I looked at online had very ornate handles. Well, actually most of them were ornate all over. My design was definitely going for a more basic utilitarian look, but I still wanted to include some dandyness.
I used a chainsaw file to cut a groove around the middle of the handle bar, which I then sanded purty by wrapping some sandpaper around the file. It turned out very nice in my opinion. Just the right amount of extra flair.
Step 22: 2nd Handle Bar


I debated whether or not to do a second complicated handle bar similar to the first one, but ultimately I decided on a simple 1/4" mild steel rod. Simple but functional, and it looks pretty good.
Measure and cut.
Step 23: Weld It Up Buttercup.


Some assembly required.
I don't think a stick welder was the best tool for this job. One of those fancy-smancy wire-fed (tig?) welders would have been much more ideal. But, one must make do with what they've got.
(Please don't examine my welds too carefully.)
Step 24: Stop.

Halt! Cease! Desist!
Since it will be nearly impossible to get a file in here to do the rough clean up on these welds after affixing the second handle bar, you would be most wise to pause at this point and do the the major clean up now.
Step 25: Affirmative. You May Fire When Ready.

Okay now you can make sparks again.
Step 26: Grind Off Your Arms.


So far the side arms are still just rough cut. They need trimmed up to be the same size, as well as cut off flush with the guard. Once that was done I shaped down the back ends and rounded them over to finish them off nicely.
Where the front of the arms and the guard meet I ground the corners off, so that the transition looks more seamless.
Step 27: Bend Out Side-Arms


I gave the side arms some curve by sticking the ends in the vice (with a piece of leather over the jaws) and bending them slightly several times along the last two inches or so.
This both looks great and eliminates the possible discomfort of having the ends dig into your forearm.
And we don't want no forearm diggin now do we?
Step 28: Grind Welds


Time to clean up the welds. I used an assortment of chainsaw files to do the majority of the work.
No. I took no pics of that. God gave you an imagination. Use it.
Not sorry.
At all.
Still not sorry.
Really.
Oh, and after doing getting rid of the majority of the weld with the files (with the exception of the areas I couldn't get a file into), I switched to using the dremel rotary tool with grinding bits.
Ain't nuthin to it, just gotta do it.
Step 29: Normalize

TiMe fOR tHe HeaT tREaT!!!
We'll start with 3 normalizing cycles.
For the ignoramooses among us, normalizing means heating up the blade to critical temperature and then letting it cool back down as slowly as possible. This relieves stresses that have built up in the steel during the forging and stock removal process and prevents possible breakages that could occur later. Generally speaking, the slower the blade cools back down, the better the normalizing cycle will work. Ideally that means sticking the blade in something that will partially insulate it (sand, vermiculite, etc) and cause it too cool down slower.
As an added bonus, normalizing also decreases the grain size of the steel, which without going into it in-depth, makes it much stronger and just plain all around better for a knife.
I do three cycles of heating to critical and slow cooling in the open air. Not the most effective normalizing method, but it should do just fine. Especially as we are working with lawn mower blade steel, which is lower in carbon and designed to take huge amounts of shock rather than be extremely hard. I doubt I'll be having any trouble with this steel breaking.....
Step 30: The Quench


I heated the blade up to critical temperature, which is 1475 (Fahrenheit). The best way to find if you have reached the correct temperature is to check with a magnet, as steel becomes non-magnetic at about 1345 degrees. Wait another little bit, until the color has shifted a notch brighter, and you should be at critical temperature.
You could try to go by the color of the steel alone, but that is risky because the color WILL look different depending on how bright the environment is in which you are working. Prime example of this is the pictures above. You can't even see the blade glowing, because it was high noon and the sun was extremely bright (the camera was also underexposed to compensate). I assure you, that blade was over non-magnetic. If I had quenched at night on the other hand, that metal would have appeared to be WAY over the correct temperature.
I quenched in a pvc pipe full of 100 degree vegetable oil.
With the lower carbon content of this steel I probably would have gotten a better result with a water quench, but I opted to play it safe as I had put an ungodly amount of work into the piece at this point and didn't want to take ANY chances of the blade cracking.
Step 31: Watch Your Temper, Now


After quenching, the steel will be extremely hard. And I mean HARD. You won't be able to cut it with a file hard.
Sounds great, but an unfortunate side effect of that hardness is brittleness. If you were to drop the knife, it would likely break. Literally. Sometimes they will break just sitting on the shelf for a couple days, simply from the stress that is in the steel.
That would really suck.
I always like to go as quickly from the quench into the temper, just to give myself the least chance possible to break the thing :)
Stick it in your kitchen oven (when your mama ain't looking, of course) @ 400 degrees, for about two hours. Depending on the size of the knife, you may need to go a longer or shorter amount of time. What matters is the temperature the blade reaches. For a successful temper, the whole blade needs to reach 400 degrees. The best way to tell is by the color of the steel. Steel changes color as it hits different temperatures, so it is easy to tell the exact temperature of the different parts of the blade just by looking at it.
Thank goodness it's so easy. Even an idjit can do it.
Golden brown/straw is the color you are looking for. If it turns purple, you have over done it and will need to redo the quench.
No pressure. Just keep an eye on it and you should be fine ;)
Step 32: Hand Sand.


Now for the fun and most dangerous part, hand sanding. I HATE hand sanding.
It is dangerous because of the severe mental strain. Fortunately, I've been training. My mind is too strong now to succumb.
Wait, what'd you say the date was?
HOLY MOTHER OF HOT TAMALES!!!
It couldn't be.
I've been here for days......
I think I forgot my own name. What was my name?!! Help! Please! (sobs)
I cannot get out. The way is shut.
And my mother's name.
Why do I exist again?
Just keep sanding....
Vanilla Frosty's are the best.
Rebekah. That was my name. Rebekah.
I love hand sanding. And snails.
Step 33: Finished!


I would write a full outro-conclusion thing here but I seem to have gone temporarily insane. At least that's what they tell me. It was the oysters. Must have been. The world is covered with oysters. Taking over the planet....
They wouldn't give me a computer here at the asylum so I had to steal one from the neighbors. It was easy. This place has like no security, I only had to set off one bomb as a diversion. The cleaning supply closet lock was only a 3 pin. Took me and the snails 35 seconds to get in. Thanks for the bobby pin Martha.
Just simple chemistry from there.
I really like this Katar. It turned out super great I think. When I remember that it started off life as a couple of rr spikes and a lawn mower blade....... just cool. Those snails are talented.
Finished dimensions:
Full length - 18.75"
Length of blade - 9.62"
Length from bottom of arms to top of guard - 10"
You know what else is just cool? Mcdonald's free wifi. I've been sitting here for like thirty minutes just watching the cops and fire trucks and national security drive by. I think i'll go swimming.
See ya next time.
Jake out.
I mean Rebekah.
Oysters out.
Step 34: The Full Experience (video Series)
For the full adventure, you can watch my build series on YouTube:
Subscribe to my Channel: https://www.youtube.com/channel/UCszMFa_qz5weFBoQ...

Participated in the
Metalworking Contest


