

Introduction: How to Install Brake Rotors


Outside of good tires, and brake pads that haven’t been ground down to nubs, there’s one more essential component in your vehicle’s stopping power – your brake rotors. Rotors come in a wide variety of designs which may include drilled holes, slots, or vents to deliver stopping power that can be counted on by commuters and racers alike. Whatever brake rotors you choose for your own vehicle, you’ll be happy to know that with just a bit of know-how, you can save big bucks on labor costs by installing your brake rotors yourself.
Step 1: Find the Right New Rotors

First thing’s first, find the right rotors for you, your vehicle, and your driving style. If you just want a simple replacement of your stock rotors, something OEM-style (like EBC Rotors) should do just fine. If you’re more interested in maximizing your track performance, something like DBA Brake Rotors might be the better choice.
Cross-drilled rotors allow for more gas and heat to dissipate while braking, providing you with cooler rotors. If a smoother, quieter ride is what you’re looking for, there are some rotors with specially designed surface slots to provide a silent performance.
Whatever rotors you choose, be sure the fit the most important criteria: they are compatible with your make and model. Check your owner’s manual if you have any concerns.
Step 2: Before We Begin

First off, while it can save you cash by replacing your rotors yourself, let’s not forget that your ability to stop is the most important safety feature you have. If you’re not sure about your mechanical prowess, maybe turn back now, or make sure you have a mechanically inclined friend that you can call or have on hand if you get in over your head.
And, if you plan on replacing your rotors, it’s usually recommended that you change your brake pads at the same time. This will allow you to get the most out of both components.
Step 3: Getting Started

You’ll need a jack, a jack stand, a siphon, a lug wrench, and a c-clamp.
First jack up your vehicle. I always recommend a jack stand for safety.
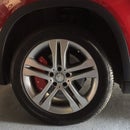
Take a wheel off. You’ll need the wheel off to access your hub, rotor, and calipers.
Using a siphon, remove about a third of your brake fluid.
Using your c-clamp, compress the brake caliper and loosed the caliper’s slider bolts.
Now you’ll be able to slide the caliper off of the disc.
Step 4: Replace the Rotor

You should be able to pull the old rotor straight off of the bolts. Once that’s off, simply put your new rotor in its place.
In fact, you can pretty much reverse the entire process at this point, putting the caliper back over the rotor and tighten the bolts.
Then just refill your master cylinder, and bleed your brake lines to remove any lingering air.
You should probably test your braking ability first at a very low speed, just to be sure, but if things seem to be working then pat yourself on the back and be on your merry way!


