

Introduction: How to Make Voice Controlled LED's Using Arduino


In this Arduino tutorial I will show you how to use a mobile app for Android and the HC-05 bluetooth module to create voice controlled LED's.
Materials Needed:
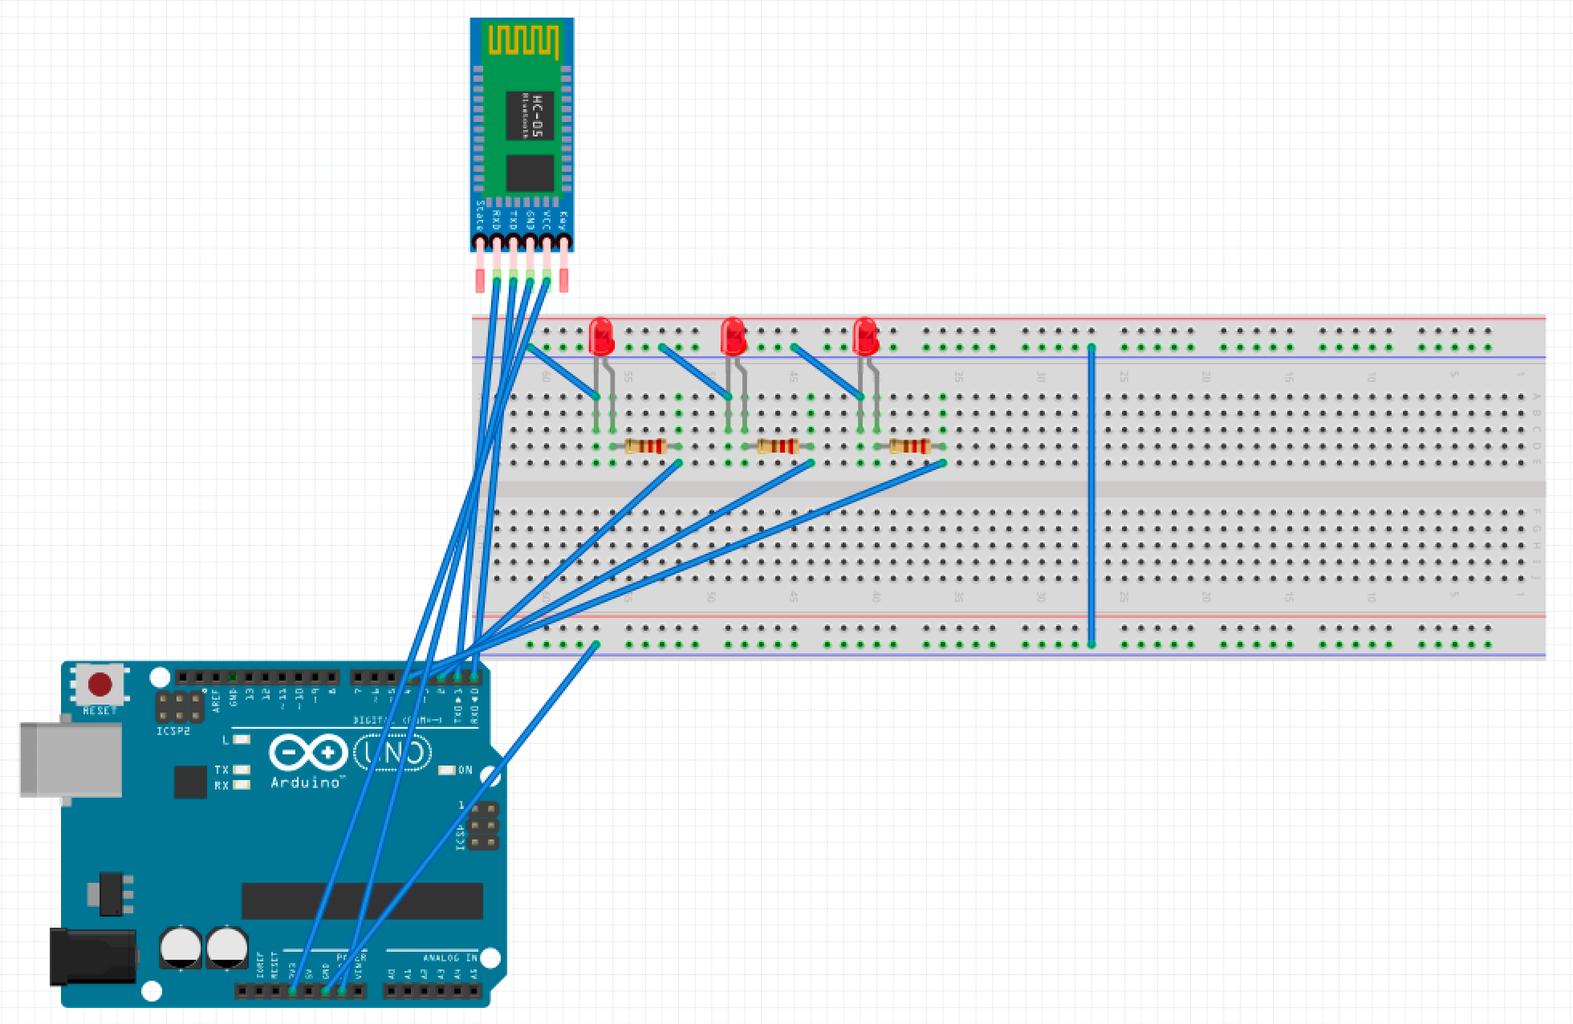
Step 1: Connecting the HC-05 Bluetooth Module


The standard HC-05 bluetooth module has six pins. However, we will only be using 4 in this project. The pins we will be using are the VCC pin, the GND pin, the TXD pin, and the RXD pin. The VCC pin of the bluetooth module connects to the +3.3V of the Arduino. The GND pin of the module connects to GND of the Arduino. TX pin of the bluetooth module connects to digital pin 0 (RXD), and the RXD pin connects to digital pin 1 (TXD).
Step 2: Connecting the LED's


The next step in creating our voice controlled LED's is to connect the LED's to the Arduino through the breadboard. First, connect the short end of the LED to ground. Next, connect the long end of each of the LED's to a 330 ohm resistor. Finally, connect the resisted current from the LED's to digital pins on the Arduino. In this project, we will be connecting one LED to digital pin 2, another to digital pin 3, and the last LED to digital pin 4.
Step 3: Supplying Power


For this project, we can supply power to the Arduino through any +5V power source. You can use a USB port from your computer to power the Arduino, but in this project I will be using a 5V portable battery. Before you connect a power source to your Arduino, make sure that the GND of the Arduino is connected to ground of the breadboard.
Step 4: Get the Code

#include 'SoftwareSerial.h' //Replace (' ') with (< >)
SoftwareSerial BLU(0,1);
String voice;
int Green = 4; //Connect To Pin #4
int Yellow = 2; //Connect To Pin #2
int Red = 3; //Connect To Pin #3
void allon()
{
digitalWrite(Red, HIGH);
digitalWrite(Yellow, HIGH);
digitalWrite(Green, HIGH);
}
void alloff()
{
digitalWrite(Red, LOW);
digitalWrite(Yellow, LOW);
digitalWrite(Green, LOW);
}
void setup()
{
Serial.begin(9600);
BLU.begin(9600);
pinMode(Red, OUTPUT);
pinMode(Yellow, OUTPUT);
pinMode(Green, OUTPUT);
}
void loop()
{
while (Serial.available()) //Check if there is an available byte to read
{ delay(10); //Delay added to make thing stable
char c = Serial.read(); //Conduct a serial read
if (c == '#')
{
break; //Exit the loop when the # is detected after the word
}
voice += c;
}
if (voice.length() > 0)
{
if(voice == "*turn on all LED")
{
allon();
}
else if(voice == "*turn off all LED")
{
alloff();
}
else if(voice == "*switch on red")
{
digitalWrite(Red,HIGH);
}
else if(voice == "*switch on yellow")
{
digitalWrite(Yellow,HIGH);
}
else if(voice == "*switch on green")
{
digitalWrite(Green,HIGH);
}
else if(voice == "*switch off red")
{
digitalWrite(Red,LOW);
}
else if(voice == "*switch off yellow")
{
digitalWrite(Yellow,LOW);
}
else if(voice == "*switch off green")
{
digitalWrite(Green,LOW);
}
voice=""; //Reset variable
}
}
Step 5: Using the Mobile App

You can begin to test your project by downloading the app for Android: BT Voice Control for Arduino; Created by SimpleLabsIN. Next, click on the menu bar in the upper right hand corner and select 'Connect Robot.' On the new window that appears, select the HC-05 bluetooth module and connect it. Congrats! You have completed your voice controlled LED Arduino project. Now, when you speak certain commands from the code into your device through the app, specific LED's should turn on and off.


