

Introduction: How to Make a Dog Feeding Station


How to Make a Dog Feeding Station, this is a easy diy woodworking project.
Step 1:
I always suggest watching the build video so that you have a better understanding for the project.
Step 2:


The first thing I did was determine how wide I needed the top to be. The bowls that I had purchased for this project measured eight and a half inches in diameter, so I allowed for the bowls to be one inch from the edge by ripping my top to ten and a half inches at the table saw.
Step 3:

Next I needed to measure the inside diameter of the bowls, this is to determine how big the hole has to be in the top to accept the bowls with out them falling through allowing them to hang from the lip of the bowl when placed into the hole.
Step 4:


Knowing the inside diameter of my bowl I draw a line center of my top, then using my trammel I lay out where the holes will be cut to accept the bowls.
Step 5:


Then at the table saw I cut the top into two halves, cutting directly on the center line I drew. Once the top has been separated into two halves I used my band saw to cut out the four half circles ( there will be two in each piece )
Step 6:


Then I was able to glue the top back together .
Step 7:


With the glue dry I used my spindle sander to clean up the holes and then cut the top to final length at the table saw.
Step 8:


Then using my router with a chamfer bit I created a chamfer to the bottom edge .
Step 9:


I wanted the base to have a splade profile , I ended up setting the miter gauge at a 20 degree angle on my table saw then cutting the pieces that will make up the base. The length of these pieces is going be based on two things, the width of your top and second how tall you want this station to be.
Step 10:

With glue applied I tacked both pieces of the base together with brad nails, then counter sunk a screw at each corner.
Step 11:

I wanted this project t o have some contrast to it so after I sanded the pieces for the base I gave them a couple of coats of flat black paint.
Step 12:


While the paint was drying on the pieces for the base I sanded the top and applied my finish to it. I ended up using six coats of wipe on polyurethane.
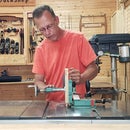
Step 13:


With both the paint and finish dry it was just a matter of attaching the base to the top. Because of the base being so short I drilled a hole just big enough for the bit to fit through going through the bottom of the base and partially into the top part of the base to serve as a counter sink. I was then able to attach the pieces of the base at each end with two screws each using my impact driver as shown.
Step 14:

This is really simple woodworking project that I think my dog is going to enjoy for years to come.


