

Introduction: How to Make a Knife Using Scrap Metal


I got my inspiration for this project by watching forged in fire, which is how I learned to forge. I made this project to show people how i made this knife, and hopefully get more people into the hobby of knife making. If you haven't watched forged in fire by the way, you should. It is a great way to learn how to forge. I hope you enjoy this project!
Supplies
Hard-enable or Mild Steel
Wood for handle scales
5 Minute Epoxy
Brass Rods for Pins
Quench Tank (optional)
Canola or corn oil (optional)
Tools
Angle Grinder
Belt Sander
Propane, Charcoal Forge, or Blowtorch(Optional)
Sharpening Stone (Optional)
Grinding, Polishing, and Cutting Angle Grinder Disks
Handheld Drill or Drill Press
Step 1: Locating Harden-able Steel


This step is one of the most important in making a knife. There are two kinds of steel, Mild Steel, and high carbon steel. High carbon steel is the kind people make knives out of that the plan to use for everyday purposes, such as cooking, but I found that if you only want to make your knife for show, then you can use mild steel. Also, if you do this you wont need to heat treat you blade. I personally used high carbon steel, because I wanted to make my knife more for durability and less for show, but this is completely up to you.(examples of hard-enable steel would be leaf springs, coil springs, and tool steel.)
So, how do you tell if the steel if high carbon or mild? The easiest way to tell is by spark testing with an angle grinder.(If you chose to use mild steel, you can move on to the next step.) To spark test, you grind away a small bit of material with the grinder. If the steel has a bushy Spark pattern (much Forking) that starts at the grinding wheel, then it is most likely high carbon steel.
Another thing you will need to take into consideration is the thickness of the steel itself.If you plan to grind out the shape, and only heat treat with a forge, then steel around an eighth of an inch thick will be perfect. If you plan to forge out the shape, then you will want a thicker piece, as the metal will most likely fold while you are hammering it. (I find that grinding out the shape to be easier and more fun, but I can't speak for other people)
Step 2: Drawing Out the Knife Shape

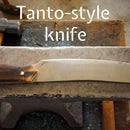
In the picture I showed above, you can see the general shape of the knife that I am making, but there are many kinds of knives and knife shapes out there, and you can choose whatever type you want. I chose the drop Point design because I liked the simplicity of it, and I thought it would look cool when it was done. A few common knife styles include the clip point, spear point, Tanto point, and trailing point.
The reason it is good to draw out a knife shape before you start cutting and grinding is because then you don't run the risk of cutting to far and ruining your piece of steel. some people may think this is a waste of time, but I found it to be very helpful when I was first starting to make knives.
Another thing you need to keep in mind is the length of your handle. This is one of the things I would always mess up when I first started making knives. I would always make my handles too small for a normal persons hand. I normally make my handles around 4 1/2 inches long, which seem to work fine for my sized hand.
Step 3: Grinding and Cutting Out the Shape


This is what took the longest out of everything that I did. The reason it took so long is because I used a relatively high grit belt on the belt sander. I had to do this because I didn't have any other belts available to me at the time.The cutting with the angle grinder and a cutting disk was pretty fast and easy, but was hard to control, so I used a belt sander after I had gotten most of the extra material off with the grinder.The grinder with a grinding disk is also very useful for tapering the edge, which makes the knife easier to cut with.(I'll Talk about this on the sharpening step.)
To drill the holes I used a drill press and a 3/16 inch bit, because that was the diameter of the brass rod that i was using for the pins. If the Brass rod that you are using is smaller or bigger than that, then be sure to use the bit that is the right size for the rod. It is also important to make sure the blade is flat on the drill press, or the pin will go through at an angle and not line up correctly on the handle scales, which can cause the handle scales to split.
Another thing to be aware of while grinding and sanding is metal dust. Always try to have good ventilation in your workspace and wear a dust mask or a respirator. Also remember to wear eye protection and ear protection while working.
Step 4: Heat Treating


If you chose to use mild steel at the beginning, you can skip this step.
Heat treating, or quenching, is where you heat up a blade and put it in oil, which cools it down very quickly and hardens the metal. The oil that I use is canola oil, which I think is good to use because it is non-toxic when it burns.
Heat treating is the most important part of making a functional knife, because it is where you put the actual strength into your blade. It can also be the most nerve-wracking part of making a knife, because it is completely unpredictable and any number of things could happen including warps and cracks. normally, when I heat treat, nothing goes too wrong, but this time my blade took a bend, which I had to straiten out using the vise. There is a short window after you quench where the blade is still soft enough to bend, and that is the time you have to straighten out warps.To heat up the blade to quenching temperature, I used a propane forge, but you can also use a charcoal forge or a propane blowtorch to do an edge quench.(An edge quench is a different method of quenching where you only heat up the edge, which lessens the likelihood of warps during the quenching process.)
Also be mindful of the material of your quench tank. Do not use anything flammable, like wood, or it could catch fire, and be hard to put out. One of the best things to use as a quench tank is an ammo can, because it can be closed it the oil catches fire, and is not flammable.
Step 5: Adding the Handle


The handle design on this knife is a full tang design, meaning there are scales on either side of the tang that are connected by pins that are put through the whole handle. There are also hidden tang designs, which are handles that completely surround the tang, and are held in by epoxy.(trying to hold handle scales on with epoxy significantly weakens the integrity of your handle, and is not a good idea) The handle scales also do not need to be the same size as the tang. As long as the scales are bigger that the tang, you can sand down the scales to match the tang. I also found that cutting the pins slightly longer than they need to be is a good idea, because then you can sand the rods down to match the thickness of the scales.
After you test fit the pins with the handle scales, you can take them off again and glue them on with epoxy using clamps to hold together the wood and metal until it dries. after the epoxy hardens, the you can start shaping the handle. To do this, you simply sand the wood down until it matches the tang, and round off the uncomfortable edges until it doesn't feel uncomfortable to hold. To finish the handle, I simply used olive oil, and darkened it using water.
Step 6: Sharpening

Sharpening is another important part of making a knife. If your knife isn't able to cut, then it isn't a Knife.
To sharpen you can use two things, a grinder or a sharpening stone. In full honesty, i don't know much about about sharpening stones, but there are plenty of people online that do, so i recommend looking up how to use one if you want to use one. The other way is by using a grinder or belt sander. This is the way i always do it, because i think it is easier and faster to put an edge on a knife this way. You also want to have a significant taper on your knife edge if you want to be very sharp.
Step 7: Finish Work


There are a few things that are important to finish your knife and make it look good. First, you need to polish it. To do this you can use a belt sander with a high grit belt, or hand sand with high grit sandpaper. Another thing that needs finish work is the handle. you can finish the handle using a number of different methods. One way you can do it is by using olive oil and water to darken and stain the handle. This is the way I did it, and i was pretty happy with how it turned out. (First Picture) I Also have done this on a few of the knives that i have have in the past. (Third Picture)
Another common way to finish a handle is a method called charring, which is where you use a blowtorch to char the outside of the handle, which makes it darker.
After you finish this, you are done! I hope this instruct-able was helpful to people and I hope it was fun to read too.Thank you for Listening!

Participated in the
Metalworking Contest


