

Introduction: How to Make a Nucleus Honeybee Colony (and Prevent Established Hives From Swarming)


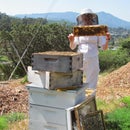
If you're reading this, then chances are you've had a hive survive the winter. Congratulations, now you must work even harder than the first year, because that established hive will now do what hives do in the spring- swarm! Its your job as a beekeeper, especially if you live in an urban or suburban environment, to prevent those bees from freaking out your entire neighborhood by swarming.
This tutorial will show you the basics of how to make nucleus splits to prevent swarming and to increase your hives for use in emergencies or for growing your apiary.
I've done my best to lay out simple steps that anyone can follow. For those who need more information or who love to fill their brains with stuff, I've included explanations and extras in italics at the bottom of some pages. At the end of this tutorial I'll have a one page synopsis for those who need a page to print out as a reminder while they're working.
Let's get started!
Step 1: Timing the Splitting of Hives

The first step before you split is to get a feel for the strength and health of your established hive.
A hive is ready for splitting when you have all or a combination of any two of the following characteristics:
-All hive bodies are filled with bees
-Signs of a strong nectar flow, ie- bees are building comb between frames, filling top brood box with nectar
-Drone brood and larvae are present
-Queen cups and queen cells are present (Once you see queen cups with eggs then you must split or they will most likely swarm)
-Hives have 10+ frames of brood and eggs
Queen cells drawn and having an egg or larvae inside is the surest sign that the hive will swarm in a matter of days if not hours.
Next let's assemble the parts necessary to make a split.
The urge to swarm in the spring is a response to the amount of room the hive has in its brood chamber. When a queen has begun to fill all the brood comb, she will be moving more rapidly from frame to frame in search of open comb to lay. At this point she will begin to lay eggs in the queen cups, or specialized cells that the workers have made along the bottoms of frames and along damaged or jagged comb.
Making splits is the best way to prevent swarming, since you're removing filled frames and making more room (and work) for the bees and the queen.
Step 2: Setting Up Your Nucleus Equipment


Its a good idea before beginning your split to have all the necessary equipment assembled.
There are two ways to house nucleus (referred to from now on as 'Nuc') colonies. One involves a single 5-frame box called a nuc box, and the other is by housing two 5-frame nucs in a 10-frame hive body, called a double nuc. Regardless of the type, for each nuc you'll need five empty frames, the hive box, cover, bottom board and entrance reducer all ready to go. Its very important to make sure you don't get ants, as they can take out a nuc in a single day. Ant traps, oil cups around hive feet, and diatomaceous earth sprinkled around the hives are all ways to eliminate or reduce ant problems, and I highly recommend taking steps to keep them out.
Back to the two methods- I'll explain both types here for you, but if you've already decided and have your nuc box ready then skip this step and go to step 2.
Single nuc box
A single nuc, or 5 frame nuc box, is similar to a full sized hive assembly except that the box is skinnier, holding five frames rather than the full ten. These nuc boxes can be purchased from most beekeeping suppliers, and can come with all the variety that regular Langstroth hives have. They can have screened or solid bottom boards, telescoping or migratory tops, and little tiny robbing screens to prevent neighbors from wreaking havoc on these baby hives.
Double nuc box
The other method of housing nucs is to double them up in standard ten frame hive bodies. Once again, the types of bottom boards and covers can vary, but what makes the double nuc special is that you're modifying existing equipment to put two small hives into one large box. You can do this by building a wall that divides the two halves of a ten frame box in two, being sure there are no gaps around the wall.
Comparing the two
There are plus and minus for both methods, which is why I've put both methods here. First, a single nuc is easy to carry, and you'll no doubt be carrying it from one place to another as time goes on. Double nucs are heavier, around 25+ pounds, and so are a pain to move. Sometimes the bees will drift from one nuc to the other if the entrances are side by side instead of staggered on either end. The advantage of a double nuc is that these can be overwintered because the wall in common helps the baby hives stay warmer should you be overwintering them. Plus, having two boxes in one saves room in your apiary.
How does one come by a double nuc box? You make one, of course! See my Instructables on how to make a double nuc box, Called "Making a Double Nuc Box". Coming soon...
Step 3: Choosing Frames for the Split

Next, you'll want to be sure to choose the right frames to make your split.
First, find your queen in the hive. You'll want to note where she is so that she doesn't accidentally end up in with your nuc.
Once you've located your queen, look in your brood frames to find two that are filled with pollen and nectar or honey. And I mean, filled to overflowing. Your bees are going to need a lot of food to get started, since they will need the resources to build more comb and grow their population.
Those two frames go on either side on the outer edge inside the nuc. Think of them as insulation, with the brood frames tucked in between all warm and cozy.
Next, you'll look for the right frames to make your new population of bees for the nuc. This may vary depending on how your nuc will get its new queen. Will you introduce a mated queen or a queen cell that is ready to hatch?*
The brood frames you select for the nuc must be free of any diseases, such as chalk-brood fungus, viruses such as Deformed Wing Virus, or drone cells for the male bees. They should be young and bright and the larvae should be healthy and well-spaced.
*Its a well-known phenomenon that a hive without a queen can make a new one by feeding 1-day old larvae extra royal jelly. Queenless hives will make several new queens from larvae, and those are called "Emergency Queen cells". Technically your 5-frame nuc could raise their own new queens, but I usually don't recommend this method because it takes a very strong colony, lots of nurse bees, and a whole lot of food to raise quality queens.
Step 4: Method A: Introducing a Ripe Queen Cell


The easiest way to make a nucleus is to introduce a "ripe" queen cell. We call them "ripe" when they are within a day or two of hatching. Queen cells are readily accepted by any bees of any age and usually the most fool-proof way to increase your colonies and grow your apiary. You'll want to do this if you like the genetics of the mother hive and want to propagate more hives with those characteristics.
The advantage of this system is that it takes a few weeks before the queen hatches, mates and then begins laying. This break in the breeding cycle reduces the hive's varroa mites, which use the reproductive cycles of bees to make their own young. The disadvantage is that sometimes it takes a few tries to have a queen mated successfully, especially when the weather is poor.
For the queen cell method, you want to make your 5 frame nuc with capped brood and brood that is at least 3 days old. You'll avoid eggs and very young brood. Be sure to knock down any swarm cells or cups you see along the edges of the frames. This is because the nuc may start its own new queen cells, and you want to avoid needing to go back and knock those cells down, since the virgin queen will be very easy to squish her first week or two.
You may wait a few days before you place the queen cell in the hive. This will ensure that the hive is ready to accept another queen, since they'll have figured out by now that they have no queen without any special pheromones. Be sure to inspect each frame of the nuc before introducing the queen cells to make sure you didn't miss any eggs and that the nuc hasn't built queen cells of their own. If the queen cell is on a frame, carefully place the frame in the center of the brood so it will have the most warmth and attention. Make sure to handle the cells carefully- never shake a frame to remove all the flying workers, but gently brush them off instead.
If its a cell on its own from a queen breeder, its a good idea to wrap that new queen cell in aluminum foil before you place it in the hive. This helps block the smell from the mother hive and keeps worker bees from chewing through the queen cell and killing the queen before she has a chance to hatch. Choose a brood frame that has some empty space and simply push the plastic edge into the comb without damaging the queen cell. Place that frame as you would the natural queen cell frame, in the center of the brood frames.
Step 5: Method B: Introducing a Young Mated Queen

With mated queens you can build a new nuc that you'd use to increase your hive count rapidly.
You'll want to have your nuc ready before your queen arrives. Give the nuc a few days of being queenless before you try and introduce a new queen. As the pheromones wear off from their old mother queen, the nuc will be eager to accept a new queen, which lowers your risk of placing an new one. Of course, you'll want the nuc ready and waiting so that the minute you receive your queen she can be placed in her new home.
To set up the nuc, you'll start with your two frames of honey and pollen placed to the outer edges inside the nuc box. Then, as with introducing a queen cell, you'll choose three frames from the source hive with capped brood only. Ideally those frames will have pollen and honey ringing the brood towards the outside of each frame. Frames completely filled with brood are fine too. Choosing frames without eggs gives a greater break in the brood cycle, which helps reduce the number of mites in the hive.
The minute that queen arrives at your doorstep, you simply hang the queen cage inside the nuc between center frames. Face the cage so that the mesh is facing out so she gets plenty of air. Be sure to inspect the nuc to make sure you don't have a queen or any queen cells, or your new queen may not win the battle that will surely ensue if you end up with two queens in one nuc.
Next we'll finish up the different methods for queening a nuc.
Queen suppliers can be found in all states, and some, like Hawaii, have queens available for purchase all times of the year. Where I am in California the queen rearing season can begin as early as March. Queens will come in a specially designed queen cage that will house the queen and a few of her workers. You'll order your queens and they'll be shipped in the US postal service, as required by law that all post offices accept live queens. No lie.
Be sure to save the brightly colored warning stickers from the packaging, and post images of them on your social media sites, especially the ones that say "LIVE QUEENS".
If you're buying queens, consider doing a little research and finding genetic stock that will do well in your area or that have been specially bred for varroa mite resistance. I raise queens in the Bay Area for sale and have them available from April to June for purchase.
Step 6: Finishing a Split: Big Time Bees

Now that you've set up your nuc colonies, you'll want to be sure they are jam packed with adult foraging bees to ensure it thrives.
The very best way to finish making a split into a nuc box is to place that nuc in the location of the mother hive. This isn't always easy or possible, but it makes a huge difference. All those foraging workers out in the field will return to the same location, and they won't care that instead of landing in a full sized hive, they're crammed into a tiny nuc. This will greatly boost the population of the nuc, ensuring that there will be plenty of pollen, nectar, and bees to make a new queen. Plus, the mother hive will suddenly have a drop in their population, making is less crowded. This method will definitely reduce the urge to swarm, and you can sit back for a few weeks and not even think about swarms. Heck, you can spend all your spring swarm season catching other people's swarms if you can pull off this method!
The next best way is to take a few frames from the mother hive and shake them into your nuc. Close the lid quickly, jam steel wool or a fine weave hardware cloth in the entrance to keep everyone inside. If you can move the nuc a few miles away then the bees will reorient themselves and not return to the mother hive. If you have to keep the nuc in your apiary, then keep that jam in place and trap the bees inside for a day before letting them out. (If you do this, be sure and shade your nuc if that day will be hot, since they won't be able to cool themselves!) It doesn't always work well, so I also hang a towel over the entrance so that they really have to work to get out, and this will help to encourage them to reorient as well.
Step 7: Verify That the Nuc Is Queenright


You'll want to check back regularly to determine whether you have a new queen, assess whether they'll need supplemental feeding, and check if they are building up their population. Once the nuc is established and the queen is laying well, the nuc may need to be moved into a full-sized hive, especially if you have a strong nectar flow. 5-frame nucs will swarm if they become overcrowded.
If you introduced a new queen, check back in 2-3 days to see if the bees have accepted her. You'll see eggs in the center of the brood combs. If she's still in the cage and the candy hasn't been eaten, let her be for a while. I've heard stories where it will take up to a month for new queens to be accepted, though I've never experienced it myself. Its important to note that the younger the bees in the nuc, the more willing they are to accept a new queen. Old ladies can become grumpy.
If the candy is chewed but you can still see someone in the cage, be sure to verify that who you see in the cage is really the queen. Bees are curious, and will climb in to see if there is a queen inside.
Be sure to check on their resources and they still have at least one frame of pollen and honey, or consider feeding.
If you chose to insert a capped queen cell, then you'll have a week or more that the virgin queen will be in the hive before she begins her mating flights. Then she will take her mating flights, going out for up to seven days, before she settles down to begin laying. During this time its best not to disturb the new queen and her nuc if you can help it. I recommend waiting 3 weeks before you do an inspection for eggs. Once you see eggs, stop and close the nuc- a new queen may run around much more than an established queen, and you run a big risk of crushing her. Its hard to be patient, but you'll need to exercise some restraint.
Once the new queen has brood of various ages and is settled into her role as mother, the nuc can be inspected as often as each week. Nucs can be grown by adding a second nuc box on top or by moving them into a full-sized hive body.
Now, for the synopsis on the next page...
A tip: take notes directly on the lid of your nucs so you don't even have to worry about losing them.
If you should fail the first time, consider trying again with another queen cell. Never assume that a failure to introduce a new queen indicates a problem with the queen. Instead, trouble-shoot to ensure better acceptance moving forward, and you may achieve greater success by adding in more brood and capped larvae, younger bees, or giving them more time for the introduction.
If you check the cage and the candy is chewed and someone is dead inside, before you assume its the queen, verify by looking closely. Hint: It often isn't.
Step 8: Synopsis
Step 1: Is my hive ready to split? Look for two or more of the following signs:
Comb building and a nectar flow underway
Queen cups and queen cells
Boxes full of bees
10+ frames of brood and eggs
Step 2: Assemble your nuc box
Step 3: Select frames for the nuc, resources plus capped brood
Step 4 Method A: Bring in a queen cell. Select three frames of capped brood. Place queen cell so its positioned in or near the center. Check back for eggs in two to three weeks.
Step 5 Method B: Bring in a queen. Select three frames of capped brood. In 2-3 days, place new queen in queen cage between frames. Return in one to two days to free the queen.
Step 6: Shake shake shake the bees from the mother hive into your nuc. Fill that nuc with forager bees any way possible.
Step 7: Follow up to monitor hive health, resources, and queen success.
Now that you've read this Instructables Project, get to it and good luck!
Step 9: Resources and Extras

photo credit: Paolo Salvagione
Beekeeping Suppliers
Mann Lake : Free shipping Nation-wide on all orders over $100, full selection
Dadant: If they offered free shipping they'd be as good as Mann Lake, Nation-wide
Kelley Bees: fellow beekeeper Robert MacKimmie recommended them and their catalogue is enticing
Beekind in California: Expensive for most supplies, but they sell follower boards and robbing screens
Beekeepers who know more than me:
Randy Oliver has published extensively on the hows and whys of beekeeping
Extras: This was my second Instructables project.
Additional projects I've written:
How to Make a Nucleus Honeybee Colony
My websites:
Step 10:


